
Quick Start Guide

QUICK START GUIDE
u-line.com
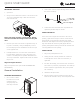
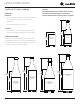
Interior Adjustments
All 5 Class models feature side mounted rack supports with
19 adjustment positions.
All units ship with wine racks or Slide and Secure storage
bins - or a combination of both.
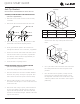
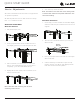
WINE RACK ADJUSTMENT
Wine Rack Removal
1. Fully extend empty rack
2. Firmly grasp both sides of rack and lift front end of
3. Pull rack towards you until all pins are clear of the
slots. If only repositioning the rack, do not remove
completely - go to “Rack Installation” Step 2.
4. Slightly tilt one side. Gently pull rack towards you to
remove rack from unit.
Note: Take care when removing rack to avoid
scratching interior of unit.
5. Once removed, retract the slides.
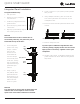
Note: The slides on the rack have a thin coating which
is used to block moisture and provide lubrication. Use
care when handling.
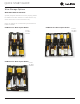
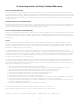
Wine Rack Installation
1. Insert empty rack into unit with one side tilted slightly
downward until back pin is between front and rear rail
supports.
2. Tilt rack back to horizontal and line up 2 back pins
with back slots.
3. Line up 2 back pins with 2 back slots and 2 front pins
with 2 front slots.
4. Continue inserting rack until all four pins are fully
inserted. Front of rack will set down slightly into the
front slots and be locked into position.
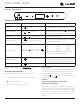
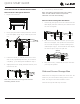
Center
the pins
Front Pin
Back Pin
Center
the pin
Center
the pins
Front Pin
Back Pin
Center
the pin
Center
the pins
Front Pin
Back Pin
Center
the pin
Center
the pins
Front Pin
Back Pin
Center
the pins
Front Pin
Back Pin
Center
the pin
12