
User Guide & Service Manual


USER GUIDE
u-line.com
Troubleshooting Extended
APPENDIX
E11: Sensor in base near fan detecting water
This sensor is designed to detect water escaping the
product due to any type of malfunction inside the machine.
Once activated, the only way to reset this error is to
completely dry the two probes and cycle power to the
machine via the rocker switch or power cord. Once power
is cycled, it will take 20 minutes to reactivate the error
code. Only the drain pump will retain power and be able to
activate under this condition.
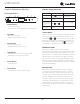
Inspect the entire base area in front and behind
the sensors.
Area Behind Sensors is Wet
1. If the unit is equipped with a drainage pump, inspect it
for leaks - check connections.
2. Remove pump and check all connections on water
valves, water supply, and drain.
3. Check bolt on water reservoir. If loose, it may leak
during a clean cycle when reservoir is lled to the top.
Torque Spec. is 16 in-lbs.
4. Check areas around ice maker auger on both ends. If
any leakage is evident, it is likely poor water quality
and/or failure to clean is the cause.
a. Check TDS - if outside tolerance, please report
to factory and advise homeowner that repairs
cannot be made to unit until water quality issue is
resolved. Filters available at u-line.com are able to
treat TDS up to 600.
b. If TDS is acceptable, unit must be cleaned and
any leakage addressed with a seal kit. (U-Line
service part # 80-55371-13)
Area in Front of Sensors (Condenser Side) is Wet
• Check connection from bin to drain.
No Water is Evident
1. Power cycle to reset error
2. Check sensors to ensure there is a gap between
sensors and pan as shown.
3. If error persists, check wiring to sensors for a
short.
E12: Float switch in reservoir not rising
This error is designed to ensure sucient water exists to
produce ice, thus preventing permanent damage to the
module. In order for this error to occur, the ice-making
sequence must initiate two tries to ll the reservoir. This
may take an hour or more to generate the error code.
Steps to check and correct - remember it is
necessary to power cycle after making the
corrections.
1. Check incoming water supply to ensure it is turned on
and has sucient pressure.
2. Verify water lter(if applicable) is in place and has
been replaced on schedule.
3. If unit is a 1 Class product, enter service mode and
activate relay 4 to determine if unit lls with water.
a. If it does not ll, check water valve for power
during sequence.
• If there is power, check valve resistance to
determine if coil is shorted.
• Check valve to ensure it is not blocked with
debris.
Water
Sensors
Area Behind
Sensors
Area In
Front
Sensors
Gap
45