
Service manual


6
Installation / General Instructions
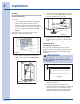
Adjusting Door Alignment
1. Loosen(donotremove)topandbottom
hingescrews(Figures 9 and 10).
15
Adjusting Door Alignment
1. Loosen (do not remove) top and bottom hinge screws
(Figure 11 and Figure 12).
Figure 11
Figure 12
2. Align door squarely with cabinet. Make sure gasket is
firmly in contact with cabinet all the way around the
door (no gaps).
3. Tighten bottom hinge screws.
4. Tighten top hinge screws.
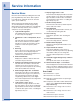
Checking Drawer Alignment
The unit’s drawers are aligned at the factory before
shipment. However, their alignment could have been
disturbed during shipment or during overlay panel
installation.
Figure 13
See Figure 13. Check each drawer to confirm that it is
aligned:
• Side-to-Side — When viewed from the top, the
drawer front should be square with the sides of the
cabinet.
• Front-to-Back — When viewed from the side, the
drawer front should be straight with the cabinet’s
sides, not cocked forward or back.
• Top-to-Bottom — When viewed from the front, the
drawer should be level horizontally.
If both drawers are properly aligned, no further
adjustment is necessary. If either drawer is not aligned,
carefully follow instructions to remove that drawer, make
the necessary adjustment and re-install the drawer.
ULIN_0293_A
ULIN_0104_A
7 Adjust Drawer
Aligned
Side-to-Side
Aligned
Front-to-Back
Aligned
Top-to-Bottom
ULIN_0312_A
Figure 9
15
Adjusting Door Alignment
1. Loosen (do not remove) top and bottom hinge screws
(Figure 11 and Figure 12).
Figure 11
Figure 12
2. Align door squarely with cabinet. Make sure gasket is
firmly in contact with cabinet all the way around the
door (no gaps).
3. Tighten bottom hinge screws.
4. Tighten top hinge screws.
Checking Drawer Alignment
The unit’s drawers are aligned at the factory before
shipment. However, their alignment could have been
disturbed during shipment or during overlay panel
installation.
Figure 13
See Figure 13. Check each drawer to confirm that it is
aligned:
• Side-to-Side — When viewed from the top, the
drawer front should be square with the sides of the
cabinet.
• Front-to-Back — When viewed from the side, the
drawer front should be straight with the cabinet’s
sides, not cocked forward or back.
• Top-to-Bottom — When viewed from the front, the
drawer should be level horizontally.
If both drawers are properly aligned, no further
adjustment is necessary. If either drawer is not aligned,
carefully follow instructions to remove that drawer, make
the necessary adjustment and re-install the drawer.
ULIN_0293_A
ULIN_0104_A
7 Adjust Drawer
Aligned
Side-to-Side
Aligned
Front-to-Back
Aligned
Top-to-Bottom
ULIN_0312_A
Figure 10
2. Aligndoorsquarelywithcabinet.Makesure
gasketisrmlyincontactwithcabinetallthe
wayaroundthedoor(nogaps).
3. Tightenbottomhingescrews.
4. Tightentophingescrews.
Keypad Options
WARNING
Electrocution can cause death or serious
injury. Take precautions when touching a
bare circuit board. Wear an anti-static wrist
strap and ground it to an electrical ground or
grounded water pipe. Handle circuit boards
carefully and avoid touching components.
When touching key combinations in which
you hold one key and press another key three
times, it is important to carefullt follow this
procedure:
1. Holdthedesiredkeyensuringthelightabove
thekeyislit.
2. Presstheotherkeythreetimes,ensuringit
lightsupeachtime.
3. Releasetheheldkeyonlyafterreleasingthe
pressedkeyforthethirdtime.
Except as noted, these functions are available
on all models.
ON/OFF
TheON/OFFmodeallowstheunittobeturned
onandoffviathekeypad.Todothis,holdthekey
forapproximately10secondsuntilthe“F”begins
toash.Releasethekeyandtheunitwillswitch
modes.
Thismodedoesnotdisconnectpowerfromthe
circuitboardsiitisstill“LIVE”.Turningtheunitoff
whileinClean,Ice Maker Off,Forced Harvest,
orForced Defrostwillcancelthosemodes.Ifthis
modeisenteredwhiletheunitisinanice-making
harvestmode,itwillcontinueit’scycleandash
“OFF”untilcompleted.
Showroom Mode
Thismodeisdesignedtoshowunitsinadisplay
environment.Wheninthismodetheonlyfunctions
willbethecontrolsandcabinetlights.The
compressor,fans,etc.willnotoperate.Toenterthis
mode,holdthedownarrowandpresstheLIGHT
buttonthreetimes.Whenentered,theunitwillbeep
onceandthedegreesymbolwillbetoash.When
thedegreesymbolisashingtheunitwillallow
theuseofthecontrolfordemonstrations.Afternot
touchingtheunitforoneminutethedisplaywill
beginto“snake”around.Thisismeanttoalertyou
theunitisinshowroommode.Theunitcanbeleft
inthismodeindenitely.Ifyouagainwanttodemo