
User Guide & Service Manual


USER GUIDE
Door Adjustments 2
u-line.com
SAFETY • INSTALLATION & INTEGRATION • OPERATING INSTRUCTIONS • MAINTENANCE • SERVICE
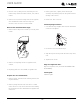
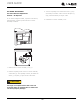
3. Remove door by tilting forward and lifting door off
bottom hinge. Retain shoulder washers; they will be
reused.
4. Remove four screws from hinge holes on the opposite
side. Reinstall into holes where the hinge was
removed. Take care not to scratch cabinet.
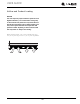
Remove and reinstall bottom hinge:
1. Remove bottom hinge from cabinet by removing three
screws.
2. Remove corresponding screws on opposite side of
cabinet.
3. Flip hinge plate over and reinstall on opposite side.
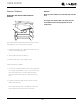
Prepare door for reinstallation:
1. Remove gasket. This will reveal mounting holes for the
magnet assembly
2. Remove plunger bracket from door with T-10 TORX
driver. Be sure to only remove the two screws holding
the assembly to the door. Reinstall on the opposite end
of the door
3. Rotate gasket 180°, aligning notch with magnet
assembly and pressing firmly into the gasket channel
starting at the corners.
4. Rotate door 180° to reverse.
Install top hinge and door:
1. Use alternate hinge supplied with unit and reinstall the
screws. Do not tighten..
2. Lift the door on to the bottom hinge.
3. Align flat edge of the hinge with the outer edge of the
unit.
4. Tighten three screws.
Align and adjust the door:
Align and adjust the door (see DOOR ALIGNMENT AND
ADJUSTMENT).
Install grille:
Install the grille.
21