
Quick Start Guide


QUICK START GUIDE
u-line.com
QUICK START GUIDE
7
u-line.com
General Installation
MARINE AND BI95/BI98 SERIES
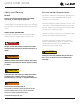
LEVELING INFORMATION
NOTICE
Because these units do not have leveling legs, it
is extremely important that they sit on a level
surface. If they are not level, the ice mold will
not fill evenly.
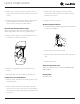
Use a level to confirm
the unit is level. Level
should be placed along
top edge and side edg e
as shown.
INSTALLATION
1. Plug in the power/
electrical cord.
2. Gently push the
unit into position. Be careful not to entangle the cord
and water line.
3. Re-check the leveling, from front to back and side to
side. Make any necessary adjustments.
4. Remove the interior packing material and wipe out the
inside of the unit with a clean, water-dampened cloth.
CRESCENT ICE MAKERS, OUTDOOR SERIES AND
ADA15IM
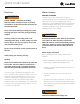
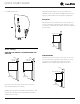
LEVELING INFORMATION
1. Use a level to
confirm the unit is
level. Level should
be placed along top
edge and side edge
as shown.
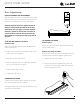
2.
If the unit is not level, adjust the legs on the corners of
the unit as necessary.
3. Confirm the unit is level after each adjustment and
repeat the previous steps until the unit is level.
INSTALLATION TIP
If the room floor is higher than the floor in the cutout
opening, adjust the rear legs to achieve a total unit rear
height of 1/8" (3 mm) less than the opening’s rear height.
Shorten the unit height in the front by adjusting the front
legs. This allows the unit to be gently tipped into the
opening. Readjust the front legs to level the unit after it is
correctly positioned in the opening.
INSTALLATION
1. Plug in the power/electrical cord.
2. Gently push the unit into position. Be careful not to
kink the water supply line or entangle the cord.
1
1
Turn to Adjust
7