
Troubleshooting guide


CLR2160, CLRCO2175 13
it from the drain hole. The water in the reservoir will
flow down the drain.
5. Replace the overflow tube after all of the water has
drained from the reservoir.
6. Start the cleaning cycle as follows:
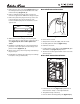
a. Touch and hold the ON/OFF button (Figure 9, 1).
b. Touch and release the LIGHT button (Figure 9, 4)
three times, then release the ON/OFF button
(Figure 9, 1).
c. The display (Figure 9, 3) will show “CL” to confirm
the beginning of the cleaning cycle.
7. When water begins to flow over the evaporator
(approximately three minutes), add one package of U-
Line Ice Machine cleaner to the water reservoir.
8. Reinstall inside front cover.
9. When the self-cleaning process stops (approximately 45
minutes) the unit will remain off for an additional 15
minutes. When clean cycle is completed, display will
automatically switch back to set temperature and unit
will run as normal operation.
10. Clean the storage bin (See INTERIOR CLEANING).
Sanitize the bin with a solution of 1 tablespoon of
bleach in 1 gallon of warm water. Rinse thoroughly
with clean water.
11. To ensure that the drain system is working properly,
pour 1 gallon of cool, fresh water into the ice bin. The
water should drain freely. If your unit is equipped with
a drain pump, it should drain the ice bin.
When ice production resumes, the water fill valve will
energize, fill the water reservoir, and shut-off after three
minutes. The compressor begins to operate and water
flows over the evaporator assembly (ice cube tray).
Initially, the water flow may not be uniform, causing
uneven sized cubes or water to spill into the ice storage
bin. This is a normal situation that will correct itself within
the first 24 hours of operation.
IMPORTANTIMPORTANT
• Discard all ice produced in the first harvest.
• Should power to the unit be interrupted during
the self-clean cycle, it will be necessary to repeat
the complete cleaning cycle after power is
restored.
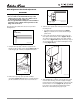
Inlet Screen
Interval - Every Twelve Months
The solenoid valve inlet screen must be cleaned at least
once each year as follows:
1. Shut off the water at the main supply valve.
2. Pull the unit out to access the back panel.
3. Disconnect electrical power to the unit.
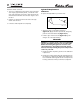
Figure 12
4. Disconnect the hose connector
(Figure 12, 1)
from the
water solenoid valve
(Figure 12, 2)
.
5. DO NOT remove the inlet screen
(Figure 12, 3)
from
the water solenoid valve. Use a toothbrush to gently
clean any sediment from the inlet screen.
6. Re-connect the water supply hose connector
(Figure
12, 1)
to the water solenoid valve
(Figure 12, 2)
.
Tighten the connector securely.
7. Open the water main supply valve and check for leaks
at the water hose connection. Ensure that the water
supply line is not kinked.
8. Reconnect power to the unit before re-installing.
9. Make sure the drain system is working properly and the
drain hose is not pinched or kinked. Pour 1 gallon of
cool, fresh water into the ice bin. The water should
drain freely. If your unit is equipped with a drain pump,
the pump should drain the ice bin.
10. To ensure that the drain system is working properly,
pour 1 gallon of cool, fresh water into the ice bin. The
water should drain freely. If your unit is equipped with
a drain pump, it should drain the ice bin.
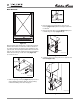
Ice Cube Thickness Adjustment
Interval - As Required
Ice thickness adjustments are made using the control
panel as follows:
Figure 13
1. To enter the thickness adjustment mode:
a. Touch and hold the UP ARROW button (Figure
13, 1).
3
2
1
ULIN_0061_A
1
3
2
ULIN_0200_A