
Installation guide


05/2007 23 www.U-LineService.com
CLR2160/CLRCO2175 Ice Makers
Initial Start-Up
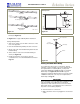
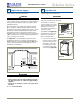
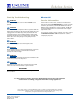
Once installation and leveling is complete, the unit is
ready for initial start-up and operation. The display panel
is located inside the unit, on the top of the refrigerator
side (see Figure 53, 1).
The LED display shows the temperature set point
and is calibrated in degrees Fahrenheit. The
controller is factory programmed for a set point of
38°F which will show when the unit is first powered
up.
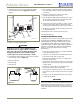
1. Open the door and remove the cover in front of the
evaporator by gently compressing and pulling
forward. This will enable you to observe the water
flow over the evaporator.
2. Check that the overflow tube is inserted securely into
the water trough.
3. Press the POWER icon
(see Figure 53, 1)
and hold for
approximately five seconds until the
°F symbol flashes
and release
. The water fill valve will energize and fill
the water reservoir. The water fill valve shuts off after
approximately 180 seconds (3 minutes). The compressor
begins to operate.
The CLRCO2175 display
(see Figure 53, 3)
will show
the set-point temperature (38°F) when the unit is on
and will show OFF when the unit is off. The CLR2160
display
(see Figure 53, 3)
will show ICE when the unit
is on and will show OFF when the unit is off.
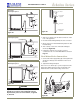
4. Watch the water flow over the evaporator assembly (ice
cube tray) to familiarize yourself with the operation.
Upon initial start-up, water flow over the evaporator
may be uneven. This may cause uneven sized cubes or
water spilling into the ice storage bin. This is a normal
situation and will correct itself within the first 24 hours
of operation.
5. Replace the evaporator cover. Note that after the first
slab of ice is produced, ice production will stop until the
refrigerator side of the CLRCO2175 reaches the set
point temperature. Then, ice production will begin
again.
6. Allow unit to run for at least 24 hours to stabilize
before making any temperature or ice adjustments.
IMPORTANT
It is possible that dirt or scale will dislodge in the water
line. Always throw away all ice cubes made during the
first two to three hours of operation.
Other Settings
Other settings for the unit are factory preset. No
adjustments should be necessary at this time. For
information about Ice Cube Thickness, or additional
settings, see the Use and Care Guide.
10 Start-Up for the First Time
123 54
ULIN_0058_A
Figure 53