
Installation guide

05/2007 19 www.U-LineService.com
CLR2160/CLRCO2175 Ice Makers
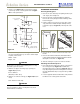
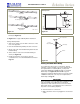
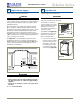
3. Attach the copper water line to the back of the unit
using the supplied clamp and the back panel screw (see
Figure 46
, CLR2175 model shown). This will prevent
rotation of the line when moving the unit.
4. Plug in the unit and put unit into OFF mode by holding
the power key for 10 seconds. Not doing this will cause
the unit to fill with water for 3 minutes.
5. Turn on the water supply and ensure the connections
are free of leaks.
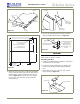
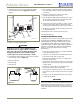
6. Begin to push the appliance into the desired cabinet
opening. The copper tubing should remain in 2 coils
behind the unit.
IMPORTANT
Normal operation creates some vibration. A water supply
line contacting cabinet wall may cause excessive noise
during operation or damage to the line.
7. While pushing the unit into the opening, continuously
reroute the drain tube to avoid kinks. The most
common installation pulls the slack into an adjacent
cabinet or basement area.
8. If installing a gravity drain, ensure you provide proper
slope.
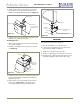
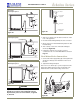
9. After unit is in its final position, finish routing drain
tube to the desired location. Common installations use
a floor drain, standpipe, garbage disposal, or Y-branch
tailpiece type drain connection (see
Figures 42, 43 and
44
).
10. Check to ensure unit is level both side to side and front
to back.
See Leveling Information on Page 20.
IMPORTANT
For the gravity/floor drain or the standpipe be sure to
secure the drain line to these items to prevent it from
coming loose and causing water damage.
IMPORTANT
For disposer or Y-branch tailpiece connections press the
drain tube over the barbed end of the connector and
secure with a worm clamp. Make sure the knockout inside
the tailpiece has been removed for both types of
connections. Depending on the size of the Y-branch or
disposer fitting, an adapter may be necessary to interface
between the 5/8” hose and connection.
11. Turn the unit to the on position by holding the power
key for 10 seconds.
12. Pour 1 gallon of water into the ice bin and check all
connections for leaks. Ensure the water is flowing from
the bin. If the water does not flow from the bin there
may be an issue with the drain connection, such as kinks
or improper slope. If your unit has a drain pump, an
indicator of P1 on the display will alert you of a slow or
clogged drain.
13. If any issues are found, retrace the drain connection,
correct the issue and retest with water.
14. Go on to
7 Prepare Power Supply
.