
Installation guide

www.U-LineService.com 18 05/2007
CLR2160/CLRCO2175 Ice Makers
WARNING
To prevent accidental electrocution, make certain
that the floor surfaces surrounding the unit are
dry whenever power is removed from, or applied
to, the unit.
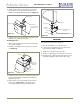
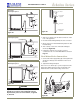
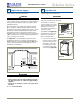
To connect to drain:
1. Slide 2 hose clamps onto the drain connection on the
rear of the appliance.
2. Insert the barbed fitting halfway into this connection.
3. On the other end of this barbed fitting attach the 5/8”
braided tubing.
4. Slide a clamp on each side of the barbed fitting as
shown
(see Figure 45).
5. Insulate the drain line, if necessary to prevent
condensation. Go on to Final Water/Drain Connection.
Page 18.
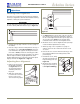
Final Water/Drain Connection:
1. Connect the water supply fitting by screwing the brass
garden hose fitting to the watervalve in the rear of
the unit.
2. Tighten this fitting with pliers.
Note: Do not use Teflon tape or joint compound on this
fitting. The rubber washer provides an adequate seal.
Other materials could cause blockage of the valve.
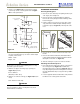
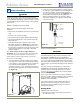
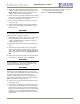
Cold
Water
Hot
Water
Waste
Waste
Shut-Off
Valve
Stand Pipe
P60 Pump Required
ULIN_0571a_A
Figure 42
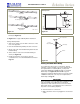
Air Gap
(Optional Hook-Up)
Cold
Water
Hot
Water
Waste
Shut-Off
Valve
Disposal Assembly
P60 Pump Required
ULIN_0572a_A
Figure 43
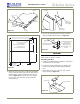
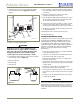
Waste
Cold
Water
Shut-Off
Valve
Hot
Water
Air Gap
(Optional Hook-Up)
Y-Branch Tailpiece
P60 Pump Required
ULIN_0573a_A
Figure 44
9/16" Wrench
1/4" Copper Water
Supply Line
7/16" Wrench
From Water Supply
to Ice Maker
ULIN_S_0168_A
Figure 45
ULIN_S_0166b1_A
Figure 46