
Installation guide

www.U-LineService.com 16 05/2007
CLR2160/CLRCO2175 Ice Makers
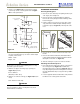
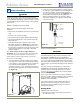
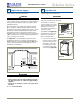
• Drain line does not create traps or created traps are
vented (see Figure 37).
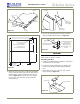
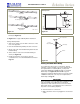
See Figure 38 for a typical Gravity Drain installation.
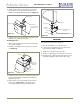
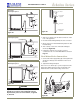
If using a Gravity Drain:
1. Slide 2 hose clamps onto the drain connection on the
rear of the appliance.
2. Insert the barbed fitting halfway into this connection.
3. On the other end of this barbed fitting attach the 5/8”
braided tubing.
4. Slide a clamp on each side of the barbed fitting as
shown
(see Figure 39).
5. Insulate the drain line, if necessary to prevent
condensation. Go on to Final Water/Drain Connection
Page 18.
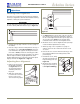
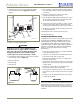
Factory-Installed Drain Pump
If your drain line will run up to a stand pipe, disposal
assembly or spigot assembly or does not otherwise meet
the requirements for a Gravity Drain, you may have
ordered the CLR2160 or CLRCO2175 with a U-Line P60
Drain Pump. See Figures 42, 43 and 44 for typical
installations requiring a Drain Pump. If you need to install
a P60 Drain Pump into your unit, see Locally-Installed
Drain Pump on Page 17.
IMPORTANT
Before installing your U-Line CLR2160 or CLRCO2175 with
Factory-Installed U-Line P60 Pump, it is extremely
important to check and test all hose connections at the
drain pump. There is a possibility that hose connections
may have loosened during shipment.
To check and test hose connections:
1. Make certain the unit is not plugged into an electrical
outlet.
Normal
Proper Drain
With Trap
Poor Drainage, Water Will Back Up
With Trap and Vent
Proper Drain
ULIN_0569_A
Figure 37
Waste
Waste
Cold
Water
Shut-Off
Valve
Hot
Water
Gravity Drain
ULIN_0570_A
Figure 38
Drain Fitting from
Back of Unit
Worm Clamps
Drain Line
5/8" x 5/8"
Barb Connector
ULIN_S_0166b2_A
Figure 39