
Installation guide

05/2007 15 www.U-LineService.com
CLR2160/CLRCO2175 Ice Makers
CAUTION
Plumbing installation must observe all state and local
codes. All water and drain connections MUST BE made by
a licensed/qualified plumbing contractor. Failure to follow
recommendations and instructions may result in damage
and/or harm.
Water Supply Connection
When connecting the water supply, follow these
guidelines:
• Review the local plumbing codes before you install the
unit.
• Connect to the cold water supply.
• The water pressure should be between 20 and 120 psi.
• The water line MUST have a shut-off valve in the 1/4”
O.D. supply line.
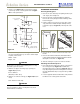
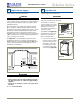
• Leave approximately 8’ of water line to be coiled
behind the appliance (see Figure 35). The water line
should be looped into 2 coils. This will allow the unit to
be removed for cleaning and servicing. However, make
certain that the tubing is not pinched or damaged
during installation.
Note:
U-Line requires the use of copper tubing for
installation.
Do not use any plastic water supply line because
the line is under pressure at all times. Plastic may crack or
rupture with age and cause water damage to your home.
To connect to water supply:
1. Locate the desired cold water supply location. Attach a
1/4” copper line to this location and route the tubing
to the appliance. Leave approximately 8’ of water line
to be coiled behind the appliance. The water line
should be looped into 2 coils. This will allow the line to
flex when removing the unit for cleaning and servicing
(see Figure 35).
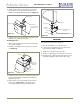
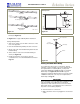
2. Locate the U-Line supplied garden hose fitting. Ensure
the end of the copper tubing has been cut straight and
free of burrs. Slide the compression nut and ferrule
onto the copper tubing as shown (see
Figure 36
). Push
the assembly completely into the the garden hose
fitting and tighten using the two wrenches. Wait to
connect this assembly to the appliance until the drain
connection is ready.
Drain Connection
IMPORTANT
Drain can NOT be located directly below unit. Unit has a
solid base that will not allow unit to drain below itself.
The CLR2160 or CLRCO2175 can be installed using a
Gravity Drain, a Factory-Installed Drain Pump (U-Line P60)
or a Locally-Installed (U-Line P60) Drain Pump. Drain lines
must have a 5/8” inside diameter. The floor drain must be
large enough to accommodate drainage from all attached
drains.
Note: We strongly recommend the use of the U-Line
CLRDRAINKIT for both gravity & pump installations. A
complete drain kit containing all the items needed to
connect your unit are available from your dealer. Order
Part No. U-CLRDRAINKIT.
Note: Longer drain connections may require additional
drain hose lengths. Additional drain line can be purchased
from your dealer or directly from McMaster-Carr.
(McMaster-Carr # 52375K35)
Follow these guidelines when installing drain lines to
prevent water from flowing back into the ice maker
storage bin and/or potentially flowing onto the floor,
causing water damage:
Gravity Drain
A Gravity Drain may be used if:
• Drain line has at least a 1-inch drop per 48 inches of
run (1/4 inch per foot).
6Prepare Plumbing
ULIN_S_165
Figure 35
9/16" Wrench
1/4" Copper Water
Supply Line
7/16" Wrench
From Water Supply
to Ice Maker
ULIN_S_0168_A
Figure 36