
Installation guide

www.U-LineService.com 12 05/2007
CLR2160/CLRCO2175 Ice Makers
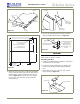
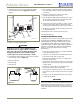
3. Attach the door panel to the overlay panel using #10 x
5/8" wood screws and nylon spacers. The nylon spacers
fit between the overlay panel and the door panel as
shown in
Figure 25
. The spacers
allow the original
door panel to slide back into the
1/4"-thick door
reveal (channel).
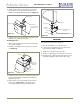
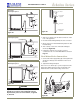
4. Remove the existing bottom pivot plate and replace
with the Full Overlay pivot plate (see
Figure 26
).
IMPORTANT
Door panel and overlay panel must be aligned properly or
the door will not operate correctly.
Assembling the Door
1. Install the assembled panel by sliding the original door
panel back into the doorframe.
2. Replace the Overlay Handle and secure with the two
screws removed in Step 4 under Removing Existing
Door.
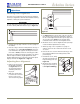
3. Attach Overlay cap to door, opposite side of where
hinges will be (see
Figure 27
).
Removed
Door Panel
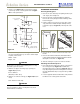
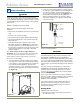
Top of
Wood Panel
Back of
Wood
Panel
Side of
Wood Panel
Tape
1-3/4" Top
3/8"
Both Sides
Figure 23
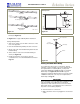
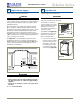
28-7/8"
1"
1"
±
1/4"
15-9/16"
±
1/4"
2-5/8"
±
1/4"
Drill ø 5/32" x 3/8" Deep
7 Places Model 2175
6 places Model 2115 and CLR2160
For use with #10 x 5/8"
Wood Screw and Nylon Spacer
11-7/8±1/32
For use on
Model 2175 Only
ULIN_0402_A
Figure 24
#10 x 5/8"
Round Head Screw
Seven Required
Typical
Wood Panel
Door Panel
Plastic Spacer
Seven Required
Figure 25
#8-32
x
3/8" SEMS Hex Screw
Two Places
Wood Panel Bottom Pivot Plate
(5/8" Longer Than
Existing Bottom Pivot Plate,
Flush Side Facing Out)
Existing
Door
Existing Bottom Pivot Plate
(Remove and Discard)
Figure 26
3/4" Wood Panel
Overlay Cap
Replacement Handle
Figure 27