
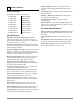
Troubleshooting guide


8 U-Line Ice Maker
Clear Ice Maker Cleaning Cycle
Interval - Every 3 Months
To maintain operational efficiency, clean the unit every three
months (depending on water conditions, more or less frequent
cleaning may be necessary). If the ice maker requires more
frequent cleaning, consult a qualified plumber to test the water
quality and recommend appropriate treatment.
IMPORTANTIMPORTANT
Wear rubber gloves and safety goggles and/or face shield
when handling Ice Machine Cleaner.
CAUTION
Use only U-Line Ice Machine Cleaner (Part No. 37050,
available from your dealer or direct from your local parts
distributor. To locate a parts distributor near you, visit
www.U-LineService.com. It is a violation of federal law to
use this solution in a manner inconsistent with its labeling.
Use of any other cleaner can ruin the finish of the
evaporator and will void the warranty. Read and
understand all labels printed on the package before use.
U-Line Ice Machine Cleaner is used to remove lime scale and other
mineral deposits. Refer to the following steps to initiate the self-
cleaning cycle.
IMPORTANTIMPORTANT
• Model CLRCO2175 refrigerator will not operate during
the ice maker cleaning cycle. Remove all fresh food to
prevent spoilage.
• Model CLRCO2175 ice production after the first
harvest may take longer after the cleaning cycle since
restoring the refrigerator temperature will take
precedence over ice production. Once the refrigerator
reaches its set-point temperature, ice making will
resume.
CAUTION
Never use anything to force ice from the evaporator.
Damage may result.
1. Turn the ice maker off (allowing any ice to melt off of the
evaporator):
2. Remove all ice from the
storage bin.
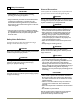
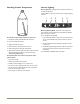
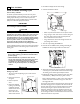
3. Remove evaporator
cover.
4. Remove the standpipe
by lifting it up while using
a slight back and forth
motion to loosen it from
the drain hole. The
water in the reservoir
will flow down the drain.
5. Re-install the standpipe into the water trough.
6. Clean the Interior Bin as follows:
• Dilute one packet of CLR cleaner into two quarts of water.
• Using a sponge or cloth, clean interior of ice bin, tubing and
door. This cleaner will remove all mineral deposits and
other contaminants from the surfaces.
• Using a bottle brush, clean out the trough drain tube and
pump tubing where needed.
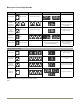
7. Turn unit on by touching the POWER icon
8. Place the unit into CLEAN mode by touching and holding the
POWER icon while pressing the LIGHT icon three times.
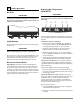
9. When water begins flowing over the evaporator (approximately
3 minutes), pour 1 packet of CLR cleaner into the water trough.
The cleaning process will last approximately 45 minutes.
10. Following the cleaning process, sanitize the ice bin with a dilute
bleach solution. (1 Tablespoon bleach per gallon of water).
Dilute 1 tablespoon bleach in 1 gallon of warm water. Apply this
solution to the entire inside of the storage area. Then rinse
thoroughly with water.
The unit will resume operation approximately 15 minutes after the
automated cleaning process is completed. The water fill valve will
energize, fill the water reservoir, and shut-off after three minutes.
The compressor begins to operate and water flows over the
evaporator assembly (ice cube tray). Initially, the water flow may
not be uniform, causing uneven sized cubes or water to spill into
the ice storage bin. This is a normal situation that will correct itself
within the first 24 hours of operation.
5 Clear Ice Maker
Evaporator cover
Standpipe
Evaporator
Water trough
Brush