
User Guide

CLR2060 — Clear Ice Maker
02/2005 7 www.U-LineService.com
™
(Black and White Units Only)
Two types of custom door panels can be installed on your
Black or White unit to harmonize with or accent the
surrounding décor: a Custom 1/4" Insert or a Full Overlay.
If no custom door panel is used, go on to 5 Adjust Door.
Custom 1/4'' Door Panel Insert
Door Panel Preparation
A custom door panel can be inserted into the doorframe.
Custom door panels can be flat or raised, as long as the
maximum panel thickness where inserted into the door
reveal (channel) is 1/4"-thick. For raised panels, the depth
of the reveal is 1/4" on all four sides.
IMPORTANT
Raised panels will reduce the door’s 90° swing/zero
clearance if the unit is installed next to a wall or similar
type of structure (see Page 4).
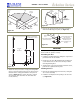
Cut the panel insert to the following dimensions.
Custom 1/4" Dimensions:
Width: 14-1/32"
Height: 28-5/32"
The door panel must not weigh more than 20 lbs.
Door Panel Installation
Install the insert as follows:
CAUTION
Use care when handling the insert. Insert edges may be
sharp.
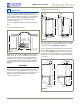
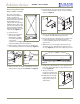
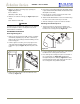
1. Remove top hinge screw pin (7/64" Allen wrench or
Phillips screwdriver, depending on your unit’s
construction, see Figure 12). Remove door by tilting
forward and lifting off bottom hinge pin.
2. Pull door gasket out of groove (top edge of door only).
Start in the middle and pull outward, moving toward
the edge (see
Figure 13
). This may take some force. Do
not remove the three screws behind gasket.
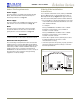
3. Remove two outside screws holding door handle.
Slightly separate door handle from door (see
Figure 14
).
4. Pull handle up and off.
5. Remove and discard
existing panel.
6. Slide custom door panel
insert into 1/4-inch
channel in door front.
7. Holding door gasket out
of the way, replace handle
on door, making sure it is
seated properly on insert
and that screw holes
line up.
8. Install two small screws removed in Step 3.
9. Starting at the corners and working inward, push door
gasket into place on door.
10. Place door on bottom hinge pin and install upper hinge
screw. Go on to
5 Adjust Door
.
4 Prepare and Install Door Panel
Figure 12 Figure 13
Figure 14