Installation Guide 2275DWRWS Stainless Wine Captain® Drawer and 2275DWRWOL Wine Captain® Drawer Overlay www.U-LineService.com Phone (414) 354-0300 • FAX (414) 354-7905 Service & Parts Tech Lines Phone (800) 779-2547 • FAX (414) 354-5696 OnlineService@U-Line.
275DWRWS/2275DWRWOL — Drawer Model Wine Captain® Contents Exterior Cleaning . . . . . . . . . . . . . . . . . . . . . . . . . . . . . . Cut-Out Dimensions . . . . . . . . . . . . . . . . . . . . . . . . . . . Product Dimensions . . . . . . . . . . . . . . . . . . . . . . . . . . . . Clearances Information . . . . . . . . . . . . . . . . . . . . . . . . . Other Site Requirements . . . . . . . . . . . . . . . . . . . . . . . . Wine Rack Removal/Installation . . . . . . . . . . . . . . . . . .
2275DWRWS/2275DWRWOL — Drawer Model Wine Captain® General Precautions 2 Inspect and Plan Use this appliance for its intended purpose only and follow these general precautions along with those listed throughout this guide: You have received a carton containing your 2275DWRW Drawer Model Wine Captain® with a package inside containing a Use and Care Guide, a Product Registration Card and Anti-Tip Kit. Complete and mail the Product Registration Card or register online at www.U-LineService.com.
2275DWRWS/2275DWRWOL — Drawer Model Wine Captain® Exterior Cleaning 3 Prepare Site (As Required) Your U-Line product has been designed for built-in installation. Your unit does not require additional air space for top, sides or rear. However, the front grille must NOT be obstructed and clearance is required for electrical connection in the rear. Overlay Models: • Clean glass drawer fronts with glass cleaner. The drawers, grille and cabinet may be cleaned with a mild detergent and warm water solution.
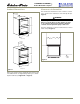
2275DWRWS/2275DWRWOL — Drawer Model Wine Captain® Product Dimensions Clearances Information The unit must be installed in a wall or under a countertop to allow for the installation of the Anti-Tip Kit (see Page 13). 23-11/16" Including Overlay WARNING The Anti-Tip Kit must be installed on this unit before it is used. Never use the drawers as steps or as a shelf to support more than the drawers’ contents. Serious personal injury could occur.
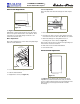
2275DWRWS/2275DWRWOL — Drawer Model Wine Captain® Other Site Requirements The drawer unit can be installed with an appliance or fixture located in front of it, as long as there is adequate clearance for the drawer to be opened and removed when servicing (see Figure 4). Power Supply The unit requires a grounded and polarized 115 VAC, 60 Hz, 15A circuit (normal household current). See Electrical Specifications on Page 12.
2275DWRWS/2275DWRWOL — Drawer Model Wine Captain® To insert a rack in the cabinet: 4 Prepare Racks and Caddy 1. Align the left and right rack channels with the tracks in the cabinet, and ensuring an even track engagement on both sides, gently push the rack into the cabinet until it stops. ® The U-Line Wine Captain is equipped with woodtrimmed wine racks that are coated at the factory with a clear vinyl sealer, which will adequately protect the wood in normal usage.
2275DWRWS/2275DWRWOL — Drawer Model Wine Captain® Note: Your model will contain an electronic display panel (Figure 6, 3) in the middle level trim piece. After removing the trim screws, and gently pulling the trim from its location, a wiring harness connector (Figure 6, 4) will become visible. Unplug the connector. IMPORTANT DO NOT use oil-based stains on wood trim. Vapors from oil-based stains will permanently penetrate the liner and will not dissipate over time. 3.
2275DWRWS/2275DWRWOL — Drawer Model Wine Captain® Adjusting Drawer Alignment 5 Adjust Drawers WARNING Checking Drawer Alignment SHOCK HAZARD — The unit must be unplugged from the wall outlet during drawer removal, adjustment and re-installation. The unit’s drawers are aligned at the factory before shipment. However, their alignment could have been disturbed during shipment.
2275DWRWS/2275DWRWOL — Drawer Model Wine Captain® Side-to-Side Adjustment Severe Adjustment: Note: The slides have extra mounting holes that may be used. Mark and Drill New Mounting Holes Not Aligned Side-to-Side Top View of Unit ULIN_0001c_A Push Slide Backward Figure 10 Figure 12 See Figure 10. The drawer will need a Side-to-Side Adjustment if, when viewed from the top, the drawer front is not square with the sides of the cabinet.
2275DWRWS/2275DWRWOL — Drawer Model Wine Captain® Minor Adjustment: Wood Overlay Note: The mounting holes on the slide are slightly larger than the screws’ diameter. Frame Preparation An overlay frame covers the drawer front to give a builtin appearance. Appropriate hardware and a copy of these instructions will be included in the unit. Screws Should Be Loose IMPORTANT The thickness of the overlay frame must be 3/4". The drawer frame must not weigh more than 10 lbs.
2275DWRWS/2275DWRWOL — Drawer Model Wine Captain® 6 Prepare Power Supply 4 Electrical Specifications 3 CAUTION Electrical installation must observe all state and local codes. This unit requires connection to a grounded (threeprong), polarized receptacle that has been placed by a qualified electrician. The unit requires a grounded and polarized 115 VAC, 60 Hz, 15A power supply (normal household current). An individual, properly grounded branch circuit or circuit breaker is recommended.
2275DWRWS/2275DWRWOL — Drawer Model Wine Captain® 7 Level the Unit 8 Install the Unit Leveling Information Installation of the Drawer Wine Captain® Note: It is recommended that the unit is level. 1. Use a level to check the levelness of the unit from front to back and from side to side. Level should be placed along top edge and side edge as shown (see Figure 19). 1. Plug in the power cord. 2. Gently push the unit into position. Be careful not to entangle the electrical cord. 3.
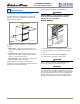
2275DWRWS/2275DWRWOL — Drawer Model Wine Captain® Installation Troubleshooting Horizontal Mounting (Left Side Shown) Q: Problem Countertop or Wall Header The drawer remains open unless it is pushed closed. A: Solution B The drawer should be self-closing when it is open approximately 8". If it is not, re-check leveling from front to back of the unit and readjust if necessary. A C Vertical Mounting (Left Side Shown) Cabinet or Wall Stud B C A Figure 21 2.
2275DWRWS/2275DWRWOL — Drawer Model Wine Captain® Start-Up Troubleshooting 9 Start-Up for the First Time Q: Problem Initial Start-Up Unit does not appear to turn on when plugged in. Once installation and leveling is complete, the unit is ready for initial start-up and operation. A: Solution Other Settings Make sure outlet has power (circuit breaker has not tripped). Other settings for the unit are factory preset. No adjustments should be necessary at this time.
Who to Call Service Information If the need for service arises, call the U-Line Customer Care Center directly @ 800-779-2547. To ensure accurate assistance, please have your Model Number and Serial Number and an explanation of the problem. The Model and Serial Number plate is located inside unit at upper right hand corner. If you need to locate a service company, you can go online at www.U-LineService.com and search for a service company by zip code.