™ Installation Guide 2075DWRWC — Drawer Model Wine Captain® www.U-LineService.com Phone (414) 354-0300 • FAX (414) 354-7905 Service & Parts Tech Lines Phone (800) 779-2547 • FAX (414) 354-5696 OnlineService@U-Line.
™ 2075DWRWC — Drawer Model Wine Captain® Contents Exterior Cleaning . . . . . . . . . . . . . . . . . . . . . . . . . . . . . . Cut-Out Dimensions . . . . . . . . . . . . . . . . . . . . . . . . . . . Product Dimensions . . . . . . . . . . . . . . . . . . . . . . . . . . . . Clearances Information . . . . . . . . . . . . . . . . . . . . . . . . . Other Site Requirements . . . . . . . . . . . . . . . . . . . . . . . . Adding a Final Finish Coat to Wood Trim . . . . . . . . . .
™ 2075DWRWC — Drawer Model Wine Captain® General Precautions 2 Inspect and Plan Use this appliance for its intended purpose only and follow these general precautions along with those listed throughout this guide: You have received a carton containing your 2075DWRWC Drawer Model Wine Captain® with a package inside containing a User Manual, a Product Registration Card and Anti-Tip Kit. Complete and mail the Product Registration Card or register online at www.U-LineService.com.
™ 2075DWRWC — Drawer Model Wine Captain® Exterior Cleaning 3 Prepare Site (As Required) Your U-Line product has been designed for built-in installation. Your unit does not require additional air space for top, sides or rear. However, the front grille must NOT be obstructed and clearance is required for electrical connection in the rear. Black Models: • Clean glass drawer fronts with glass cleaner. The drawers, grille and cabinet may be cleaned with a mild detergent and warm water solution.
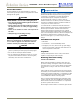
™ 2075DWRWC — Drawer Model Wine Captain® Product Dimensions Clearances Information The unit must be installed in a wall or under a countertop to allow for the installation of the Anti-Tip Kit (see Page 12). 25-13/16" Including Handle WARNING The Anti-Tip Kit must be installed on this unit before it is used. Never use the drawers as steps or as a shelf to support more than the drawers’ contents. Serious personal injury could occur.
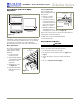
2075DWRWC — Drawer Model Wine Captain® ™ Other Site Requirements The drawer unit can be installed with an appliance or fixture located in front of it, as long as there is adequate clearance for the drawer to be opened and removed when servicing (see Figure 4). Power Supply The unit requires a grounded and polarized 115 VAC, 60 Hz, 15A circuit (normal household current). See Electrical Specifications on Page 11.
™ 2075DWRWC — Drawer Model Wine Captain® 7. Lightly sand, tack and reapply 2 times, if desired. 4 Prepare Racks and Caddy 8. Allow the final coat to dry for 24 hours. ® The U-Line Wine Captain is equipped with woodtrimmed wine racks that are coated at the factory with a clear vinyl sealer, which will adequately protect the wood in normal usage. A final finish coat was not applied so that the wood trim could be stained to match décor. The trim on the racks may be coated with a final finish or stained.
™ 2075DWRWC — Drawer Model Wine Captain® Adjusting Drawer Alignment 5 Adjust Drawers WARNING Checking Drawer Alignment SHOCK HAZARD — The unit must be unplugged from the wall outlet during drawer removal, adjustment and re-installation. The unit’s drawers are aligned at the factory before shipment. However, their alignment could have been disturbed during shipment. Drawer Removal 1. Confirm that the unit is unplugged from wall outlet. Aligned Front-to-Back 2.
™ 2075DWRWC — Drawer Model Wine Captain® Minor Adjustment: Minor Adjustment: Note: The mounting holes on the slide are slightly larger than the screws’ diameter. Note: The mounting holes on the slide are slightly larger than the screws’ diameter. Loosen Mounting Screws 1. Loosen the slide’s mounting screws. 1. Loosen one slide’s mounting screws. 2. Push the slide backward. 2. Level the slide. 3. Retighten the screws. See Figure 9. Screws Should Be Loose 3. Retighten the screws. See Figure 12.
™ 2075DWRWC — Drawer Model Wine Captain® Top-to-Bottom (and Left-to-Right) Adjustment Severe Adjustment: Note: The slides have extra mounting holes that may be used. Not Aligned Top-to-Bottom Mark and Drill New Mounting Holes 1. Remove one slide’s mounting screws. 2. Reposition the slide so it is the same distance from the bottom of the liner as the other slide. Measure to confirm. Not Aligned Left-to-Right Push Slide Upward or Downward Figure 16 3.
™ 2075DWRWC — Drawer Model Wine Captain® 6 Prepare Power Supply 7 Level the Unit Electrical Specifications Leveling Information Note: It is recommended that the unit is level. CAUTION 1. Use a level to check the levelness of the unit from front to back and from side to side. Level should be placed along top edge and side edge as shown (see Figure 18). Electrical installation must observe all state and local codes.
™ 2075DWRWC — Drawer Model Wine Captain® 8 Install the Unit Horizontal Mounting (Left Side Shown) Countertop or Wall Header Installation of the 2075DWRWC 1. Plug in the power cord. 2. Gently push the unit into position. Be careful not to entangle the electrical cord. B 3. Re-check the leveling, from front to back and side to side. Make any necessary adjustments. The unit’s top surface should be approximately 1/8" below the countertop.
™ 2075DWRWC — Drawer Model Wine Captain® 2. Insert the screws through the anti-tip bracket (B) and attach the bracket to the unit. Tighten screws securely. 9 Start-Up for the First Time 3. Repeat for the other side. Initial Start-Up Note: The bracket should be flush with the surface it is being attached to. If it is not, loosen the screws and slide the bracket against the mounting surface. Tighten screws securely.
™ 2075DWRWC — Drawer Model Wine Captain® Start-Up Troubleshooting To display actual temperature of each drawer, press the “ ” and “ ” touch sensors simultaneously for three seconds. The display indicates the actual temperature. After approximately 10 seconds, the set point temperature displays. Q: Problem Unit does not appear to turn on when plugged in. To adjust the temperature set point, touch and hold either the “ ” or “ ” for that drawer for three seconds.
™ Who to Call Service Information If the need for service arises, contact the dealer from whom the unit was purchased. State the Model Number and Serial Number and explain the problem. The Model and Serial Number plate is located inside unit at upper right hand corner. If you need to locate a service company, you can go online at www.U-LineService.com and search for a service company by zip code.