Installation Guide 1115R Refrigerator and 1115WC Wine Captain® www.U-LineService.com Phone (414) 354-0300 • FAX (414) 354-7905 Service & Parts Tech Lines Phone (800) 779-2547 • FAX (414) 354-5696 OnlineService@U-Line.
1115R and 1115WC Models Contents Exterior Cleaning . . . . . . . . . . . . . . . . . . . . . . . . . . . . . . Cut-Out Dimensions . . . . . . . . . . . . . . . . . . . . . . . . . . . Product Dimensions . . . . . . . . . . . . . . . . . . . . . . . . . . . . Door Swing/Clearances Information . . . . . . . . . . . . . . Reversing the Door. . . . . . . . . . . . . . . . . . . . . . . . . . . . . Side-By-Side Installation Instructions . . . . . . . . . . . . . . Custom 1/4'' Thick Door Panel Insert . . . . .
1115R and 1115WC Models General Precautions 2 Inspect and Plan Use this appliance for its intended purpose only and follow these general precautions along with those listed throughout this guide: You have received a carton containing your 1115R Refrigerator or 1115WC Wine Captain® with a package inside containing a Use and Care Guide and a Product Registration Card. Complete and mail the Product Registration Card or register online at www.U-LineService.com.
1115R and 1115WC Models Exterior Cleaning 3 Prepare Site (As Required) Your U-Line product has been designed for either freestanding or built-in installation. When built-in, your unit does not require additional air space for top, sides or rear. However, the front grille must NOT be obstructed and clearance is required for electrical connection in the rear. Black Models: • Black surfaces may be cleaned with a mild detergent and warm water solution. Do not use solvent-based or abrasive cleaners.
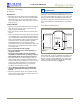
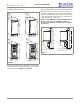
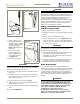
1115R and 1115WC Models Product Dimensions 23-1/8" Including Handle Door Swing/Clearances Information Black 1115R units have a zero clearance for the door to open 90° (see Figure 3). U-line recommends a minimum clearance of 1/4” for black units and 2” for Stainless units to accommodate the handle if the unit is installed next to a wall or similar type of structure. 23-11/16" Including Handle Note: A 1115 BLACK Wine Captain® must be able to have door swing open a minimum of 135°.
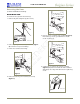
1115R and 1115WC Models Reversing the Door (1115R & 1115WC Black Units Only). Black Model 1115R To reverse the door, perform the following: 1. Remove the grille and grille cap (two screws). Figure 6 ULIN_0122_A 5. Remove screws on opposite side of cabinet (Figure 6). Note that there may be a nut behind one or both screws on either side. Figure 4 ULIN_0143_A 2. Remove top hinge from cabinet (three screws) (Figure 4). Hold door to keep it from falling. 3. Lift the door off the bottom hinge.
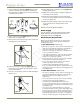
1115R and 1115WC Models 7. Relocate plastic spacer/bushing (Figure 8) on bottom of door to opposite side, and place door on bottom hinge pin. Clean out bushing hole in door bottom with a screwdriver if necessary. 12. Fasten upper hinge to unit (three screws) (Figure 11). Partially tighten screws. 13. Adjust door to assure proper seal. Tighten upper and lower hinge screws securely. 14. Replace three plastic plugs removed in Step 10 into holes on top of unit.
1115R and 1115WC Models Side-By-Side Installation Instructions 4 Prepare/Install Door Panel or Prepare Racks For a complete refreshment center, install two of the 1115 series units side by side: 1115R and 1115WC. Three types of custom treatments may be involved in your installation: • Cut-out width for a side-by-side installation is the total of the widths listed under Cut-Out Dimensions in each unit’s Installation Guide.
1115R and 1115WC Models CAUTION To prevent permanent damage to the inner liner of the Wine Captain, the wine rack wood trim MUST be removed from the unit for staining and/or finishing. Allow stain/ finish to dry thoroughly (at least 24 hours per coat) in accordance with the stain/finish manufacturer's instructions prior to re-installing the wood trim inside the cabinet of the Wine Captain. Failure to do so may cause the inner liner of the unit to have a permanent odor, which is not covered by the warranty.
1115R and 1115WC Models If staining the trim is desired, it must be done before the application of any type of final finish. Review the following staining/final finish and final finish-only guidelines when staining and/or sealing the wood to ensure proper adhesion and durability of the finish. Final finish-only application: 1. Remove all screws, securing wood trim to interior components, and remove the trim. 2. Lightly scruff sand the wood trim with 280 or finer grit sandpaper.
15R and 1115WC Models 5 Adjust Door 6 Prepare Power Supply Electrical Specifications Checking Door Alignment CAUTION The unit’s door is aligned at the factory before shipment. However, its alignment could have been disturbed during shipment or during door panel installation. Electrical installation must observe all state and local codes. This unit requires connection to a grounded (threeprong), polarized receptacle that has been placed by a qualified electrician.
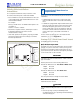
1115R and 1115WC Models 7 Level the Unit 8 Install the Unit Leveling Information Installation of the 1115R/1115WC Note: It is recommended that the unit is level. 1. Plug in the power cord. 1. Use a level to check the levelness of the unit from front to back and from side to side. Level should be placed along top edge and side edge as shown (see Figure 18). 2. Gently push the unit into position. Be careful not to entangle the electrical cord. 3.
9 Start-Up for the First Time Initial Start-Up The unit is shipped with the controller preset. No other adjustments should be necessary at this time. For information about Adjusting the Temperature Control, see the Use and Care Guide. Start-Up Troubleshooting Q: Problem Who to Call Service Information If the need for service arises, call the U-Line Customer Care Center directly @ 800-779-2547.