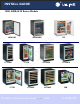
® INSTALL GUIDE 1000, ADA & 29 Series Models ADA24R 1115WC 1175R ADA24RG 1115R 75F 1075BEV 1075WC 1175WC The Built-In Undercounter Leader Since 1962 www.goedekers.com 1175BEV 29R U-LINE.
1 Table of Contents Safety Precautions Safety Alert Definitions.........................................................................................................................................1 General Precautions ..............................................................................................................................................1 Inspect & Plan Product Registration ..............................................................................................................
2 Safety Precautions General Precautions IMPORTANT • PLEASE READ all instructions before installing, operating, or servicing the appliance. • Proper installation procedures must be followed when completing an installation or relocation of a unit. Consult the installation guide before any installation begins. U-Line contact information appears on the rear cover of this guide.
Tools / Material Required 3 Inspect & Plan • Screwdrivers — slotted and Phillips head • 1/4-inch thick door panel material and cutting tools (If installing a 1/4” Panel) (optional for finishing wood fronts) Product Registration • Minwax® Water-Based Wood Stain You have received a carton containing your U-Line Wine Captain®, Refrigerator, or Beverage Center with a package inside containing a Use and Care Guide and a Product Registration Card.
1115 Series 4 Prepare Site Your U-Line product has been designed for either free-standing or built-in installation. When built-in, your unit does not require additional air space for top, sides or rear. However, the front grille must NOT be obstructed and clearance is required for an electrical connection in the rear. Follow the cut-out drawing The 15-3/16" width allows 1/4" for ease in installation and removal of the unit. 24" is the cabinet depth in most installations.
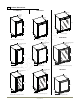
5 Product Dimensions 1175 Series 1115 Series 23 5/16” 34 3/16” Including Hinge 23 5/16” 34 3/16” 23 1/16" 34 3/16” 3 9/16” 24" 1175 Wine Captain® 3 9/16” 14 15/16" 3 9/16” 1115 Refrigerator & Wine Captain® 24" 1075 Series 1175 Refrigerator & 75FB Not Including Handle 23 5/16” Not Including Handle 23 1/16” Not Including Handle 22 3/4" 34 3/16” 34 3/16” 34 3/16” 3 9/16” 3 9/16” 14 15/16" 3 9/16” 24" 1175 Stainless Refrigerator 24” 1075 Stainless Beverage Center & Wine Captain® Sta
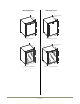
ADA24 Series ADA24R(GL)B Series ADA24R(GL)S Series Not Including Handle 23 1/16” 23 5/16” 32” 32” 24” 24” Stainless Refrigerator ADA24RS Refrigerator ADA24RB Not Including Handle 23 5/16” 23 1/2” 32” 32” 24” 24” Stainless Glass Refrigerator ADA24RGLS Glass Refrigerator ADA24RGLB Product Dimensions www.goedekers.
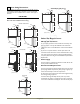
6 Door Swing Dimensions ADA24R(GL)(SB) Series All units have a zero clearance for the door to open 90°. U-Line recommends a minimum door clearance of 2" to accommodate the handle if the unit is installed next to a wall or similar type of structure. Wall Wall 1/4" Min. IMPORTANT 2" Min. 21-1/8" 21-1/8" Non stainless 1175 or 1115 Wine Captain® models must have a full 135° available for door swing. 1175 & 1075 Series Wall Wall 1/4" Min. 25-5/16" 2" Min.
To reverse the door: 7 Standard Doors Remove grille: Door Alignment and Adjustment Remove the grille see MAINTENANCE section of this guide. Align and adjust the door if it is not level, or is not sealing properly. If the door is not sealed the unit may not cool properly, or excessive frost may form in the interior. IMPORTANT Properly aligned, the door’s gasket should be firmly in contact with the cabinet all the way around the door (no gaps).
1 Install bottom hinge: Prepare door for reinstallation: 1. If you have a plate hinge, reorient the pivot screw so it protrudes the opposite direction form the hinge. Remove the pivot screw from the hinge. Turn the plate over and reinstall the screw. For black or white doors: 1. Remove plastic hole plug from top of door handle and reinstall on opposite side. 2. Align hinge outer edge with cabinet. For models with a plate hinge, the flat edge of the hinge alignes with the outer edge of the cabinet. 2.
8 Wood Trim Finishing Staining and final finish application: IMPORTANT WARNING To prevent permanent damage to the inner liner of the Beverage Center and the Wine Captain, the wire rack wood trim MUST be removed from the unit for staining and/or finishing. Allow stain/finish to dry thoroughly (at least 24 hours) in accordance with the stain/finish manufacturer’s instructions prior to re-installing the wood trim inside the cabinet of the Beverage Center or Wine Captain.
9 Door Panel Installation Custom 1/4'' Thick Door Panel Insert Door Panel Preparation A custom door panel may be inserted into the doorframe. Custom door panels can be flat or raised, as long as the maximum panel thickness where inserted into the door reveal (channel) is no more than 1/4" thick. For raised panels, the depth of the reveal is 1/4" on all four sides. 2. Pull door gasket out of groove (top edge of door only). Start in the middle and pull outward, moving toward the edge.
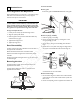
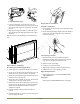
Installation 10 10 Installation 1. Plug in the powercord. Leveling Information 2. Gently push the unit into position. Be careful not to kink the water supply line or entangle the electrical cord. It is recommended that the unit is level. 1. Use a level to check the levelness of the unit from front to back and from side to side. Level should be placed along top edge and side edge as shown 3. Re-check the leveling, from front to back and side to side. Make any necessary adjustments.
® INSTALLATION GUIDE SERVICE INFORMATION If you have a problem with this appliance, your use and care guide has troubleshooting information to help you quickly identify common problems and provide information on possible cause and remedy. Answers to Customers Frequently Asked Questions are available at www.u-line.com/customer/faq.cfm. You may contact U-Line directly: GENERAL INQUIRIES: SERVICE ASSISTANCE: U-Line Corporation P.O. Box 245040 Milwaukee, Wisconsin 53224-9540 U.S.A.