INSTRUCTION MANUAL BUILT-IN WINE COOLER MODEL: TYWC100 / TYWC150 Read this manual and follow all safety rules and operating instructions before first use of this wine cooler.
TABLE OF CONTENTS IMPORTANT SAFETY INSTRUCTIONS 3 PRODUCT DIAGRAM 5 INSTALLATION INSTRUCTIONS 6 Before Using Your Wine Cooler To Install Stainless Steel Handle To Install Your Wine Cooler OPERATION INSTRUCTIONS 6 6 7 9 Controls 9 Recommended Temperature Settings 10 Storage 10 Door Lock 10 Beech Shelves 10 To Remove a Sliding Shelf CARE & MAINTENANCE 11 11 Cleaning Your Wine Cooler 11 Power Failure 12 Vacation Time 12 Moving Your Wine Cooler 12 Energy Saving Tips 13 Charcoal Fi
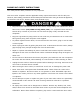
IMPORTANT SAFETY INSTRUCTIONS Your safety and the safety of others are very important. This wine cooler complies with the applicable safety requirements and is safe for daily use. However, basic safety precautions should always be followed when using an electrical appliance, to reduce the risk of fire, electric shock, and personal injury. Plug into its own individual electrical outlet with a voltage rating that matches the rating label on the cooler (115/120V AC only, 60Hz, 10A).
Do not use this wine cooler for other than its intended purpose. For indoor, household use only. Move this wine cooler by 2 people. Failure to do so can result in injury. Place this wine cooler in a well-ventilated area with temperatures above 15°C (60°F) and below 32°C (90°F). To ensure proper ventilation for your wine cooler, the front of the cooler must be completely unobstructed. This wine cooler must be installed in an area away from wind, rain, water spray or drips.
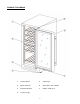
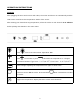
PRODUCT DIAGRAM 1 Control Panel 5 Top Hinge 2 Beech Shelves 6 Glass Door with Handle 3 Exhaust Window 7 Safety Child Lock 4 Leveling Legs 5
INSTALLATION INSTRUCTIONS Before Using Your Wine Cooler Remove the exterior and interior packaging. Check to be sure you have all of the following parts: o 6 Beech Shelves o 2 Keys o Stainless Steel Handle o Instruction Manual o 2 Extra Screws for Installing Handle IMPORTANT: Before connecting this wine cooler to a power source, let it stand upright for approximately 24 hours. This will reduce the possibility of a malfunction in the cooling system from handling during transportation.
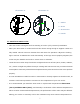
Illustration #1 Illustration #2 1 Gasket 2 Screw 3 Screw Driver 4 Handle To Install Your Wine Cooler This wine cooler is designed for free standing or built-in (fully recessed) installation. Place your wine cooler on a solid and level floor that is strong enough to support it when it is fully loaded. This will ensure a vibration-free and noise-free operation. Adjust the leveling legs in and out to stabilize the cooler horizontally.
fluctuate, and the temperature range of 5ºC-22ºC (41ºF-72ºF) may not be reached. Connect the wine cooler to an exclusive, properly grounded, standard electrical supply (115 V AC only, 60 Hz), in accordance with the National Electrical Code and local codes and ordinances. Any questions concerning power and/or grounding should be directed toward a certified electrician or an authorized products service center. Warning: Improper use of the grounded plug can result in the risk of electrical shock.
OPERATION INSTRUCTIONS Controls After plugging the wine cooler into a wall outlet, the cooler would turn on automatically and the LCD screen would show the temperature inside of the cooler. After setting your desired serving temperature, allow the cooler to cool down for 3 to 4 hours before placing wine bottles in the wine cooler. Press once to turn the interior light ON or OFF.
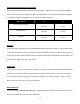
Recommended Temperature Settings Storing wines at the proper temperature is important. To preserve them as long as possible, wine needs to be stored at approximately 55° Fahrenheit. However, the chart below suggests the optimal drinking temperature for the different varietal of wine. Wine Varietal Rose and Sparkling Wines Dry/White Wines Red Wines °F °C 41°F-46ºF 5°C-8ºC 48°F-53ºF 9°C-12ºC 59°F-65ºF 14°C-18ºC Storage This wine cooler is designed to store standard Bordeaux 750 ml wine bottles..
The slide-out shelves allow bottles of wine to be viewed and removed more easily. Any of the shelves can be removed to store larger bottles. To prevent damaging the door gasket, make sure to have the door all the way opened when pulling shelves out of the rail compartment. For easy access to the bottles, you may need to pull the shelves approximately 1/3 out of the rail compartment. To Remove a Sliding Shelf 1. Remove all bottles from the shelf. 2. Pull the shelf out as far as it will go. 3.
Wash the shelves with a mild detergent solution. Wring excess water out of the sponge or cloth when cleaning the area near the controls, or any electrical parts. Wash the outside cabinet with warm water and a mild liquid detergent. Rinse well and wipe dry with a clean soft cloth. Do not use steel wool or steel brush to rub the stainless steel, which will contaminate the stainless steel with steel particles and rusting may occur.
Energy saving tips - The cooler should be located in the coolest area of the room away from heat sources or direct sunlight. - Ensure that the cooler is adequately ventilated. Never cover air vents. - Only open the cooler door for as long as necessary. Frequent opening of the door will affect internal temperature. Charcoal filtration system Your wine is a living object that breathes through the cork of its bottle.
TROUBLESHOOTING GUIDE PROBLEM The wine cooler does not run. The wine cooler is not cold enough. The compressor turns on and off frequently. POSSIBLE CAUSE SOLUTION The wine cooler may not be plugged in, or plug may be loose. Ensure the wine cooler has been plugged in properly. The wine cooler is turned off. Press to turn on the cooler. House fuse blown or tripped circuit breaker. Check/replace fuse. Reset circuit breaker. External environment may require a higher setting. Set a colder setting.
PROBLEM The light does not work. POSSIBLE CAUSE SOLUTION Not plugged in. Plug the cooler in. The circuit breaker tripped or a blown fuse. Check the breaker and/or fuses. The light button is “OFF”. Vibrations. The cooler seems to make too much noise. The door will not close properly. Moisture build up on interior or exterior of the wine cooler. Error Code: E1-E2-E3-E4-E7-E8 Press to turn the light ON. The cooler is not leveled. Check to assure that the cooler is level.