
Operator's Manual


MM101332V1, Rev. K
10 BASIC OPERATION
10.1 TURNING ON THE RADIO
1. Power ON the radio by rotating the POWER ON-OFF/VOLUME knob clockwise. A short alert
signal (if enabled through programming) indicates the radio is ready to use. Refer to
Figure 8-1 for
location of the POWER ON-OFF/VOLUME KNOB.
2. The display shows the last selected system and group or a default system and group (depending on
programming).
3. Adjust the POWER ON-OFF/VOLUME knob to the desired volume level.
4. Select the desired system and group. The display indicates the current system and group names.
5. The radio is now ready to transmit and receive calls.
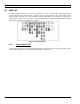
In the trunked environment, CC SCAN will be displayed if communication with the
system's control channel cannot be established. This may occur if, for example, the
radio is out of range of the trunking site. It may be necessary to move to another
location or select another trunking system to re-establish the control channel link for
trunked mode operations. CC SCAN is displayed on the group line until a control
channel is accessed.
10.2 SYSTEM SELECTION
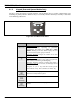
From the control knob: If system selection is programmed to the
SYSTEM/GROUP/CHANNEL SELECTION control knob, select a system
by turning the knob to the desired system number position (1-16). The
display registers the new system name on line one. The Option 1 button can
be programmed to provide access to a “2
nd
b
ank” of 16 system numbe
r
positions (17-32)
METHOD 1:
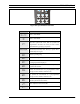
METHOD 2: (System and Scan model radios only) From the keypad: If system
selection is programmed as the primary function of
and , select a
system by pressing
or to scroll through the system list. The display
registers the new system name on line one.
METHOD 3:
(System model radios only) Direct Access: Press
to enter the system
select mode. Press the numeric key, which is mapped to the desired system.
Press
. The radio will move to the selected system.
METHOD 4: (Select model radios only) If programmed, press the Option 1 button to
scroll through and change systems. The display registers the new system
name on line one.
30