
Manual


Connecting the Torpedo VM-202
1.1 VM-202 integration
1.2 In the studio
The VM-202 has applications in the studio for either analog or digital recording. This part of the manual
focuses on digital recording.
8 Ohms 150W RMSLEFT RIGHT
AES/EBU
IN
IN
OUT
R o HS
2002/95/EC
WORDCLOCK
IN
IN
2
3
4
5
6
1
USB
WORDCLOCK OUT
WORDCLOCK OUT
WORDCLOCK OUT
OUT
WordClock
REMOTE
Audio Interface
AES/EBU
Big Preamp
1
0
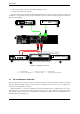
1 Guitar or bass 3 TORPEDO VM-202 5 Audio interface
2 Amplifier 4 DAW 6 Master Clock
The VM-202 is here an analog-to-digital converter, clocked by a wordclock, connected to a DAW
through the AES/EBU connection or SPDIF connection for sampling frequencies from 44,1 kHz to 96 kHz. The
VM-202 clock can be set as master or slave.
In master mode, the VM-202 generates its own clock, you can choose the input/ouput frequency. In
slave mode, you can sync the VM-202 with the AES/EBU or the S/PDIF signal, or with the Wordclock input.
We recommend to install the VM-202 in slave mode: this way you will be able to sync the VM-202 with
your sequencer/recorder by selecting the working frequency in your project.
Please note that the internal working frequency in the VM-202 is always 96 KHz whatever the selected
sync frequency.
1. Check that your digital interface is configured in master mode.
2. In the setup menu of the VM-202, select sync, SPDIF, AES/EBU or Wordclock to indicate the machine’s
sync source. (for any further details, please refer to part 4. 4
3. Connect a SPDIF or AES/EBU cable from the digital interface OUT to the VM-202 IN, or a wordclock
cable from your master clock. On the Torpedo idle menu, you must see the indication "Lock".
4. Connect a SPDIF/AES/EBU cable from the VM-202 OUT to the digital interface.
Two Notes Audio Engineering Torpedo VM-202 19