
User Manual


Last
update:
2017/11/08
15:11
torpedo_studio:torpedo_studio_user_s_manual http://wiki.two-notes.com/doku.php?id=torpedo_studio:torpedo_studio_user_s_manual
http://wiki.two-notes.com/ Printed on 2017/11/10 22:17
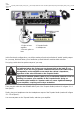
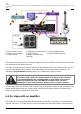
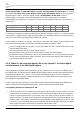
1. Electric guitar or bass
2. Guitar or bass amplifier
3. Torpedo Studio
4. DAW with Torpedo Remote
5. Audio interface
6. Master clock generator
(optional)
7. To other digital devices
8. Optional speaker cabinet
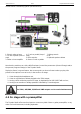
The Torpedo Studio acts here as an analog-to-digital converter, clocked by a wordclock and connected
to a DAW with the AES/EBU connection.
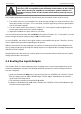
The USB connection gives you instant control over all the parameters of the Torpedo Studio. It is also
useful for uploading firmware updates, for preset backups, and for loading new simulations. The
standalone Torpedo Remote software allows you to address all of those functions.
For a working S/PDIF or AES/EBU connection, your audio interface can be
set to slave mode, while the Torpedo Studio is in master mode. However,
we recommend having the Torpedo Studio in slave mode if you wish to
control the digital sync from your DAW or a master clock. For more
information on your audio interface, please refer to its user’s manual.
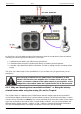
An interesting option is to use the THRU output to feed a real speaker cabinet and do a miking of that
cabinet while recording with the Torpedo Studio, meaning having three different microphone and
cabinet combinations recorded at the same time.
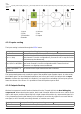
4.4 On stage with an amplifier
The analog I/O of the Torpedo Studio offers great options on stage. For example, the analog outputs
(number 9 in figure “3.1.2 Rear panel”) can be connected at the same time both to the front mixing