
Manual

ULTRA-CUT 100 XT
Manual 0-5303 INSTALLATION 3-41
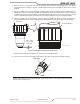
4. Insertthestackofconsumablepartsintothecartridge.EnsurethatthelargeO-ringonthetorchtipts
completelyintothecartridge.IfanypartoftheO-ringprotrudesfromthecartridge,thepartsarenotseated
properly.
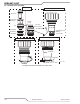
5. Usethecartridgetooltoholdthecartridgeassembly,whileturningtheshieldcup(andshieldretainerfor
200Ampparts)ontothecartridgeassembly.For300Amppartsturntheshieldretainerontotheshieldcup
now.Whenthisgroupisfullyassembled,theshieldshouldprotrudefromthefrontoftheshieldcuporshield
retainer.Withoutthisprotrusiontheshieldcupisnotproperlytightenedontothecartridgeassembly.
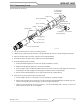
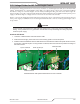
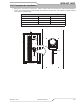
6. Takethecartridgetooloffthecartridge.Fitthecartridgeassemblyontothetorchhead.TheSpeedLok
ringshouldclickintoplaceandthecartridgeassemblyshouldtouchthelargeO-ringonthetorchbody.
To rch Head O-Ring
Torch Head
Art # A-08300_AB
0.063 - 0.083"
(1.6 - 2.1 mm)
Protrusion
Installing Assembled Cartridge Onto Torch Head
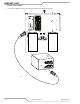
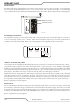
7. Slide the ohmic clip over the shield cup if using ohmic torch height sensing.
8. Connect the wire lead from the height nder to the ohmic clip if using ohmic torch height sensing.
Ohmic Clip
Art # A-03393_AB
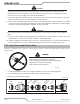
NOTE
Ohmic height sensing is not recommended with water shield. Water on the plate interferes electrically
with the ohmic sensing circuit.