
Manual

ULTRA-CUT 100 XT
3-40 INSTALLATION Manual 0-5303
CAUTION
The gas and coolant leads include compression ttings. Do not use sealant on these connections.
Slowly apply pressure to the gas lines. Check for leaks at all connections before continuing. If there are
no leaks, shut off the gas supplies and continue with installation.
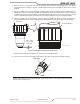
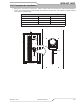
7. ConnectthepilotleadtotheTorchHead.Pressthetwoendsoftheconnectorrmlytogether.Threadthe
plasticleadcover/connectorontothematingTorchHeadconnector.
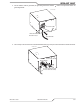
8. PresstheTorchHeadAssemblyupwardtoconnecttotheMountingTube.Pulltheleadsbackasneeded
toensureapropertthroughtheMountingTubeandTorchLeadsEndCap.HoldtheTorchHeadAssembly
stationary;rotatetheMountingTubetothreaditontotheTorchHead.
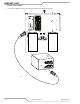
CAUTION
Ensure that the leads do not twist within the mounting tube. Leads must lie as shown in the installation
sketch.
9. ThelowerendoftheMountingTubeincludesfourthreadedholes.InstallanAllensetscrewinanyofthe
threadedholestosecuretheTorchHeadAssemblytotheMountingTube.
10.Installtheappropriateconsumablepartsasshownonthefollowingpages.Thetorchmanualincludesdia-
gramsshowingthecorrectpartstoinstall,dependingonthemetaltobecutandthegasesinuse.
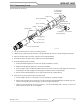
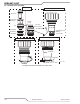
3.22 Install Consumable Torch Parts
Install the consumable parts as follows to ensure proper operation. These steps will help ensure that parts are
seated correctly.
Art # A-03887
WARNINGS
Do not install consumables into the Cartridge
while the Cartridge is attached to the Torch Head.
Keep foreign materials out of the consumables and Cartridge.
Handle all parts carefully to avoid damage,
which may affect torch performance.
1. Checktheappropriatecutchartfortherightcombinationofpartsforthecuttingapplication.
2. For200Amppartsonly,threadtheShieldRetainerontotheShieldCup.
3. Stacktheconsumablepartstogether.
Shield
Retainer
Shield Cup
Shield Cap
Shield Gas
Distributor
Tip
Plasma Gas
Distributor
Electrode
Cartridge
Art # A-08303
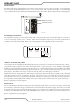
A
BC
1 - Assemble “A” 200 A only. 2 - Assemble “B”. 3 - Assemble “B” to “C”. 4 - Assemble “A” to “B-C” assembly.