
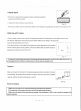
Installation Guide
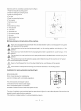
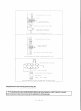

4.Liftthe
bead
ontothe mount/demounthead
with
the
bead
lifting
tool,
and stepon
theturntable control
pedal
B
(in
Fig
2
step
on
the
pedal
8
and
in Fig
3 step on the
pedal
2) to
turn the
turntable clockwise
till the bead is
completely separated
(Fig.13),
it is
suggested to
place
the mount/demount
head
about 10mm
to the right
side of the air
valve
if the wheel has
a
tube, so
as not to
damage the tube
)
lf
the denounting is blocked,
stop the machine at once,
and
pull
up the
pedal
I
(in
Fig 2
pull
up the
pedat
I and
in FigJ
pull
up the
pedal
2)
to turn the turntable
counter-crockwise, so as fo clear
up the block.
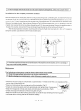
5.Takeoutthetubeif
thereis.Turnover
the wheel tolet
the
othersidetowardthemount/demounthead.andreoeat
the
above
steps to demount the
other
side of the bead.
(Fig.1a)
(Fis
1a)
(Fis
13)
)
Keep
your
hand and body away ftom
the moving
parts
du ng
the operation, lt is very dangercus
to
wear necklace,
bracelet ot loose
blouse for the operctors.
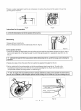
Mounting (Fig15)
)
Make
sure that
the size
of the
rim
and tire is same
before mounti
'1
Clamo the rim
on the turntable.
2.Lubricate the
bead
with
soao solution.
3.Put the bead
on the
machine
with
the
left
side upward,
and
oress down the tire
simultaneously, and turn the
turntable
clockwise to let the
bead enter the
bead seat
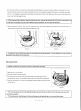
4.Cover
the
tube onto the rim if
there is, and repeat
the above
steps
to mount
the
upper
side of the tire,
)
It is nof
necessary
to
move
the locking handle
every time, if
the size
of the
rims is
fhe same,
just
move
the
horizontal
swing arm.
)
Do not
put
your
hand
between the
tire and swing arm during locking,
so as to
avoid body
injury,
\
(Fis
15)
6