
Installation Guide


5
FP9K-DX-XLT
Jan 2019
TOOLS REQUIRED
Ø Set of Metric Wrenches and/or Sockets
Ø Adjustable Wrench
Ø Locking Pliers
Ø 25’ Tape Measure
Ø Step Ladder
Ø Phillips Screw Driver
Ø Rotary Hammer Drill (If anchoring)
Ø 3/4" Masonry Bit (If anchoring)
Ø 3 Gallons of Hydraulic Oil*
*Recommended Oil: ISO 32 Light Hydraulic Oil
SELECTING SITE
Before installing your new lift, check the following.
OVERHEAD OBSTRUCTIONS: The area where the lift will be located should be free of overhead
obstructions such as heaters, building supports, electrical lines etc.
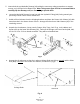
FLOOR REQUIREMENTS: Visually inspect the site where the lift is to be installed and check for
cracked or defective concrete. This lift must be installed on a solid level concrete floor with no more
than 2 degrees of slope. A level floor is suggested for proper installation and level lifting. If a floor is of
questionable slope, consider a survey of the site and/or the possibility of pouring a new level concrete
slab. This lift is designed to be installed on a minimum of 4" thick, 3000psi, with steel reinforced
concrete. Do not install this lift on asphalt, wood, or any other surface other than described. This lift is
only as strong as the foundation on which it is installed.
NOTE: This Lift does not require bolting to the floor (BUT) If you choose the option to anchor
the Lift to the floor, please follow the detailed instructions in the manual and criteria above.
(See page 15)
DO NOT install this lift outdoors unless special consideration has been made to protect the power unit
from weather conditions. The Power unit is not water proof!
DO NOT install lift close to wall. It is necessary to leave adequate clearance for safely walking.
Suggested clearance to be 1 meter (3 feet) at min.
OPERATING CONDITIONS: Lift is not intended for outdoor use and has an operating ambient temperature
range of 41º-104ºF (5º-40ºC).