
Product Manual


44
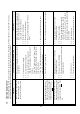
Corrections
13.1 Do not fill above the safety valve. See sec
7.2.
13.2 If unwrapped instruments are being
sterilized, this is not a problem.
For wrapped instruments see sec 7.11.
14.1 Once the chamber is finished venting,
open the door right away.
Also, straighten the cooling coil in the
reservoir. The open end of the cooling
coil should not be below the water line.
15.1 Correct the cause and reset the Cut out
thermostat; if the problem persists have a
technician check the machine.
a) Check section 7 for correct operating
procedures. See sec. 4 for installation
instructions.
b) Tighten the door more; if leaking
persists, replace the door gasket.
c) Follow procedure in section 8.5. If
leaking persists, have technician
replace the Safety valve.
d) Sterilize fewer towels or gowns or adjust
the front of the unit higher to allow more
water into the chamber.
See installation instructions section
4.2/maximum load table section 2.
e) Have a technician check the machine.
Possible Cause Checkup and Tests
13.1 Water level too high in the reservoir.
13.2 Waiting too long to exhaust after
sterilization is complete.
14.1 Leaving the multi-purpose valve in the
“Exh/Dry” position while leaving the door
closed and having a cooling coil that is
mispositioned in the reservoir.
15.1 The unit has detected an overheating
condition due to too little water in the
chamber caused by either:
a) Incorrectly filling the chamber at the
beginning of the cycle.
b) A leaking door seal.
c) A leaking safety valve.
d) Absorbent material being sterilized.
e) An internal steam leak.
Symptom
13. Water is left in the bottom of
the chamber at the end of
sterilization.
14. Water spills on the floor when
the door is open.
15. Cut out thermostat trips.