
Product Manual


42
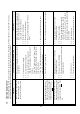
Corrections
8.1 Once the timer rings at the end of the sterile
cycle, immediately turn the multi-purpose
valve to the “Exh / Dry” position. Once
venting is complete, start the drying cycle.
8.2 Adjust loading according to "Maximum
Load Sizes" table in sec. 2.
8.3 Items to be sterilized should be separated
and not stacked. See preparations for
sterilization para. 6. A Tuttnauer Pouch Rack
is recommended.
8.4 Have a technician check the unit.
9.1 Check
table
2.6
for
correct
operating
voltages.
9.2 Check section 7 for correct operating
procedures. See sec. 4 for installation
instructions.
9.3 Tighten the door more, if leaking persists,
replace the door gasket.
9.4 Door bellows is leaking, have a technician
replace the bellows.
9.5 Follow procedure in section 8.5. If leaking
persists have technician replace the Safety
valve.
9.6 Sterilize fewer towels or gowns or adjust the
front of the unit higher to allow more water
into the chamber. See installation
instructions section 4.2/maximum load table
section 2.
9.7 Unit may be out of calibration or there is an
internal steam leak. Have a technician
check the unit.
9.8 Have a technician check the unit.
Possible Cause Checkup and Tests
8.1 The unit is not being vented immediately
after the sterile cycle.
8.2 Units may be overloaded.
8.3 The load may be too densely packed.
8.4 Units may not be heating properly.
9.1 Unit is not getting the correct voltage.
9.2 Chamber was not filled with the correct
amount of water.
9.3 Door gasket is leaking steam.
9.4 Steam is leaking at the closing device.
9.5 Safety Valve is leaking.
9.6 Items being sterilized are absorbing all
available steam (cloth towels or gowns).
9.7 Heat light goes out before correct pressure
is reached.
9.8 One or more of the heating elements is bad.
Symptom
8. Wrapped or bagged items do
not dry. See also section 10.32
and section 8.8.
9. Unit does not reach the proper
operating pressure.