
Product Manual


20
4 INSTALLATION INSTRUCTIONS
Caution:
The sterilizer must be placed on a rigid and leveled surface. The stand must
be able to hold the load of the device and loaded material.
Note:
Make sure, when placing the autoclave, to leave space around the machine,
to give the technician access to service the machine.
4.1 Electrical
The electrical connection should comply with the devices power
requirement. It must also comply with local installation and safety rules
and regulations. The voltage supplied to the device must comply with
the label ± 5%.
In order to avoid any injury by electrical hazard, it is mandatory for the
customer to have installed an earth leakage relay (GFI outlet or circuit
breaker) in the electrical circuit to which the autoclave is connected.
This relay disconnects all the poles of the electrical power line in case
of accidental contact by the power line, with the autoclave’s metal
enclosure.
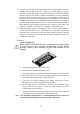
Note: Keep the back and the right side of the autoclave approximately 1”
(25mm) away from the wall to allow for ventilation.
Connect the power cord to the socket on the rear side of the autoclave;
plug it into the supply outlet.
4.2 Setup
Proper adjustment of the chamber pitch is one of the most important
things you can do for the sterilizer. Proper chamber pitch insures that
among other things, the sterilizer will have the proper amount of water
in the chamber at the beginning of each cycle. Insufficient water in the
chamber, at the beginning of the cycle, will cause the unit to overheat
and activate one of the safety thermostats. This will occur at some
point during the cycle when the water level becomes too low. If, on the
other hand, there is too much water in the chamber, this will extend the
heating portion of the cycle. Extending the heat up time will shorten
the sterilization time, causing items to not be sterilized, indicator strips
to not change color and spore tests to fail.
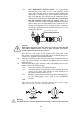
For proper setup please follow these setup steps (see drawing below):
♦ The autoclave should be turned off and unplugged.
♦ Make sure the counter is level and sturdy (3).
♦ Make sure all the feet are on the autoclave and none have been lost.
♦ Make sure the feet are free to move in and out (2).
♦ Position the autoclave on the counter.
♦ Fill the reservoir with distilled water (see sec 7.2).
♦ The chamber should be empty of any instruments, trays or leftover
water.