Tools Needed Adjustable Wrench Groove Joint Slier + Phillips Screwdriver Silicone Sealant + Teflon Tape Included Maintenance Your new faucet is designed for years of trouble-free performance. Keep it looking new by cleaning it periodically with a doff, damp cloth. Avoid abrasive cleaners, steel wool and harsh chemicals as these will dull the finish and cold your warranty.
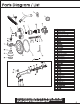
Parts Diagram / List No.
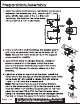
Preparation/Assembly 1. Note the minimum/maximum installation dimensions between the shower arm handle and spout Also note, if this is a thin wall 121487 2. If this is not a thin wall mounting, the plaster guard (#9) may be removed from the valve body Note: Secure the valve body (#1 3) to the support cross board for stability. 3. Apply Teflon tape to all pipe threads. Install an elbow at one end of the pipe.
Installation Instructions 5. Turn on the hot and cold water shut offs and check for leaks. If a leaks occurs, refer to steps 3 or 4. Turn on the faucet and let the water run for one minute. This will help clear any debris that may have come loose during installation and prevent the system from becoming clogged. Turn off the water. Note: Turn on both the hot and cold water shut offs before turning the faucet on. Not turning on both the hot and cold water will cause the cartridge to become pressure locked.
Installation Instructions 9. Temperature Limiting Device: Remove the lock nut By default, the temperature limiting device is serf to the highest temperature setting (A). In order to reduce the temperature, remove the temperature limiting device (the red cap) and turn the device clockwise to the desired temperature (position B or C).
Troubleshooting If you've followed the Instructions carefully and your faucet still does not work properly, take these corrective steps. Problem Cause Acton Leaks underneath the handle The lockout {#11) has come loose or the O-ring on the cartridge (#12) is dirty or misaligned. Turn off the water supplies. Remove the handle (#21) and trim cap If the lock nut (#11} is loose tighten it.