
Cov lus qhia
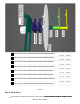
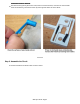
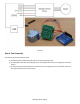
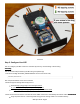
Table Of Contents

Step 2: Finish Parts
https://www.instructables.com/ORIG/FLN/E9OC/L6W7495E/FLNE9OCL6W7495E.stl
DownloadView in 3D
https://www.instructables.com/ORIG/F5R/D5HX/L6W7495F/F5RD5HXL6W7495F.stl
DownloadView in 3D
https://www.instructables.com/ORIG/F4J/TU3P/L6W7495G/F4JTU3PL6W7495G.stl
DownloadView in 3D
https://www.instructables.com/ORIG/FBC/YHE3/L6W7495H/FBCYHE3L6W7495H.stl
DownloadView in 3D
https://www.instructables.com/ORIG/FG2/T8UX/L6W7495I/FG2T8UXL6W7495I.stl
DownloadView in 3D
https://www.instructables.com/ORIG/F0E/38K0/L6W7495J/F0E38K0L6W7495J.stl
DownloadView in 3D
https://www.instructables.com/ORIG/FLM/YXUK/L6W7495K/FLMYXUKL6W7495K.stl
DownloadView in 3D
https://www.instructables.com/ORIG/FTY/GEKU/L6W7495L/FTYGEKUL6W7495L.stl
DownloadView in 3D
Remove debris and blobs from the parts well. Especially, all axes of hands should be smooth to avoidall axes of hands should be smooth to avoid
WiFi Sync Clock: Page 2