User Guide
Congratulations on your purchase of the XP SEVEN gaming headset from Turtle Beach. Well played (so far). This premium product is designed to bring unmatched realism and effects to your gaming experience, enhancing it in ways you haven’t known previously. Welcome to Turtle Beach excellence! download game optimized presets http://www.turtlebeach.
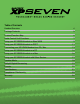
Heading Table of Contents Headset Overview 4 Package Contents 5 Feature/Function Map 6 Audio Control Unit Functions 7 Using your XP SEVEN Headset on Xbox 360® 9 Using your XP SEVEN Headset on PS3™ 11 Connecting your XP SEVEN Headset to a PC / Mac 13 Using your XP SEVEN Headset on a PC 14 Using your XP SEVEN Headset on a Mac 16 Using your XP SEVEN Headset with Other Devices 17 Speaker Mode 18 Dolby® Digital Processing 19 Presets 20 Specifications 21 Compliance / Conformity 22 W
Headset Overview Your Turtle Beach XP SEVEN headset is compatible with Xbox 360, Playstation 3 and PC or Mac gaming platforms. You can enjoy gaming at home or at tournaments and while on the go with portable game systems and mobile devices like smartphones and tablets. · Programmable presets that change your sound environment and allow you to hear sound cues you’d normally miss. The Advanced Sound Editor tool to download, manage or create presets for your headset can be downloaded at: Turtlebeach.
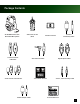
Package Contents XP SEVEN Headset with Audio Control Unit Removable Microphone (ACU) Console Interface USB Cable Audio Control Unit Extender Headset Console Interface Xbox 360 Chat Cable Breakaway Cable Digital Optical Cable Turtle Beach Stickers 3.5mm, 4 Pole Auxiliary Cable FOR / POUR XBOX 360fi I PS3 I PC / MACfi Presets Reference EN: Download additional presets or customize your own with the tools available from TurtleBeach.com.
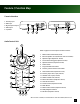
Feature / Function Map Console Interface 1. Auxiliary Input 2. USB Input 3. Digital Input & Output 4. USB Output 5. 9-pin DIN 1 2 3 4 5 Audio Control Unit 1 2 Refer to page 6 for a description of button functions. 3 19 1. Master Game Volume Knob / Mute 2. External Speaker Jack (located on side of controller) 3. Speaker Angles (Capacitive Touch)* 4 18 4. Surround Sound Toggle (Capacitive Touch)* 5. Speaker Selection (Capacitive Touch) 5 17 6. Power Switch 7. Programmable Control Dial 8.
Audio Control Unit (ACU) Functions Gameplay with the XP SEVEN headset is performed using the functions of the ACU. The ACU has the following functions: 1. Game Volume Wheel: This controls the master game volume as well as the individual 5.1 speaker volumes. Press the wheel to mute game audio and again to un-mute. The circular LED around the knob lights RED when muted and WHITE when functioning normally. Volume Knob Speaker Function LEDs / 5.
Audio Control Unit (ACU) Functions (Continued) Additional Chat Functions: Change the pitch of your voice from the deep lows to shrill highs, disguising yourself to other online players. See Chat Presets on Page 18. - Voice Morphing: Change the pitch of your voice from the deep lows to shrill highs, disguising yourself to other online players. See Chat Presets on Page 18.
Using your XP SEVEN Headset on Xbox 360® 1. Connect the Console Interface to the Xbox 360® game console using the Digital Optical Cable and Console Interface USB cable as shown below. Connect the Digital Optical Cable to the Console Interface’s DIGITAL IN jack. 2. Connect the Control Unit to the Console Interface as shown below. Utilize the Control Unit Extender Cable if necessary. 3. Connect your Xbox Controller to the ACU using the Xbox Talkback Cable as shown below. 4.
Using your XP SEVEN Headset on Xbox 360® Xbox 360® Audio Configuration Voice Digital Output Current Setting Digital Stereo Dolby Digital Dolby Digital 5.1 Dolby Digital 5.1 with WM A Pro Choose the digital output type for your system. This setting only applies to optical digital and HDMI audio outputs. Voice Volume 10 Game Volume 10 Mute Kinect Voice Output Play Through Headset Play Through Speakers Play Through Both Select Back 1. Go to Xbox Settings. 2.
Using your XP SEVEN Headset on PS3™ 1. Connect the Console Interface to the PS3 game console using the Digital Optical Cable and Console Interface USB cable as shown below. Connect the Digital Optical Cable to the Console Interface’s DIGITAL IN jack. 2. Connect the Audio Control Unit to the Console Interface as shown below. Utilize the Audio Control Unit Extender Cable as necessary. 3. Connect the XP SEVEN Headset to the Audio Control Unit using the Headset Breakaway Cable as shown below. 4.
Using your XP SEVEN Headset on PS3 PS3 Audio Configuration 1. Go to “Settings” - Choose “Accessory Settings” Audio Device Settings - Choose “Audio Device Settings” - Choose “Input/Output Device” - Choose “Turtle Beach XP SEVEN” 2. Adjust microphone levels Microphone Level 3 Input Device TURTLE BEACH XP SEVEN Output Device TURTLE BEACH XP SEVEN OK Back X Enter 1.
Connecting your XP SEVEN Headset to a PC / Mac 3.5mm Stereo Cable (not included) 3.5mm, 4 pole Auxiliary Cable Headset Breakaway Cable Computers and Smartphone not included.
Using your XP SEVEN on a PC Please note: Depending on your OS Version, the screens may differ but the steps will remain the same. 1. Connect the Audio Control Unit to your PC using the USB Cable. Allow five (5) minutes for Windows to automatically install drivers. 2. Once Windows successfully installs the drivers, power the unit OFF, then power ON again. 3. Using your mouse, right click the speaker icon on the task bar and select “Playback Devices.” 4.
Using your XP SEVEN on a PC 5. Right click on “Turtle Beach XP SEVEN Chat” and select “Set as Default Communication Device.” 6. Left click “Turtle Beach XP SEVEN Game” and click, “Configure” to confirm 5.1 channel audio. 7. Press “Next” two (2) times to ensure that “Front Left and Right” and “Surround Speakers” are set to full range. Then press “Next” again to confirm setting. 8. Click on the Recording tab followed by a right click on “Turtle Beach XP SEVEN Chat” Select “Set as Default Device.
Using your XP SEVEN Headset on a Mac 1. Connect the Control Unit to your Mac and go to System Preferences / Sounds. 2. Select “Turtle Beach XP SEVEN Game” on the Output tab. 3. Select “Turtle Beach XP SEVEN Chat” on the Input tab. Chat Set Up Chat program screens may differ depending on the operating system. Using Skype (download from www.skype.com), open your preferences. Go to Audio / Video and select, “Turtle Beach XP SEVEN Chat” for microphone, ringing and speakers.
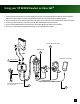
Using your XP SEVEN Headset with Other Devices The 4-pole 3.5mm jack in your XP SEVEN Headset’s Breakaway Cable allows you to enjoy great audio wherever you go by plugging into your mobile phone, portable game system, tablet, MP3 player and more. Utilize the attached mic boom for chat or remove it and use the included Mobile Adapter Cable for streamlined inline mic and call controls.
Speaker Mode The XP SEVEN Audio Control Unit (ACU) may be connected to a stereo speaker system. Note, the Headphone Jack is deactivated when in Speaker Mode. 1. Connect the ACU to a digital music player using the included 3.5mm auxiliary cable as shown. 2. Connect desktop speakers (not included) to the Control Unit using the 3.5mm jack. 3. Connect PC to the ACU using USB cable as shown. 4. Press the Mode Button on the ACU and the blue light will indicate that Speaker Mode is active.
Dolby® Digital Processing The XP SEVEN uses Dolby® Digital surround processing technology – the industry-standard format for encoding multichannel game audio. Dolby Digital processing recreates 5.1 channel surround sound using the XP SEVEN headset so you can hear the sound all around you, as if you were listening to a 5.1 speaker system. subwoofer right surround right surround left front right front left left Stereo Sound Field center Sound field with Dolby® Digital 5.
Presets Your XP SEVEN headset features several built-in presets on the ACU for enhanced gaming, voice and speaker effects. Simply tap the numbered preset on the ACU to switch Game Presets. Press the Chat Presets Button once to enable Chat Presets for buttons 1 – 8 (times out after 5 seconds). Press again to return to Game Presets. Speaker Presets are only available when in Speaker Mode.
Presets / Specifications Speaker Presets Main: Incorporates Surround Sound processing for an immersive audio experience. 1. Flat: Hear stereo game sound without effects processing or Surround Sound. 2. Bass Boost: Hear and feel the rumble of deeper bass sound effects. 3. Treble Boost: Boost high frequencies for crisper sounds and greater clarity. 4. Bass Boost & Treble Boost: Rumbling lows and crisp highs come through clearly. 5.
Regulatory Compliance Statements Heading for the EAR FORCE XP7 Models Federal Communications Commission (FCC) Compliance Notices Class B Interference Statement This equipment has been tested and found to comply with the limits for a Class B digital device, pursuant to Part 15, Subpart B of the FCC Rules. These limits are designed to provide reasonable protection against harmful interference in a residential installation.
Declaration of Conformity Heading Marking by this symbol: indicates compliance with the Essential Requirements of the EMC Directive of the European Union (2004/108/EC). This equipment meets the following conformance standards: Safety: EN 60950-1: 2006 + A11 + A1 + A12 (T-Mark License) Also Licensed for Standards: I EC 60950-1: 2005 + A1: 2009, (CB Scheme Report/Certificate), UL60950-1 (NRTL License), CSA22.
LIMITED ONE YEAR WARRANTY FOR TURTLE BEACH PRODUCTS: Voyetra Turtle Beach, Inc. (“VTB”) warrants to the original end-user purchaser (“Purchaser”) that the retail Turtle Beach hardware Heading product herein (“Product”) will be free of defects in materials and workmanship for a period of one year from the date of purchase by the Purchaser (“Warranty Period”). Any Extended Warranty or Service Plans purchased through a Retail store are not honored by VTB.
EXCLUSIONS FROM LIMITED WARRANTY: This Limited Warranty shall not apply and VTB has no liability under this Limited Warranty if the Turtle Beach Product: - i s used for commercial purposes such as “LAN, Call Centers” (including rental or lease); - i s modified or tampered with; - i s damaged by Acts of God, power surge, misuse, abuse, negligence, accident, wear and tear, mishandling, misapplication, or other causes unrelated to defective materials or workmanship; - serial number is defaced, altered or remov
FOR / POUR Xbox 360 I PS3™ I PC I Mac ® Watch Turtle Beach product training videos at: youtube.com/TurtleBeachVideos product support and warranty information: TurtleBeach.com/support Copyright © 2013 Voyetra Turtle Beach, Inc. (VTB, Inc.) All rights reserved. No part of this package may be reproduced without permission. Turtle Beach, the Turtle Beach Logo, Voyetra, Ear Force, and Engineered for Gaming are either trademarks or registered trademarks of VTB, Inc.