WorkSpace for PC User Guide 9.
WorkSpace for PC 2 TABLE OF CONTENTS ABOUT WORKSPACE Technical Requirements Getting Started Downloading and Installing WorkSpace Registering the Software Checking for Software Updates Setting Up WorkSpace Connect Setting Up MobiView Setting Up Mobi Learners Setting Up the DualBoard via USB Setting Up the DualBoard via Wireless Kit Setting Up the Touch Board and Touch Board Plus via USB Connecting the Touch Board Plus Mouse Actions Touch Gestures The WorkSpace Toolbar WorkSpace Modes WorkSpace Window 4 4
WorkSpace for PC Selecting Device Manager 3 30 WORKSPACE MODES Lesson Mode Accessing Lesson Mode WorkSpace Tools Mouse Mode Enabling Mouse Mode Capture Annotate Over Desktop Mode Annotating Over the Desktop Multi-User Mode Selecting the Multi-User Menu Setting Up Multi-User Mode Setting Up Quick Start Selecting the Presenter Presenter Tools Locking Tablets and Clickers (If Applicable) Exiting Multi-User Mode Office Mode Whiteboard Mode Enabling Whiteboard Mode Using Whiteboard Mode 31 31 31 32 33 33 33
WorkSpace for PC ABOUT WORKSPACE WorkSpace allows instructors to create, assemble and present content while engaging students. The software can be used with any program - content or curriculum - and features more than 50 tools for building, displaying, annotating, organizing, controlling, importing, capturing, recording and sharing teaching materials.
WorkSpace for PC 5 Getting Started This section covers the following topics: Downloading and Installing WorkSpace Registering the Software Checking for Software Updates Setting Up WorkSpace Connect Setting Up MobiView Setting Up Mobi Learners Setting Up the DualBoard via USB Setting Up the DualBoard via Wireless Kit Setting Up the Touch Board and Touch Board Plus via USB Connecting the Touch Board Plus Downloading and Installing WorkSpace WorkSpace can be installed from a disc, www.turningtechnologies.
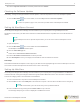
WorkSpace for PC 6 3 Enter the required information in the fields provided and click Submit. Checking for Software Updates Periodically, Turning Technologies releases software updates. Follow the steps below to check for WorkSpace updates. 1 Click the Main Menu icon on the toolbar, mouse over Help and select Check for Updates. NOTE If Check for Updates is gray in color, the most up-to-date version of WorkSpace is installed.
WorkSpace for PC 7 When the MobiView connects to the Mobi receiver, the Home Screen appears. TIP If the message, Unable to Connect is displayed, verify that the Mobi receiver is inserted into a working USB port.
WorkSpace for PC 8 Setting Up the DualBoard via USB The Turning Technologies Device Manager must be installed on your computer prior to using the DualBoard. Device Manager is automatically installed with the following software: WorkSpace, CPS, Response and Flow. 1 Connect the AC/DC power adapter to the controller box. 2 Plug the opposite end of the AC/DC power adapter into a wall outlet. 3 Connect the USB cable to the DualBoard controller box.
WorkSpace for PC 9 Setting Up the Touch Board and Touch Board Plus via USB The Turning Technologies Device Manager must be installed on your computer prior to installing the Touch Board. Device Manager is automatically installed with the following software: WorkSpace, CPS, Response and Flow. The RF receiver works best when it is not plugged into a computer that is under a podium or a desk.
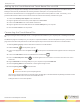
WorkSpace for PC 10 Mouse Actions Mouse Command Use Mouse Action Action Left-click Open items Touch and release to click Double-click Open files and folders Two quick finger taps Right-click Access content sensitive dropdown menu Touch with two fingers slightly apart **menu appears by first touch Drag Drag items across screen Move one finger left or right Touch Gestures NOTE Touch Gestures are native to Windows 7 and 8 and are not compatible on Windows XP, Vista, OS X or Linux platforms.
WorkSpace for PC 11 The WorkSpace Toolbar By default, WorkSpace opens in Lesson Mode with the WorkSpace toolbar floating on the desktop. The WorkSpace toolbar can be customized. See Customize Toolbar. TIP The WorkSpace toolbar will become transparent if not in use. Click anywhere on the toolbar to reactivate it. WorkSpace Modes WorkSpace allows you to capture text, graphics, or virtually any image from any application that you can project from your computer.
WorkSpace for PC 12 TIP Icons can be made available by customizing the toolbar. See Customize Toolbar for more information. WorkSpace Window Once in WorkSpace, the WorkSpace Window is displayed. The WorkSpace Window consists of a page in the presentation file and several toolbars on the right side and bottom of the window. By default, the window can be sized and moved. The Toolbar displays when WorkSpace is opened in Lesson Mode. The default toolbar scheme is set to Intermediate.
WorkSpace for PC 13 PREFERENCES The Preferences window features the following tabs: Options New Page Setup Transparency and Language Toolbar Settings Customize Toolbar Gradient Page Setup Tablet Settings To access the Preferences window, click the Main Menu icon and select Preferences. Options Use the Options tab to configure a variety of WorkSpace features. User Selectable Folders When WorkSpace is installed, four User Selectable Folders are created in the Documents\InterWrite WorkSpace folder.
WorkSpace for PC l l l 14 User-supplied stamps will be displayed in the Properties Bar for the Stamper tool. Both images and stamps must be in BMP, GIF, JPEG, TIFF or PNG format. The Record and Playback tool will play any AVI or WMV recording stored in the User Recordings Folder by opening the default video player on the system. To change the location of a folder, select the folder in the User Selectable Folders list, click Browse and navigate to a new location.
WorkSpace for PC 15 New Page Setup The New Page Setup tab features preferences for new pages and captures. Setting up Blank Pages Use this option to configure blank pages, including the default background color and the default capture options. Set a background color for the Create Blank Page tool and Create Grid Page tool. Setting up Captures By default, WorkSpace switches to Annotation Mode, captures the screen, and displays it in the Annotation window.
WorkSpace for PC 16 Select To Add Title Box Add a title box positioned at the top of the grid page, as shown in the Preview box. Line Color Change the color of the grid lines. Line Type Select a line type from the drop-down list of options. Line Width Adjust the line width in pixels (1 - 16). Change Background Color Change the background color of the grid page.
WorkSpace for PC 17 Toolbar Settings The Toolbar Settings tab provides several options for customizing the toolbar. Toolbar Button Options Set the shape and size of the toolbar buttons. l l By default, the shape of the toolbar icons is Classic Rectangle. The toolbar icon shape can be changed to barrel, circle or pentagon. Each selection is displayed in the Preview box. The toolbar icons can be sized at either 22 x 22 pixels or 40 x 40 pixels.
WorkSpace for PC 18 4 To set a URL for the button: a Click the URL icon. b Enter the URL into the Search field. c Click OK. The custom button is added to the Customize Tools Preferences. Customize Toolbar The WorkSpace toolbar can be completely customized depending on the tools you use most frequently. Use this option to organize, add or remove tools on the toolbar and in the Toolbox.
WorkSpace for PC 19 Creating a Custom Scheme 1 Click Save Scheme. The Enter Name window is displayed. 2 Enter the name of the new scheme. 3 Click OK. The new scheme is added to the Scheme drop-down list. NOTE To delete a custom scheme, select the scheme from the Scheme drop-down menu and click Delete Scheme. Gradient Page Setup Select the Gradient Page tab from the Preferences window to determine gradient settings. Gradient page options include twocolor or four-colors and the direction of the gradient.
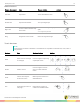
WorkSpace for PC 20 THE WORKSPACE TOOLBAR AND MENUS This chapter covers the following sections: Toolbar Menus Other Options Toolbar Intermediate Toolbar Table 1: WorkSpace Modes Icon Mode Description Mouse In Mouse Mode, your computer mouse functions as a normal mouse. Lesson Create and annotate lessons, presentations, blank pages or images while in Lesson Mode.
WorkSpace for PC 21 Table 2: Tools Available in Lesson and Annotate Over Desktop Mode Icon Name Description Pen Use the Pen tool to write or draw on a blank page. Draw colorful lines with the Multi-color Pen tool. The Multi-color Pen has two different styles: Multi-color pen Gradient - The properties to the left of the Gradient Style button define the starting color, while the properties to the right define the ending color.
WorkSpace for PC Icon 22 Name Description Stamper Use the Stamper tool to add stamps. Personalize the Stamper by adding images to the Documents\Interwrite WorkSpace\User Stamps folder. The images must be in a BMP, GIF, JPEG, TIFF or PNG format. If images are added to the User Stamps folder while WorkSpace is open, the stamps will not be available for use until WorkSpace is closed and re-opened. Audio File Add audio files to the presentation file.
WorkSpace for PC Icon 23 Name Description Page Sorter Use the Page Sorter to view thumbnails of pages in a presentation file. To select a page, simply click the page you wish to view. The Page Sorter also allows you to click and drag a page to a different location in the presentation file. (not available in Annotate Over Desktop mode) Previous Page Go to the previous page in the presentation file. Next Page Go to the next page in the presentation file.
WorkSpace for PC Icon 24 Name Description Preferences Open the Preferences window to configure settings for many of the WorkSpace tools and functions. Freehand Text Recognition Convert handwritten text into typed text and insert the typed text into an active application, such as Word or Excel. The Freehand Text Recognition Window provides a spell checker and the ability to insert carriage return, space, tab and backspace characters into the text.
WorkSpace for PC Icon 25 Name Description New Page Setup Click the New Page Setup icon to set the page options for a new page. Fill Fill any object with color, or change the background of the page if no object is selected, with the Fill tool. Gradient Page Add a gradient page to the presentation. Exit Close WorkSpace. Toolbox Display all available WorkSpace tools. Customize the organization of the tools on this menu and on the toolbar in the Preferences window.
WorkSpace for PC 26 Menus The WorkSpace toolbar Main Menu available menu. Menu Item icon reveals a list of sub-menus. The following table provides an overview of each Description The File Menu provides options for saving and distributing WorkSpace presentation files. The Edit Menu provides options for the WorkSpace editing tool. The tools are only active when WorkSpace is in Annotation Mode and when the Selection tool is active. The Tools Menu is displayed when the Toolbox is selected.
WorkSpace for PC 27 Edit Menu l Undo - Use this option to undo the most recently performed action. l Redo - Use this option to redo the last undo action. The tool is unavailable until something has been undone. l l l l l l Cut - Remove the selected object or objects with the Cut option. Cut is only available when one or more objects have been selected. Objects that are cut are moved to the Clipboard, making them available for pasting.
WorkSpace for PC 28 l Help - Opens the current WorkSpace user guide. l Check for Updates - Checks for WorkSpace software updates. If the text is gray in color, the software is up-to-date. l Register Online - Opens the Product Registration page, where you can submit your registration information. l About - This window provides contact information, a copy of the End User License Agreement (EULA) and copyright information.
WorkSpace for PC 29 Flow Integration WorkSpace integrates with Flow, allowing users to create, edit and ask questions. Creating a Flow Question Prerequisites A plugged in receiver and an open WorkSpace page. 1 Click the Main Menu icon and select Student Response System. The Student Response System window opens. 2 Select Flow and click OK. TIP If the correct file path is not listed, click Browse and locate the following path: C:\Program Files (x86)\Turning Technologies\Flow\Flow.
WorkSpace for PC 30 Device Manager Use the Device Manager window to manage devices used with WorkSpace. Device Manager detects connected devices and establishes communication with WorkSpace. The following devices can be used with WorkSpace: l DualBoard l Touch Board l Touch Board Plus l MobiView l Mobi Learner tablets l Mobi 501 l Clickers l WorkSpace Connect Device Manager runs in the background of your computer to discover, connect and manage devices.
WorkSpace for PC 31 WORKSPACE MODES A WorkSpace mode is a specific environment in which a set of pre-defined tools and functions is available. The following modes are available in WorkSpace: Lesson Mode Mouse Mode Annotate Over Desktop Mode Multi-User Mode Office Mode Whiteboard Mode Lesson Mode Lesson Mode is the primary operational mode of WorkSpace. In Lesson Mode, participants can view the presentation while you interact with your computer or other projection surface such as DualBoard™.
WorkSpace for PC 32 WorkSpace Tools WorkSpace tools can be used to annotate, add to or edit the pages of the presentation. Other tools are used during the presentation to draw attention to important points and to move between the pages of the presentation. Group Tool Description Annotation tools manipulate text.
WorkSpace for PC 33 Mouse Mode Mouse Mode allows you to select and start applications and perform all the functions you would typically perform with the mouse and keyboard. The Mouse Mode cursor on the toolbar is unavailable while in Mouse Mode. Enabling Mouse Mode The Mouse Mode icon is unavailable until the Blank Page icon, Shapes icon or one of the writing tool icons is selected. 1 Open WorkSpace. 2 Click the Blank Page icon or one of the writing tool icons to annotate over the desktop.
WorkSpace for PC 34 NOTE Zooming, scrolling, selecting items on the desktop and using the Gallery are all unavailable while in Annotate Over Desktop Mode. Annotating Over the Desktop 1 Open WorkSpace. 2 Click the Main Menu icon, mouse over Pages and select Annotate Over Desktop. The desktop becomes an annotation area. TIP Alternatively, click the Annotate Over Desktop icon from the toolbar to annotate the area.
WorkSpace for PC 35 Follow the steps below to allow more than one participant to write on the interactive or virtual whiteboard. 1 Open WorkSpace. 2 Click the Multi-User Menu icon on the Page Functions toolbar. A menu is displayed with the following options: l Multi-User Page Setup l Quick Start 3 Select either Multi-User Page Setup or Quick Start. If Multi-User Page Setup is selected, refer to Setting Up Multi-User Mode. If Quick Start is selected, refer to Setting Up Quick Start.
WorkSpace for PC 36 5 Drag and drop a device to the area needed. NOTE It is recommended to leave one device out to keep control of all users. Ideally, this will be the "presenter" device. 6 Click OK after all devices have been dropped into place. Setting Up Quick Start 1 Connect up to nine devices in Device Manager. IMPORTANT Do NOT add the device that will be used to control the main toolbar or the other devices unless it is set to Presenter within Device Manager.
WorkSpace for PC Icon 37 Name Description Move User Once selected, allows the presenter to move the user to another area within the WorkSpace page User Functions Icon Name Description Select Allows the user to select within the window Eraser Manually removes annotations within the user's window Clear Delete the selected text or objects. If nothing is selected on the page, the Clear tool deletes everything on the page within that user's window.
WorkSpace for PC 38 Exiting Multi-User Mode 1 Click the Multi-User Mode icon on the Properties Bar. 2 Select Turn Multi-User Off. The devices are no longer available for simultaneous input, however the screen with the annotations is still available. Office Mode Office Mode allows you to interact directly with Microsoft Excel, PowerPoint and Word. In Office Mode, you can add annotations directly to a slide, document or spreadsheet.
WorkSpace for PC 39 Whiteboard Mode When Whiteboard Mode is selected, all notes made on the whiteboard can be captured and saved as pages within WorkSpace for distribution, without the use of the projector. The communication in Whiteboard Mode is one-way between the DualBoard and the computer. A projector is not involved and computer input is not communicated back to the Dualboard. A special dry erasable pen is needed. Enabling Whiteboard Mode Whiteboard Mode must be enabled through Device Manager.
WorkSpace for PC 40 USING WORKSPACE This chapter covers the following topics: Using Layers Copying an Object Locking and Unlocking an Object Creating Page Transitions Exporting a Presentation Object or Entity Distributing Files Distributing Files as GWB (PC Only) Distributing Files as IWB Exporting Files Using Layers Use the Layers tool to manage all of the items that make up your WorkSpace page. A layer in WorkSpace is analogous to a clear folder that contains artwork.
WorkSpace for PC 41 Move Layers Up/Down How to use layers... 1 Open a Blank Page within Lesson Mode. 2 Annotate or add an image to the page. 3 Click the Add Layer icon. A new layer is added to the page. The active layer is highlighted in black. 4 Continue to annotate and add layers. Optionally, click the: l Remove Layer icon to remove a layer l Up/Down Arrows to change the layer order 5 Click the Save icon on the WorkSpace toolbar to save the file.
WorkSpace for PC 42 How to unlock an object... 1 Select the locked object. The Object Options toolbar is displayed on the Properties Bar. 2 Click the Unlock icon. Creating Page Transitions Slide transitions are the animation-like effects that occur when you move from one page to the next during an on-screen presentation. You can control the speed of each slide transition effect. There are more than 40 transition options. 1 Open a Blank Page while in Lesson Mode.
WorkSpace for PC 43 Distributing Files as GWB (PC Only) The GWB file format is native to WorkSpace. Files saved with the GWB extension can be easily opened and edited in WorkSpace as needed. 1 Click the Main Menu icon. 2 Mouse over File and select Save. The Save GWB File window is displayed. 3 Name the file and click Save.
WorkSpace for PC THE GALLERY The WorkSpace Gallery tool provides more than 4000 resources to supplement your lesson planning. The Gallery stores images, background pages, teaching tools and Flash content called Interwrite Sims. The WorkSpace Content component must be installed prior to using the Gallery. If you have not installed it, visit www.turningtechnologies.com/responsesystemsupport/downloads. Before using the Gallery for the first time, you will be prompted to build the Gallery.
WorkSpace for PC Searching the Gallery Search for content by file name, keyword, media type or subject. How to search the Gallery by file name... 1 Click the Search box and enter the search criteria. 2 Click the Search icon or press the Enter key. How to perform an advanced search... 1 Click the Advanced Search tab. The Advanced Search tab opens. 2 In the Media Type window, select the type of file(s) from the list. 3 In the Search For field, enter the keyword(s).
WorkSpace for PC 46 How to add files to the Gallery by the drag and drop method... 1 Navigate to or create the category were the file is to be added. 2 Locate the file, link, image, PDF or WorkSpace Lesson and drag it into the Gallery with your mouse or pen. Once the object is saved into the Gallery, a thumbnail of the object is displayed. Building a Database The Build Gallery Database window allows for easy maintaining and building of user-specific gallery databases.
WorkSpace for PC Within the Properties window, the Display Name, Keywords, Background and Image Position can be adjusted. 3 Click OK. Exporting Gallery Files 1 From the Gallery, right-click the object thumbnail. The Gallery Options menu is displayed. 2 Click Export. The Export window is displayed. 3 Browse to the desired save location and click Save. Adding a New Category The Add New Category function allows you to create a new root category and add a sub-category to an existing category.
WorkSpace for PC 48 3 Click Yes to proceed. The file is removed from the Gallery. NOTE The file is removed from the Gallery but remains in the WorkSpace main directory. einstruction.
WorkSpace for PC 49 CONTACT US For additional help, contact Turning Technologies Technical Support. Technical Support is available from 7 a.m. - 9 p.m. EST. From within the contiguous United States, you can reach Technical Support toll-free by calling 866.746.3015. If you are calling from outside of the United States, please call +1 330.746.3015. Technical Support may also be reached via e-mail at support@turningtechnologies.com or support@einstruction.com, a brand of Turning Technologies.