EzUHF JR Module Manual Supplement January 2014 ImmersionRC | EzUHF JR Module Manual Supplement 1
Introduction Congratulations on your purchase of an ImmersionRC EzUHF ‘JR’ module transmitter. This manual is a supplement to the general EzUHF Control System, Overview & Operating Instructions manual, which may be downloaded from the ImmersionRC Website, and gives more general information on the EzUHF system. This module-based transmitter has a similar feature set to the standard 500mW EzUHF Transmitter, but with a more convenient form-factor, and much simpler cabling.
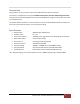
Compatibility The EzUHF JR module is ‘plug and play’ compatible with the following radios: Manufacturer FrSky Model/Notes Taranis Turnigy 9xR Photo The following radios can be made compatible after a simple modification procedure Turnigy 9X Plastic part in the module bay needs removing in order to support the EzUHF JR module ImmersionRC | EzUHF JR Module Manual Supplement 3
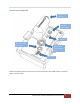
Connectors & Controls SMA Antenna Connector High/Low Power Switch Bind Button Aux Input (future expansion) Head Tracker Input & Goggle Power Micro-USB Details of the Head Tracker connector pin-out may be found in the main EzUHF manual, mentioned earlier in this document.
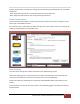
Firmware Upgrade As with all EzUHF equipment, it is important that compatible firmware is installed on both the transmitter, and the receiver. The EzUHF JR module requires, at minimum, firmware version v1.48b. Receivers should be upgraded to v1.48, freely downloaded from the ImmersionRC.com website. Note: A small batch of transmitter modules shipped with v1.48a, these should be upgraded to v1.48b before use. To upgrade the firmware on the JR module, follow the below procedure: 1. 2. 3. 4. 5. 6. 7.
Typically, the band does not need to be changed from its default setting. Examples of when it should be changed are: - When flying with other LRS users, to avoid the frequency band used by them - When flying in RF-polluted areas, with strong interfering transmitters Remote Power Switch The Remote Power Switch allows a channel from the R/C transmitter to be used to change the output power level of the EzUHF transmitter.
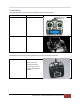
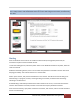
Note that the FatShark ‘Trinity’ head tracker is highly recommended for use with the EzUHF system. This is really a best-in-class headtracker which uses sensors with 9 degrees of freedom, and absolutely zero drift. Binding Once the firmware revisions of the Tx and Rx have been verified, and upgrades performed, the transmitter may be bound to an EzUHF receiver. To start the binding process, switch the power switch on the EzUHF JR module to Low power, while the radio is turned off.
Tip: We often get asked why the LED ‘breathes’ like this. Basically, an LED which fades on and off by varying the duty cycle is a better indicator of reception quality than a simple on/off LED. While range testing for example, signal quality can be estimated by looking at ‘stuttering’ in the LED’s fading. Error/Beep Codes When the EzUHF JR module detects a problem, it will beep in a sequence of long, and short beeps, which will indicate what is wrong. _.