
User Manual
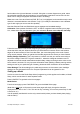
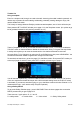
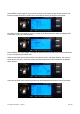
Turn on your model. You should already have set it mechanically to give plenty of control, but here
you can dial down the response. Adjust the weight value until you are happy that the high rate
travel is suitable. Let’s suppose you choose 90%.
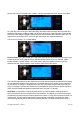
Now move down to highlight the DrSw1 value. You can choose any physical switch here by using
the LEFT/RIGHT keys. Note that moving to the right of “---” gives you the normal switch setup,
represented by, say, ELE, while moving to the left of “---” gives the logical opposite, represented by
!ELE (read as “not ELE”). Here we chose plain ELE for both switch settings, both DrSw1 and
DrSw2.
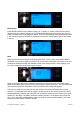
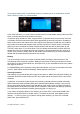
You can also choose a switch by simply using it. Move it to the required position and it will show on
the screen in that position.
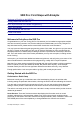
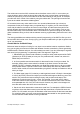
Now flip the switch and note that the rate shifts between Hi and Low.
You already have Hi rate set to 30% expo and 90% weight. Flip the switch to Low and set, say
40% expo and 60% weight (as shown above). This will give smoother control with the ELE.D/R
switch in the down position.
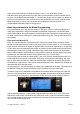
Set up the rudder and aileron in a similar way, using what you think to be reasonable values. You
can control all of them with the ELE switch, or use a separate switch for each.
Now you are ready to fly with expo and dual rates available. Try out the settings in the air. Adjust
until you feel comfortable with the response. One guideline is that for mild control in low rate the
model should take a couple of seconds for one complete roll, while full up elevator should give a
large loop. Make sure you have enough elevator travel on low rate to flare for landing at slow
speed.
If the model is twitchy, you can increase the expo value for softer control around neutral. Be careful
if using expo above about 40%, as it can result in unexpectedly large movements at the ends.
Mixes
We’ve seen that even the most basic model programming is built around mixes that define the way
in which each of the primary controls links the movement of a stick to the response of a servo. Now
it’s time to think about other kinds of mix that bring together two controls.
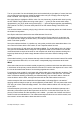
For example, some models fly much better with a little rudder in the same direction as aileron. This
usually applies to relatively long wingspan models, such as gliders or the Piper Cub. The rudder
action counteracts skidding produced by the differential drag of up and down aileron. When we
move the aileron stick to bank, we might want the radio to add a little rudder into the turn.
Another example. With some models like the Spacewalker, knife-edge flight is a lot easier if
applying rudder to keep the nose up is accompanied by a little aileron. This can prevent the model
from trying to roll out of the knife-edge position. The correct rudder-to-aileron mix can help you a
lot as a pilot.
In these examples you have a primary control which brings about the desired movement and a
secondary control that improves the response to the first one. In the case of the Piper Cub, the
primary control is aileron and the secondary one is rudder – you need a lot of aileron and a bit of
rudder to make a coordinated turn. The rudder alone responds when its own stick is moved, but it
also moves in unison with aileron when that stick is moved.
First Steps with Ersky9X – Version 1 8 of 13