
User Manual
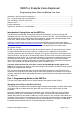
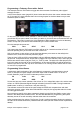


Now for a little more detail. There are many Mac voices and the default (Alex) is probably not what
you want, as people prefer female voices. Go to System Preferences and open the Speech
Preferences.
Depending on the age of your Mac the number and quality of voices will vary. My iMac with OS
10.8 has six voices total all of good quality. You can also download 20 or so voices specifically for
different languages, such as Italian. I used the Australian English voice 'Karen' which is a fairly
close match to available voice files. In recent OSs the voice can be found under 'custom' in the list
of voices.
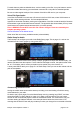
Your shortcuts may be different depending on the age of your Mac. Look in System Preferences -
Keyboard Shortcuts - Services . Here you can tick the box for 'Add to iTunes as a Spoken Track'
and define your own shortcut. This command line will then appear in your ctrl + click menu.
Option 3: Using a Voice from the Web on your PC
To create voice files using a Windows PC you will first need a text-to-speech application. Here’s
one which has been found to be good:
http://www.acapela-group.com/text-to-speech-interactive-demo.html
You will also need a user friendly audio editor. Audacity is recommended. It is free and is more
than adequate. Search for ‘Audacity audio editor' and download the appropriate version for your
computer. It supports drag and drop to open files.
Open your text to speech application. Type the text you wish to have spoken, press “Listen!” and
record the output as a file on your desktop.
Open the file in your audio editor. Set the project rate to 16000 Hz and Convert and Export the file
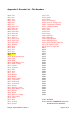
as a 'WAV (Microsoft) signed 16 bit PCM'. Rename the file with a four digit number corresponding
to a number on the list in Appendix A. Select one which is vacant and not one reserved for the
system (unless you intend to replace a system file).
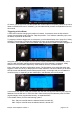
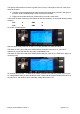
Here’s what the Audacity main screen looks like:
The large blank field in the middle is where you drag and drop the spoken text. The box in the
bottom left corner is where you set the project frequency rate to 16,000Hz for Ersky9x (and Er9x).
The volume of the spoken text is adjusted by the slider in the box to the immediate left of the
waveform. Just above this box is another with a green arrowhead. Click on this to play the
individual track. The slider to the right sets the playback speed. If you want to join two tracks
together load both into the field in the middle.
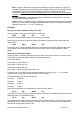
Using the tool which looks like a double headed arrow (available from the box in the middle of the
top row of symbols) move one track so that it is aligned at the end of the other. You will now have
one track following another. In the drop down menu 'Tracks' click on 'Mix and Render' Audacity will
make one continuous track from the two (or more).
In the drop down menu 'File', click on 'Export' and select 'WAV (Microsoft) signed 16 bit PCM' as
the file format (delete as many of the fields as you wish – they add information that is useless for
our purposes) and export. Rename the file and add it to your 'Voice' folder. When you have your
new folder complete upload it to your SD card.
Creating many audio files
Audacity has a command 'analyze>sound' finder. It will split a .wav into multiple files, then when
you're happy with the split (you can adjust the label track), you can select "export multiple" from file
drop down menu."
Use of that feature in Audacity saves hours of time, allows automatic cropping of the quiet periods
both before and after the sound and makes multiple exports in the correct sequence. You type up
all the sounds you want to record in one long list, highlight the lot, generate one long audio file,
drag and drop this voice file into the Audacity new file window, set the project rate at 16000 Hz,
select "analyze sound" from the "Analyze" drop down menu, set the before and after quiet periods
to 0 seconds, and then hit "export multiple".
Ersky9x Voice Explained: Version 1 page 8 of 12