
User Manual


Using the Eepskye Program – Version 1 12
Along the top is a row of 13 tabs, one for each page of the model setup. If you turn on your
radio and long press the right navigation key once, select a model and then press once more
right, these are essentially the same 13 pages you will see on your radio.
Using these pages on your computer is just like programming directly on the transmitter, except
that you have the advantage of a keyboard, mouse and big screen. You will find that it’s much
easier to do some things, such as setting expo and dual rate, or adjusting curves, this way.
To understand them and to know how to fill in all the fields please refer to the manuals First
Steps with Ersky9x and Ersky9x Explained. You can create a model here on your computer and
then upload it to the transmitter, just as you can create a model on your transmitter and then
download it to here.
Note that the Templates in Eepskye work just like those in Ersky9x except that here you double
click on the required template. If you choose something like V-Tail or Elevon/Delta you will get a
warning that you are about overwrite existing mixes.
When you have created the model, you can test it out by clicking on Simulate at the bottom of
the editing screen. See “Simulating a Model” later in this manual.
Finally, save the file. Now decide if you want to upload the file to the transmitter, thereby
overwriting the models and general settings in the EEPROM. Let’s suppose you want to work on
Editing a Model
If instead of double clicking on a blank model slot you choose an existing model, then you will
see the various pages of the editing screen populated with the parameters that describe the
model – the mixes, expo and D/R settings, limits, curves, etc.
Suppose we have already created a basic model created by using the Simple Four-Channel
template. The T-Cut Template has also been installed (giving an extra mix on Channel 1).
From this simple starting point we can proceed to edit and embellish with additional mixes to do
jobs such as provide a retract gear switch on Channel 5, or a mix from aileron (Channel 2) to
rudder (Channel 4) to help coordinate the turns.
Other aspects of the model can also be edited, such as the expo and dual rate settings, servo
travel limits and reversing, timer settings, etc. For an introduction to the possibilities of
programming, see the manual First Steps with Ersky9x. For more detail, see Ersky9x
Explained.
When editing is finished and the results have been tested in the Simulator (click the bar at the
bottom of the page), it’s time to save the file (File>Save or File>SaveAs). Then the file can be
uploaded to the transmitter (Burn>Write EEPROM memory from file).
Note that everything we can do to edit the model in Eepskye can also be done in the transmitter.
The advantage of doing it here is convenience and the ability to save the file to the computer.
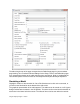
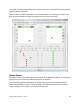
Below is an example of what you might see if you went to the Mixer screen for a model called
Pirate in the Model 13 memory slot.