
Installation Guide
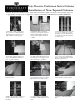


13) Screw or nail column to
blocking ONLY ON THE BOT-
TOM. Do not attach at center or
top (to allow for expansion).
14) Apply adhesive to mitered
edges of base moulding (9¼” tall)
and assemble around bottom of
column shaft.
15) Fasten joints on base with screws
or nails.
16) The TOP of the shaft should
NOT be fastened to the blocking,
and there should be at least ¼” gap
to allow expansion (see step 4).
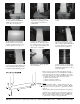
17) There are TWO methods of
attaching the cap. First, apply adhe-
sive to mitered edges of cap mould-
ing (7¼” tall) and assemble around
shaft. Screw or nail joints.
18) Option 1: Attach cap to soffit
with construction adhesive and toe-
nail to soffit. DO NOT ATTACH cap
to column shaft if the cap is flush
with soffit (to allow expansion).*
19) Option 2: Leave ¼” expansion
room above cap, and pin-nail the cap
to the column. Be sure the pin-nails
DO NOT reach the blocking inside!*
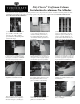
20) Caulk edges of base, cap, and
nail or screw holes.
21) Clean surface of column with
cleaner recommended by the paint
manufacturer. Paint with 2 coats of
acrylic latex paint.
Please note the correct assembly of the E-Z Lock joint
shown at the left. The screws or nails MUST be installed
only in the edges shown (3 and 4). Installing on the other
edges may result in open seams. (Pre-drill if using screws.)
1) Glue both joint edges; slide first joint together
2) Push second joint closed
3) Nail or screw this joint first
4) Nail or screw this joint second
Notes:
Panels are marked “TOP” — trim from the bottom only.
Cap and base pieces are also marked as “CAP or “BASE”
Only use non-corrosive fasteners — galvanized, stainless
steel, etc.
Always follow glue and paint manufacturer’s instructions.
*Column must not be allowed to collect water, debris, etc.
If the top of the column extends beyond the soffit/beam,
the cap must be flashed with lead, copper, aluminum, etc.
to prevent entry of water or foreign materials.
PHONE (541) 826-2911 * FAX (541) 826-1393 * POST OFFICE BOX 2429 * WHITE CITY, OR 97503