
Operation Manual


20
21
20
DE
FR
DE
IT
GB
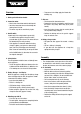
Overview
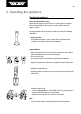
1. Driving unit with rubber handle
2. Immersion mixer
– Attach mixer from below onto the driving unit.
– Insert the immersion mixer on the driving unit
turning it until it clicks.
– The mixer may not be used directly in pots.
3. On/off switch
It works only if the safety button is pressed (4).
– To switch on the appliance keep the switch
pressed down (if you release it, the mixer will turn
off automatically for safety reasons).
–
If the appliance is turned on when the battery
charger is down, a safety device automatically
turns it off. The LED display starts flashing (5).
After it turns off automatically, do not press down
on the On/Off button (3), otherwise the accumula-
tor might be damaged.
4. Safety button
The safety button avoids that one accidentally turns
on the appliance.
– To turn the appliance ON, press down on the safe-
ty button and the On/Off switch (3). While the mix-
er is working one can release the safety button.
5. Battery Charger - Led Display
While the appliance is being used, the battery charge
status is displayed by the LED (the appliance is not
connected to the battery charger):
– press the safety button (4.)
–
LED is lit = Battery full
–
LED flashes slowly = Battery half fulll
–
LED flashes quickly = Battery almost empty
–
Before using the appliance for the first time, fully
charge the base unit (approx. 2 hours).
6. Blending cup with lid
– Place the cup on a flat surface.
– To avoid spurts, immerge mixer completely before
pressing down on the ON button.
– For better results blend small portions.
– To preserve in the fridge apply the lid onto the
blending cup.
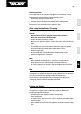
7. After use
– First draw out the immersion mixer.
– Remove the mixer for cleaning (be careful because
the blade is very sharp; hold it only by its plastic
handle).
–
Insert the battery charger into the socket (do not
use any other battery charger!).
–
Position the driving unit on the special support.
Keep all contacts clean.
8. Battery charge status:
– LED goes out after approx. 10 seconds. = battery
full.
–
LED on = battery is charging.
–
If you don’t use the appliance for a long time,
unplug the battery charger.
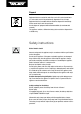
Assembly
– The charging station can be placed on a flat surface
or mounted on a wall with the screws contained in
the box (not, however, over sinks, stoves or plugs).
9.-12. Assembly
– Unpack screws and screw anchors.
– Mark the holes on the wall (extract by pulling
down the assembly plate from the charging station
and use it like a template). Do not assemble over
kitchen sinks, stoves or current sockets.
– Drill creating two holes (6 mm in diameter).
– Insert screw anchors and fix the plate with the
screws ( with pins in the upward position).
– Insert the charging station from above (it clicks).
– Insert the battery charger into the socket (the
remaining cord can be wound around the two pins
of the assembly plate).
– Position the driving unit onto the special support
on the left.