
Manual

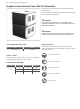
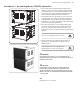
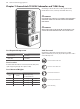
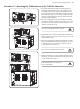

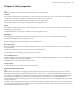
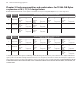

Table Of Contents
- Important Safety Instructions
- Legal Disclaimer
- Limited warranty
- Chapter 1: Safety Information
- Chapter 2: Introduction
- Chapter 3: Assembling a TLX84 Array on a TLX84-FLB Flybar
- Chapter 4: Assembling TLX215L Subwoofers on a TLX84-FLB Flybar
- Chapter 5: Assembling a TLX84 Array with a TLX215L Subwoofer
- Chapter 6: Groundstack of two TLX215L Subwoofers
- Chapter 7: Groundstack TLX215L Subwoofer and TLX84 Array
- Chapter 8: Safety Inspection
- Chapter 9: Enclosure quantities and combinations for TLX84-FLB flybar suspension at 10:1, 7:1, 5:1 design factors
- Manufacturer’s Declaration

TLX84 and TLX215L Rigging Manual 35
1. Prepare all the TLX84 cabinets, by pulling out the front rigging pins (1),
and sliding the front mount links (3) down. Secure the links in the lower
position with the pins (1). Remove the rear pin (4) and then the rear drop-
down link (5) will drop down. Check that the drop down link (5) and its pivot
pin and circlip and are all present, clean, and in good condition. Check that
the circlip is correctly holding the pivot pin in place, and preventing it and
the drop-down link from falling out.
2. Remove the front rigging pins (7) from the lower subwoofer. Carefully lift
the TLX84 cabinet until its drop-down links (3) t into the top slots (6) in the
lower subwoofer. Insert the front pins (7) of the lower subwoofer to secure
the links (3) in the subwoofer slots (6).
Take care not to trap your ngers between components.
3. Align the TLX84 cabinet's rear drop-down link (5) with the forward hole (8)
in the lower subwoofer's rear top bracket. Insert the rear pin (4) to secure the
TLX84 and TLX215L together.
4. Remove the front rigging pins (10) from the lower TLX84 cabinet. Carefully
lift the next TLX84 cabinet until its drop-down links (3) t into the top slots
(9) in the lower cabinet. Insert the front pins (10) of the lower cabinet to
secure the links (3) in the cabinet slots (9).
Take care not to trap your ngers between components.
5. Align the top TLX84 cabinet's rear drop-down link (5) with the desired rear
hole (11) in the lower cabinet's rear drop link channel. Insert the rear pin (4)
to secure the TLX84 cabinets together.
Double check that all pins are correctly inserted,
before proceeding further.
7
3
6
5
4
8
10
3
9
5
4
11
3
2
4
1
3
5
Procedure 7.1 - Attaching the TLX84 cabinets to the TLX215L Subwoofer