
Manual
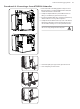
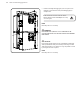
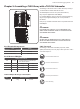
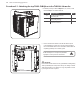
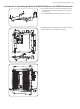
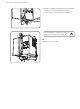
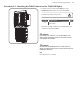
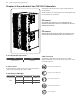
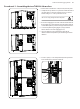
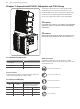
Table Of Contents
- Important Safety Instructions
- Legal Disclaimer
- Limited warranty
- Chapter 1: Safety Information
- Chapter 2: Introduction
- Chapter 3: Assembling a TLX43 Array on a TLX43-FLB Flybar
- Chapter 4: Assembling one TLX212L Subwoofer on a TLX43-FLB Flybar
- Chapter 5: Assembling a TLX43 Array with a TLX212L Subwoofer
- Chapter 6: Groundstack of two TLX212L Subwoofers
- Chapter 7: Groundstack TLX212L Subwoofer and TLX43 Array
- Chapter 8: Safety Inspection
- Chapter 9: Enclosure Quantities and Combinations for TLX43-FLB Flybar Suspension at 10:1, 7:1, 5:1 Design Factors
- Manufacturer’s Declaration

34 TLX43 and TLX212L Rigging Manual
Procedure 5.1 - Attaching the top TLX43-FLB ybar to the TLX212L Subwoofer
1. Perform the previous procedures in Chapter 4: 4.1, 4.2, and 4.3, to attach
the TLX43-FLB ybar to the TLX212L subwoofer.
Procedure Description of Work Check
4.1
Installing the TLX212L Subwoofer
Top Mounting Links
4.2
Preparing the TLX43-FLB Flybar
for suspending a TLX212L
4.3
Attaching the TLX43-FLB Flybar
to the TLX212L Subwoofer
2. Lower the bottom front mount links on the TLX212L subwoofer (3) and
secure with rigging pins on both sides. Lower the rear drop-down link at
the rear of the TLX212L subwoofer. This is done with the TLX212L subwoofer
suspended approximately 1 metre from the ground.
Double check all pins are correctly inserted, and that the
upper ybar is securely attached to the subwoofer.
CAUTION
Do not lower the TLX212L subwoofer onto the ground with the mounting links (3)
and drop-down link (4) in the down position. This may cause damage to the links
and the drop-down link, or cause damage to the stage. They should be retracted
by reversing the order of the steps above.
3
4