
Manual
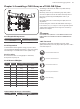
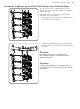
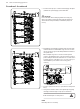
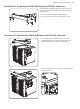
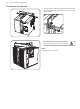
Table Of Contents
- Important Safety Instructions
- Legal Disclaimer
- Limited warranty
- Chapter 1: Safety Information
- Chapter 2: Introduction
- Chapter 3: Assembling a TLX43 Array on a TLX43-FLB Flybar
- Chapter 4: Assembling one TLX212L Subwoofer on a TLX43-FLB Flybar
- Chapter 5: Assembling a TLX43 Array with a TLX212L Subwoofer
- Chapter 6: Groundstack of two TLX212L Subwoofers
- Chapter 7: Groundstack TLX212L Subwoofer and TLX43 Array
- Chapter 8: Safety Inspection
- Chapter 9: Enclosure Quantities and Combinations for TLX43-FLB Flybar Suspension at 10:1, 7:1, 5:1 Design Factors
- Manufacturer’s Declaration

26 TLX43 and TLX212L Rigging Manual
Procedure 3.2 continued
3. Insert the front two pins (3) to secure the front mounting lugs of the ybar
(8) with the two top mounting lugs (4) of the TLX43 cabinet.
CAUTION:
Do not let the TLX43 cabinet assembly hang from the two front lugs only.
This may cause damage to the front lugs. Always support the weight of the
cabinets until the rear drop-down link (9) is secured with its pin (6) in the
next step.
4. Align the ybar's drop-down link (9) with the desired hole (5) in the TLX43
rear bracket. The holes are marked with the angle. Choose the correct hole
that corresponds to the angle recommended by EASE FOCUS II software for
the top TLX43 cabinet.
No te: normally the 0 degree hole is selected to attach the top TLX43
enclosure to the TLX43-FLB in order to set the site angle of the top element
parallel to the ybar. This allows the TLX43-FLB to serve as a visual reference
for checking array focus on the audience area, i.e., if you can see the top of
the TLX43-FLB then you are outside the vertical coverage pattern
of the array.
5. Insert the rear pin (6) into the hole (5) to capture the hole in the drop-down
link (9).
6. The angles of the lower three cabinets can be adjusted by rst supporting
their weight, and then moving the rear pins (6) to the desired holes.
Double check that all pins are correctly inserted.
NOTE
Disassembly is the reverse of assembly.
3