TM Owner’s Manual for the turbochef high h conveyor 2020 and 2620 ovens © 2008-2012 TurboChef Technologies, Inc.
For further information, call 800.90TURBO or +1 214.379.
The information contained in this manual is important for the proper installation, use, maintenance, and repair of this oven. Follow these procedures and instructions to help ensure satisfactory baking results and years of trouble-free service. Errors – descriptive, typographic, or pictorial – are subject to correction. Specifications are subject to change without notice. Please carefully read this manual and retain it for future reference.
Table of Contents Safety Information Important Safety Information - Please Read First General Safety Information Reducing Fire Risk Preventing Oven Damage Grounding Instructions Power Cord Replacement i i ii ii ii ii Specifications and Installation HhC 2020 Dimensions HhC 2020 Electrical Specifications HhC 2620 Dimensions HhC 2620 Electrical Specifications Packaging Certifications Construction Installation Instructions Delivery and Initial Inspection Lifting the Oven Oven Location and Placement Installati
Oven Modes Config Mode Smart Card Screen (Loading a Menu) Accessing the Fault Count Screen Accessing the Setup Mode 14 14 14 14 Setup Mode Changing the Display Temperature Changing the Belt Direction Edit Options Screen Changing the Speaker Volume Info Screen Updating the Firmware 14 15 15 15 15 16 16 Troubleshooting 17 Replaceable Parts 19 North America Limited Warranty 20 International Limited Warranty 23
i Important Safety Information – Please Read First Improper installation, adjustment, alteration, service, or maintenance of this equipment can cause property damage, injury, or death. Thoroughly read the installation, operating, and maintenance instructions before installing or servicing this equipment.
ii Safety Information Reducing Fire Risk If materials inside the oven ignite or if smoke is observed, 1. Turn off the oven. 2. Disconnect the power cord or shut off power at the fuse/circuit breaker panel. Carefully attend the oven if paper, plastic, or other combustible materials are placed inside the oven to facilitate cooking. DO NOT leave items in the cook cavity when the oven is not in use. DO NOT cook items wrapped in cling wrap or plastic film. DO NOT overcook food.
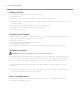
1 8.5” (216 mm) 35.7” (907 mm) 13.0” (330 mm) 48.3” (1227 mm) 8.5” (216 mm) 13.0” (330 mm) HhC 2020 Dimensions 30.0” (762 mm) 35.7” (907 mm) 13.0” (330 mm) 4.0” (102 mm) Figure 1: HhC 2020 Oven Dimensions - Side 48.3” (1227 mm) Exterior 13.0” (330 mm) 17.0” (432 mm) 30.0” (762 mm) 60.1” (1527 mm) with extensions 13.0” (330 mm) 17.0” (432 mm) 3.0” 0 mm) 43.0” (1092 mm) Height --with legs 13.0” (330 mm) 17.0” (432 mm) Width 48.3” (1227 mm) Depth 35.7” (907 mm) 13.
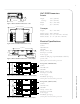
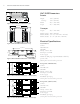
2 Specification and Installation HhC 2620 Dimensions Exterior 17.0” (432 mm) 8.5” (216 mm) 4.0” (102 mm) 24.0” (610 mm) 41.7” (1059 mm) 6.0” (152 mm) 4.0” (112 mm) Figure 6: HhC 2620 Oven Dimensions - Side 48.3” (1227 mm) Height --with legs 13.0” (330 mm) 17.0” (432 mm) Width 48.3” (1227 mm) Depth 41.7” (1059 mm) Conveyor Length Width (Single) 20.0” (508 mm) Width (50/50) 9.5” / 9.5” (241 mm / 241 mm) Width (70/30) 15” / 4” (381 mm / 102 mm) 41.
3 Packaging All ovens are packaged in a double-wall corrugated box with integrated wooden skids. All international ovens shipped via Air or Less than Container Loads are packaged in wooden crates. Certifications Construction - 430 stainless steel front, top, sides, and back Cool to touch covers and panels Stainless steel interior 20-inch-wide cook chamber Installation Instructions The oven is designed and certified for safe operation when installed in accordance with local and/or national codes.
4 Specification and Installation Proper placement of the oven will enhance long-term operator convenience and satisfactory performance. Be sure to place the oven in an area accessible for proper operation and servicing. The surface on which the oven is placed must be at least 30” (762 mm) deep and capable of supporting 200 lb. (90.7 kg) for the HhC 2020 and 265 lb. (118 kg) for the HhC 2620 (weights are per oven).
5 Daily Cleaning Instructions = Wash, rinse, sanitize. (Use only TurboChef approved cleaner, part number 103180). = Completely dry with clean towel. WARNING: Always disconnect power before cleaning or servicing oven. WARNING: DO NOT attempt to clean the oven until it has cooled (screen reads “Oven Off”). WARNING: DO NOT use a water jet when cleaning the oven.
Cleaning Weekly Cleaning Instructions = Wash, rinse, sanitize. (Use only TurboChef-approved cleaner, part number 103180). = Completely dry with clean towel. WARNING: Always disconnect power before cleaning or servicing oven. WARNING: DO NOT attempt to clean the oven until it has cooled (screen reads “Oven Off”). WARNING: DO NOT use a water jet when cleaning the oven. Step 1: Turn the Oven Off 1.
7 Step 4: Clean Oven Components Step 3: Remove Inner Oven Components 1. 1. 2 1 2. 2. 1 2 1 3. 3. 4. 4. Replace filters if damaged or torn. 2 1 5. 1 5. 6. 7.
8 Cleaning Step 5: Replace Oven Components 9. 1. 2. 2 2 1 Step 6: Verify Chain Tension 3. See detail below. A B 4. Acceptable - Chain (A) is tight and easily clears crumb tray holder (B) 2 1 A B 5. Call service to have link removed - Chain (A) is loose and risks contact with crumb tray holder (B) Step 7: Ready the Oven for Use 6. 7. 8. Latch 1. 2.
9 2 2 High h Conveyor by TurboChef TM BACK OFF IDLE GE ER Y NC EM 3 S 4 5 6 TOP 1 Figure 12: Oven Controls Oven Controls Oven Controls Figure 12. Figure 19 1. Display 4. Back/Off Key The display shows current oven operation and/or user programming information. Depending on the mode the oven is in, the back/ off key will return the oven to the previous screen or turn the oven off (page 10). 2.
10 Standard Oven Operation 1 4 PROFILE 1 6 PROFILE 1 PROFILE 3 OVEN OFF BELT F 5:00 PROFILE 2 PROFILE 4 PROFILE 1 5:00 3:20 PROFILE 3 2:00 4:00 2 SOAKING TIME LEFT = 5:00 BELT R 3:20 BTM AIR 100 % PROFILE 1 TOP AIR 80 % 2:00 3:00 PROFILE 2 2:30 2:45 PROFILE 4 PROFILE 3 COOLING DOWN SET 475F 5 BELT SPEED PROFILE 1 TOP AIR 80 % OVEN TCC = 425F PROFILE 2 PROFILE 4 7 BELT F 5:00 COOKING BELT R 3:20 PROFILE 1 SET 475F BELT F 5:00 BTM AIR 100 % BELT R 3:20 TOP AIR 30% OVEN I
11 Mode 3: Warming Mode 6: Cooling Down Mode during which the oven warms to the preset cooking temperature defined by the cooking profile that was selected. Mode during which the burner assembly shuts off to allow the oven to cool. Happens When... - A selection is made from mode 2, and the oven’s temperature at the beginning of warmup was not within (less than) 25°F (14°C) of the oven’s set temperature. Goes To...
12 Standard Oven Operation Editing a Cooking Profile Changing a Cooking Profile Name To edit a cooking profile, the oven must be in the cooking mode and the full edit or flex option must be enabled for each option to be edited. For more information on selecting between full edit, rigid, and flex options for each editable setting, see Edit Options Screen on page 15. 1. From the cooking screen (Figure 14), press L1 to access the name change screen (Figure 15).
13 Adjusting the Belt Speed Adjusting the Top and Bottom Air The oven can accommodate either one or two conveyor belts. The oven will automatically detect the number of conveyor belts installed and display the option to change the speed of each conveyor belt independently. 1. Press R1 (Figure 14, page 12) to access the top air controls, or R3 to access the bottom air controls. 1.
14 Oven Modes Config Mode Accessing the Fault Count Screen The config mode (Figure 16) serves four main purposes: 1. To access the smart card screen. 2. To access the fault count screen. 3. To access the setup mode. 4. To access the test mode (service use only). From the config mode (Figure 16), press R1 to access the fault counts screen (Figure 20, page 15). The oven will display the number of faults that have occurred. To access the config mode, press the up key from the oven off mode.
15 FAULT L1 F1: F2: F3: F4: F5: L2 L3 COUNTS 0 0 0 0 0 F6: F7: F8: F9: F10: R1 0 0 0 0 0 R2 R3 Figure 20: Fault Counts Screen L1 DEGS F L2 BELT L-R L3 EDIT/RIGID/FLEX 1 L2 2 L3 3 SETUP MENU ENGLISH R1 VOL 3 R2 INFO R3 ENTER PASSWORD 4 R1 <6633> 5 R2 6 R3 Figure 22: Password Screen L1 L3 TEMP: FLEX EDIT MODES SELECT L2 INFO L3 Figure 24: Info Screen The edit options screen (Figure 23) allows the user to switch between full edit, rigid, and flex options for profil
16 Oven Modes Info Screen The info screen (Figure 24, page 15) is used to display the following information in an easy to access place: - Serial number - Electrical compartment temperature - Voltage - Total time the oven has been on - Total time the oven has been idle - Firmware version To access the info screen, press R3 within the setup mode (Figure 21). Updating the Firmware From the oven off screen, 1.
17 Troubleshooting The following is a list of fault codes and error messages, along with the possible problem(s) that the oven may experience. Please attempt the recommended action before calling Customer Support (800.90TURBO, +1 214.379.6000) or your Authorized Distributor. If any fault or error message occurs that is not listed below, contact Customer Support (800.90TURBO, +1 214.379.6000). WARNING: Food and oven cavity are hot! Use extreme caution when troubleshooting the issues below.
18 Troubleshooting Issue F2: Low Temp During Cook Possible Cause(s) Resolution - Oven power interrupted. - Verify wall circuit breaker is on. Reset breaker and then power oven back on. - Excessive load. - Reduce load. - Oven is not clean. - Clean the oven following the weekly cleaning instructions on pages 6-8. - Oven not fully warmed up. - Press the back/off key until oven returns to the oven off mode. Re-select the cooking profile and allow oven to reheat. - Defective heater.
19 Replaceable Parts The following is a list of parts that may need replacing during the life of the oven. For more information, please contact TurboChef. (Within North America, call 800.90turbo. Outside North America, call +1 214.379.6000 or your authorized distributor.
20 North America Limited Warranty North America Limited Warranty The Limited Warranty outlined below for the TurboChef conveyor oven (model HhC 2020 or HhC 2620) is activated upon shipment of your oven. Should you require additional assistance after reviewing the warranty outlined below, please call TurboChef Customer Service at 800.90TURBO. Limited Warranty TurboChef Technologies, Inc.
21 Modifications and Repair: Equipment that has been modified or altered by persons other than TurboChef or its service agents, or Equipment that has had non-approved devices or connection items attached thereto, is excluded from coverage under this warranty. Repair of the Equipment by anyone other than TurboChef or its authorized service agents will void all warranties on the Equipment.
22 North America Limited Warranty pay such invoice based on terms of net 10 days. Customer also agrees to pay any cost incurred by TurboChef or its service agent associated with a service agent responding to a call for service, but then being refused or unable to gain access to the Oven on Customer’s premises. Failure to submit payment may, at TurboChef ’s discretion, result in TurboChef voiding the balance of the warranty.
23 International Limited Warranty This Limited Warranty shall apply to the sales of all TurboChef HhC 2020 or HhC 2620 Conveyor ovens (the “Equipment”) manufactured by TurboChef Technologies, Inc. (“TurboChef ”), and sold to purchasers outside of the United States, Canada, and Puerto Rico by an Authorized Distributor of TurboChef International (the “Authorized Distributor”).
24 International Limited Warranty Warranty Service During the Warranty Period, any materially defective Equipment will be repaired or replaced free of charge at TurboChef ’s option provided that: 1. You notify the Authorized Distributor from whom You purchased the Equipment and/or TurboChef as soon as reasonably possible after discovery of a defect and in accordance with the warranty claims procedure set out below; 2.
25 The claim must include the serial number of the Equipment and be received by TurboChef on or before the last day of the Warranty Period. Upon receipt of Your claim, TurboChef will promptly notify an Authorized Distributor or an authorized service agent to contact You, to verify Your claim and, if necessary, to arrange for an on-site repair visit during normal working hours.
26 International Limited Warranty Governing Law, Entire, Agreement: This Limited Warranty shall be governed by and construed according to English law. The application of the United Nations Convention on International Sale of Goods to this Limited Warranty is expressly excluded.
27 International Limited Warranty
For service or information: wi thin no r th a me r ica ca l l Customer Support at 1-800-90turbo or outsi d e no r th a me r ica ca l l +1 214-379-6000 or Your Authorized Distributor TM Part Number: HCT-4201 / Rev. K / November 2012 Country Code: NA/EU Global Operations Customer Support: 4240 International Pkwy, Suite 105 Carrollton, Texas 75007 usa +1 214-379-6000 phone +1 214-379-6073 fa x 1-800-90turbo +1 214-379-6000 tur boch ef.