TM Owner’s Manual for the turbochef tornado ® and tornado 2 TM rapid cook ovens
m od e l se r i a l n u m b e r i n sta l l e d b y i n sta l l a ti on c h e c k e d b y s e r v i c e c e n te r n a m e / n u m b e r For service or information: wi thin no r th a me r ica ca l l Customer Service at 800.90turbo or Sales & Marketing at 866.
IMPORTANT safety information - please read first warning: Improper installation, adjustment, alteration, service or maintenance can cause property damage, injury or death. Read the installation, operating and maintenance instructions thoroughly before installing or servicing this equipment. This product employs an exposed radiant heating element on the bottom of the cavity. This element is hot during operation and will remain at dangerous temperatures after the unit is switched off.
Table of Contents Important Safety Instructions To Reduce the Risk of Fire in the Oven Cavity Precautions to Avoid Possible Exposure to Excessive Microwave Energy Grounding Instructions Power Supply Cord Replacement RF Interference Considerations Overview of the Tornado Specs and Dimensions Dimensions Construction Standard Features Accessories Certifications Packaging Electrical Specifications i ii ii ii iii iii TM How the Technology Works The Technology Behind the Tornado Asse
Operating the Tornado The Control Pad Powering Up the Oven Initial Power-Up Power-Up Voltage Sensing Cooking Instructions Turning the Oven Off Editing a Food Item Changing the Edit Pin Number Editing a Food Item Changing the Idle IR Set Temperature Enabling/Disabling the Edit Mode Cooking Options - Time, Done, and Snooze The “Enter Cook Time” Screen The “Done” Screen The “Snooze” Mode 13 14 14 15 16 17 18 18 18 Recipe Development and Cooking Tips Developing Recipes Development M
I ntro d u ction i IMPORTANT SAFETY INSTRUCTIONS WARNING: When operating this oven, strictly adhere to the following safety precautions to reduce the risk of burns, electric shock, fire, injury, damage to oven or property near oven, or possible exposure to excessive microwave energy. General Safety Information a Read all instructions before using this appliance. a Read and follow the specific “Precautions to be Observed to Avoid Possible Exposure to Excessive Microwave Energy” found on page ii.
ii Intro d uction Grounding Instructions This appliance must be grounded. In the event of an electrical short circuit, grounding reduces the risk of electric shock by providing an escape wire for the electric current. This oven is equipped with a cord that has a grounding wire with a grounding plug, which must be plugged into an outlet that is properly installed and grounded.
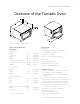
Ov er v i ew o f th e Torna d o O ve n Overview of the Tornado Oven f i g ur e 1 : Dimensions of the Tornado Oven specs and Dimensions Dimensions e xt e rior Height with legs* Width Depth with handle (Tornado) with handle (Tornado 2) Weight 19” 23” 26” 25.7” 28.2” 28.45” 190 lb. (482 mm) (584 mm) (660 mm) (653 mm) (716 mm) (723 mm) (86 kg) c ook c avity Height Width Depth 8” 15.5” 14.
2 O ve rvie w of the Tornado Ov en Accessories (Additional Charge) o 24” (610 mm) stainless steel oven stand with locking casters o 18” (457 mm) stainless steel oven stand with locking casters Certifications Packaging All ovens are packaged in a double-wall corrugated box with integrated corrugated skids.
How th e t echnol ogy work s How the Technology Works f ig u r e 2 : How the Technology Works The Technology Behind the Tornado The Tornado uses a patented combination of high speed forced air convection, heating, and microwave energy to cook food up to 12 times faster than conventional methods. At a very high speed of circulation, a controlled, smoothly flowing field of hot air forms a shroud around the food.
4 As s e mbly and installation Assembly and Installation Installation Instructions The TurboChef Tornado is manufactured to comply with applicable CE, NSF, UL, cUL, TÜV, PSE, GOST R, FDA, and FCC requirements. All equipment is designed and certified for safe operation when installed in accordance with local and/ or national codes. It is the owner and/or installer’s responsibility to comply with any codes that may exist. Install the oven only in accordance with the procedures detailed in this manual.
A ssembl y an d in sta l l ation figure 3: Oven Secured to Cart There must be at least 4” (102 mm) between the top of the unit and any shelf or surface. The oven must be installed level front to back and side to side. For additional stability, the oven legs may be bolted to the countertop if desired. An optional Oven Restraint Kit (P/N TC3-0242) is also available and can provide additional stability for the oven. See page 7 for further information. Securing Oven to Cart (Figure 3) 1.
6 As s e mbly and installation 5. Remove the legs of the oven that will be placed on top. This requires two or more persons—at least one person to lift and one person to unscrew the legs. 6. Remove the screws from the oven that will be placed on top, as marked with black arrows in Figure 4. 7. Place the oven on top of the oven that has the stacking bracket attached. WARNING: Do not attempt to lift the oven with fewer than 2 people.
a ssembl y an d in sta l l ation 2.0" (51mm) 2.0" (51mm) Unobstructed Airflow Fan 300 CFM (8.5 CMM) Discharge to Ambient 4.0" (102mm) Unobstructed Airflow 2.0" (51mm) 2.0" (51mm) Notes: 1: Must be included by contractor fi g ure 5: Built-in Installation figure 6: Installation Near Open Heat Source Optional Installation Items Oven Restraint Kit (P/N TC3-0242) The Oven Restraint Kit is an optional system intended to hinder the oven from moving forward during use and/or cleaning.
8 As s e mbly and installation figure 7: 24” (610mm) Cart with a Single Oven f i gu r e 8 : 24” (610mm) Cart with a Single Oven Oven Carts (P/N TC3-0143-1 & P/N TC3-0143-2) There are two carts – 18” (457 mm) (TC3-0143-2) and 24” (610 mm) (TC3-0143-1) – available for use with the Tornado oven. See Figures 7 and 8 (above). Both carts can be used with single or stacked ovens.
a ssembl y an d in sta l l ation saving a menu to a smart card At some point you may be required to save your existing menu settings to a smart card (for example, if the control board needs to be replaced). Please note that once the procedure below is completed, any existing menu settings on the smart card will be permanently lost. 1. Ensure the oven is in the oven off/cooling down mode.
10 as s e mbly and installation T hi s p a ge l e ft i n te n ti o n a l l y b l a n k .
common Op erating t e rms Common Operating Terms Oven Operating Components Display The display is the primary interface to relay messages to the operator. Keypad The keypad is the primary interface for the operator to enter commands to the oven. Cook Cavity Cavity in which the food products are cooked. Modes and States Mode A mode is a software environment that allows certain operations to occur. These modes consist of off, warm-up, idle, cook, cool down, edit, and test.
12 common Operating term s IR Set Temperature The operating temperature of the IR heating element during a given recipe. Cook Cavity Actual Temperature The actual temperature of the cook cavity as registered by the cook cavity thermocouple. The IR heating element is the electrical heating element located beneath the cooking rack which supplies the heat used primarily to toast and/or brown the underside of a product.
op erating th e Torna d o O ve n Operating the Tornado Oven The Control Pad Reference Figure 10. . Display 1 Displays operation and editing information. 1 . Soft Keys 2 Eight keys adjacent to the display. Press a soft key to select an option on the screen adjacent to the key. . Arrow Keys 3 Press to navigate between screens, or within screen if editing a recipe. Also used to access “code entry” screen when pressed simultaneously from off or cooling down mode. 2 2 4.
14 op e rating the Tornado Oven TRNADO_R 101906 OVEN OFF PLEASE WAIT S/N NGC-XXXXX WARMING UP NGCD-XXXXX CC 74OF IR 113 OF MENU LOADING... AC VOLTS 240 OVEN ON figure 11: Initialization Screen f ig ure 1 2 : Off Screen Powering Up The Oven Initial Power-Up When power is initially applied, the “Initialization” Screen will display the firmware version and the oven’s serial number for five (5) seconds (Figure 11) before advancing to the off screen.
op erating th e Torna d o O ve n GROUP A GROUP A GROUP E ITEM 1 ITEM 5 GROUP B GROUP F ITEM 2 ITEM 6 208 VAC GROUP C GROUP G ITEM 3 ITEM 7 240 VAC GROUP D GROUP H ITEM 4 ITEM 8 DETECTED 208 VAC PLEASE SELECT TO CONFIRM figure 14: Voltage Sensing Screen f ig ure 1 5 : Idle Screen (Select Menu Group) f i gu r e 1 6 : Menu Item Select Screen cooking instructions From the idle screen, the user can select a food group and item to cook: note: Press the back key at any time to return to the
16 op e rating the Tornado Oven ENTER COOK TIME 02:00 01:15 COOKING MISC BAKE BISCUIT START figure 17: Enter Cook Time Screen f ig ure 1 8 : Cook Screen DONE DONE PLEASE REMOVE FOOD FROM OVEN SAVE TIME figure 19: Please Remove Food Screen COOK MORE f ig ure 2 0 : Done Screen 7. If the done screen is enabled, the user has the option to cook the item more or save an altered cook time (the cook time would have been altered only from the enter cook time screen). See Figure 20.
op erating th e Torna d o O ve n EDIT GROUPS GROUP A GROUP E GROUP B GROUP F GROUP C GROUP G GROUP D GROUP H < GROUP A > ITEM 1 COUNT 0 COOK TIME 01:30 IR SET TEMP 1150 0 F 0 SET TEMP 500 OF PRESS "ENTER" OVEN OFF figure 21: Edit Temperature Screen %TIME %AIR %WAVE 1 2 3 4 5 6 25 9 24 18 24 0 10 50 10 30 40 10 TEST 0 30 0 40 0 0 SAVE WARMING UP f ig ure 2 2 : Group Select Screen (Edit Mode) f i gu r e 2 3 : Edit Recipe Screen Editing a food item Changing the Edit Pin Number By default,
18 op e rating the Tornado Oven WARNING: Inside of oven is HOT! Insert food with caution. 7. Continually press the back key to return to the cooling down/off mode. c. Close the oven door and press the bottom-left soft key to test the new settings. As a general rule, the idle IR set temperature should be the average of all food item IR set temperatures (typically 1000ºF). This prevents the IR element from having to drastically warm up or cool down between cook cycles. d.
op erating th e Torna d o O ve n The “Done” Screen Enable the done screen to provide the option to: - Cook an item longer after the completion of a cook cycle. To access snooze mode: - Save a changed cook time (only if the enter cook time screen is also enabled). 2. From the idle mode, press the back key to turn the oven off. See page 16. 3. Press the bottom-left soft key to enter snooze mode, or press the bottom-right soft key to proceed to the cooling down mode.
20 op e rating the Tornado Oven T hi s p a ge l e ft i n te n ti o n a l l y b l a n k .
r ecipe d ev el opm ent an d cooking tip s Recipe Development and Cooking Tips Developing Recipes TurboChef ovens use a combination of hot air and microwave energy to cook food.
22 re cipe d e velopment and cooking tip s Finish: Little to no microwave is used. The air is moderate to high to finish the caramelization of the product, and achieve the desired color. A recipe might look like this: Step Defrost Cook Finish Event 1 2 3 4 5 6 %Tim e 30 40 30 0 0 0 %AIR 10 50 60 10 10 10 %Wav 100 90 30 0 0 0 Example 2: French Fries & Frozen Puff Dough Items Just like with a frozen pizza, these two items will have to be defrosted, cooked and then finished.
r ecipe d ev el opm ent an d cooking tip s Ovenables When cooking with the Tornado, using the following products will help prolong the life of the oven and enhance food quality. Dual-Ovenable Paper Board o Pactiv ® Pressware o Champion (recently purchased by Pressware) o Chinet Company Ovenware II Although designed as single use, dual-ovenable paper board, paper pulp, and plastics can usually sustain multiple uses before being disposed.
24 re cipe d e velopment and cooking tip s Plastics o CPET and PCTA CPET and PCTA plastic containers may be used, but are dangerous. If there is no alternative to CPET or PCTA, then the application must be carefully structured and controlled. Although PCTA has a melting temperature approximately 50ºF (25ºC) higher than CPET, both products perform similarly. Both can get soft, deform and possibly melt in the TurboChef.
maint enanc e an d tro u b l eshooting 1 6 2 3 4 5 7 8 9 10 dai ly maintenance for the Tornado When cleaning the oven, use only TurboChef Oven Cleaner. Any other cleaning products can damage critical parts, resulting in a non-warranty service call. Supplies and Equipment TurboChef Oven Cleaner (P/N 103180 USA, 103380 Intl), Oven Guard (P/N 103181 USA, 103381 Intl), nylon scrub pad, cleaning towel Step 1: Prepare the Oven o Turn oven off by pressing the back key.
26 mainte nanc e and tro u bleshooting Step 10: Apply Oven Guard and Clean Oven Exterior o Spray Oven Guard on towel. Wipe sides of cook cavity and inside of door. ox d o not spray Oven Guard directly into cook cavity or wipe on nozzle plates/bottom element. o Wipe the oven exterior with a clean, damp towel. o Oven is ready to turn on. tips for prolonging oven life DO: Ensure the oven is cleaned daily. Use only TurboChef Oven Cleaner. o Remove items from the oven as soon as they are cooked.
maintenanc e an d tro u b l eshooting Table 1: Error Codes/Faults, Possible Causes and Suggested Remedies The following is a list of fault codes and error messages, along with the possible problem(s) that the oven may be experiencing. Please attempt the recommended action before calling Customer Service. Note: Any fault codes listed in bold will terminate a cook cycle upon discovery. F6 will not terminate a cook cycle; however, it will alert the user of a possible air circulation problem.
28 mainte nanc e and trou bleshooting issue possib l e ca use( s) resol u tion F1: Blower Running Status Bad o Oven power interrupted. o F2: Cook Temperature Low o Oven power interrupted. o o ir nozzles on the top of the A cook cavity are clogged. o Oven door is out of alignment. o o Defective heater. Blower motor not running. o Oven not fully warmed-up. o epeat warm-up and allow oven to R idle for five (5) minutes. F3: Magnetron Current Low o Microwave circuit defective.
maint enanc e an d tro u b l eshooting issue possib l e ca use( s) F6 EC Temp o Wave Guide Cover is broken or damaged. resol u tion lockage of cool air into B the oven. o Rear cooling fan exhaust guard is clogged. o User abuse. o Check for paper towels or anything that may be obstructing cool air into the oven. o Check rear fan to see if it is free of debris. Clean as required. o Call Customer Service.* *For Customer Service, call 800.
30 north america limited warrant y North America Limited Warranty TurboChef “Tornado” high speed toasting oven – north america The TurboChef speed cook oven Limited Warranty outlined below is activated upon shipment of your oven. Should you require additional assistance after reviewing the warranty outlined below, please call TurboChef Customer Service at 800.90TURBO. Limited W arranty TurboChef Technologies, Inc.
north america l imited warrant y Accessories: Accessories and parts (collectively “Accessories”) that are consumed in the normal course of Equipment operation or maintenance are excluded from this warranty. Failure of or damage to Equipment or components from the use of non-approved cleaning chemicals, devices or processes is also excluded from this warranty.
32 north america limited warrant y Disclaimer of Damages TurboChef disclaims all incidental, special and consequential damages, including but not limited to loss of use, lost revenue or profits, or substitute use, suffered by you or any third party, whether arising in contract, tort (including negligence), or otherwise, resulting from any breach by TurboChef or its service agents of this warranty, or resulting from the manufacture, use, or defects, of or in the Equipment, even if TurboChef was apprised o
I Nt ernationa l l imited warrant y International Limited Warranty This Limited Warranty shall apply to the sales of all TurboChef “Tornado” Series ovens (the “Equipment”) manufactured by TurboChef Technologies, Inc. (“TurboChef”), and sold to purchasers outside of the United States, Canada, Puerto Rico, Central and South America by an Authorized Distributor of TurboChef International (the “Authorized Distributor”).
34 IN te rnational limited warranty 3. Y ou make the Equipment available to TurboChef, the Authorized Distributor or its authorized service agents; 4. The Equipment has been installed by an Authorized Distributor and you have provided all necessary information for the Authorized Distributor to register the Equipment in the TurboChef global warranty system; 5.
I Nt ernationa l l imited warrant y dental, special or consequential damages, including but not limited to loss of use, lost revenue or profits, or substitute use suffered by You or any third party, whether arising in contract, tort (including negligence), or otherwise resulting from any breach by TurboChef or the Authorized Distributor of the Limited Warranty provided herein.
For service or information: wi thin no r th a me r ica ca l l Customer Service at 800.90turbo or Sales & Marketing at 866.90turbo outsi d e no r th a me r ica ca l l +1 214-379-6000 or Your Authorized Distributor TM Part Number: NGC-1006/Revision J/June 2011 Country Code: NA/EU Global Operations Customer Support: 4240 International Pkwy, Suite 105 Carrollton, Texas 75007 usa +1 214-379-6000 phone +1 214-379-6073 fa x 1-800-90tur bo +1 214-379-6000 tur boch ef.