High h Batch Owner’s Manual FOR THE TURBOCHEF HIGH h BATCH SPEED COOK OVEN Accelerating the World of Cooking TM 800.
MODEL SERIAL NUMBER INSTALLED BY INSTALLATION CHECKED BY SERVICE CENTER NAME / NUMBER For service or information: WITHIN NORTH AMERICA CALL Customer Service at 800.90 T U R B O or Sales & Marketing at 866.
The information contained in this manual is important for the proper installation, use, maintenance, and repair of this oven. Follow these procedures and instructions to ensure satisfactory baking results and years of trouble-free service. Errors – descriptive, typographic, or pictorial – are subject to correction. Specifications are subject to change without notice. PLEASE CAREFULLY READ THIS MANUAL AND RETAIN IT FOR FUTURE REFERENCE.
Table of Contents Safety Instructions Important Safety Information – Please Read First General Safety Information Reducing Fire Risk Preventing Oven Damage Grounding Instructions Power Cord Replacement i i i i ii ii ii Theory of Operation, Specifications, and Installation Theory of Operation Certifications Dimensions Construction Exterior Interior Electrical Specifications North America (except Canada)/South America Canada Europe/Asia/Pacific United Kingdom/Ireland Performance Standard Features Control Sy
Oven Maintenance Daily Maintenance Supplies and Equipment Cleaning Procedures Deep Clean Instructions Supplies and Equipment Deep Clean Procedures 9 9 9 9 9 9 10 Operating the Oven Control Display and Key Identification Oven States and Menu Access Oven State Descriptions Menu Descriptions Powering Up Powering Down Cooking Instructions Cooking Options Time Screen Options Done Screen Options Using the Options Menu Enabling/Disabling the Edit Menu Erasing the Recipe Menu Enabling/Disabling the Write Card Fun
INTRODUCTION IMPORTANT SAFETY INFORMATION – PLEASE READ FIRST Improper installation, adjustment, alteration, service, or maintenance of this equipment can cause property damage, injury, or death. Thoroughly read the installation, operating, and maintenance instructions before installing or servicing this equipment.
ii INTRODUCTION PREVENTING OVEN DAMAGE x x x x When servicing this appliance, do not tear insulation to get to components. Rather, find the edge of the insulation and remove the tape that holds it in place. Operate the oven only when food is in the Cook Chamber. Clean the oven daily. Clean the oven only with TurboChef Oven Cleaner. DO NOT clean with a water jet. DO NOT slam or mishandle the oven door. DO NOT frequently open and close the door to check the cook status of the food.
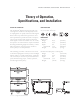
THEORY OF OPERATION, SPECIFICATIONS, AND INSTALLATION Theory of Operation, Specifications, and Installation THEORY OF OPERATION CERTIFICATIONS The TurboChef ® High h Batch speed cook oven uses high heat transfer rates developed by forced air impingement to rapidly cook food. The High h Batch utilizes top and bottom jetplates that have been optimized for specific food items. The plates can be easily removed and replaced to facilitate either higher or lower heat transfer rates.
2 THEORY OF OPERATION, SPECIFICATIONS, AND INSTALLATION Cook Cavity Height Width Depth Volume Wall Clearance Top Sides 8′′ 18.75′′ 16.75′′ 1.45 cu. ft. 2′′ 2′′ (203 mm) (476 mm) (425 mm) (41.
THEORY OF OPERATION, SPECIFICATIONS, AND INSTALLATION STANDARD FEATURES Integral recirculating catalytic converter for UL listed ventless operation (UL KNLZ) Configurable top and bottom jetplates for product specific cooking Variable-speed High h recirculating impingement airflow system Oscillating rack for high heat transfer without spotting Half-sheet pan/16-inch pizza capacity Smart Voltage Sensor Technology* (U.S.
4 THEORY OF OPERATION, SPECIFICATIONS, AND INSTALLATION Bolt Flat Washer Bracket Flat Washer Split-Lock Washer Nut FIGURE 2 : Stacked HHB Ovens Secured to Cart bolted to the cart and wheels are locked (see previous section). 4. Attach the Stacking Bracket (P/N HHB-8159) to the back of the bottom oven: a. Remove the screws marked with gray arrows in Figure 2. b. Align the holes on the Stacking Bracket with the holes on the oven and reinstall the screws.
THEORY OF OPERATION, SPECIFICATIONS, AND INSTALLATION 5 2.0" (51mm) 2.0" (51mm) Unobstructed Airflow Fan 300 CFM (8.5 CMM) Discharge to Ambient 4.0" (102 mm) Unobstructed Airflow 2.0" (51mm) FIGURE Notes: 1: Must be included by contractor 2.0" (51mm) 3: Built-in Installation FIGURE 4: Installation Near Open Heat Source Built-In Installation (Figure 3) TurboChef ovens are designed to be installed on a countertop or table. They are not intended for built-in or enclosed installation.
6 THEORY OF OPERATION, SPECIFICATIONS, AND INSTALLATION Installation Near Open Heat Source (Figure 4) When placing a TurboChef oven near an open heat source, strictly adhere to the following: Verify oven location has a minimum 6′′ (152 mm) clearance on top and minimum 2′′ (51 mm) of clearance on each side. If the oven is being placed near a grill or stove, there must be a divider between the oven and the open heat source, with a minimum of 6′′ (152 mm) between the oven and the divider.
THEORY OF OPERATION, SPECIFICATIONS, AND INSTALLATION FIGURE 5 : 24′′ (610 mm) Oven Cart with Oven(s) 24′′ (610 mm) Oven Cart Height with single oven with stacked ovens* Width with single oven with stacked ovens* Depth with single oven with stacked ovens* REPLACING/EXCHANGING JETPLATES 24′′ 44.5′′ 65′′ 27.8′′ 27.8′′ 27.8′′ 26.625′′ 31.5′′ 31.5′′ (610 mm) (1130 mm) (1651 mm) (706 mm) (706 mm) (706 mm) (676 mm) (800 mm) (800 mm) *Requires Stacking Bracket.
8 THEORY OF OPERATION, SPECIFICATIONS, AND INSTALLATION Bottom Support Rail (Left) Top Jetplate Bottom Jetplate Top Support Rail (x2) Bottom Support Rail (Right) Rack FIGURE 6 : Removing/Exchanging a Jetplate
OVEN MAINTENANCE Oven Maintenance DAILY MAINTENANCE The procedures below will help in maintaining the High h Batch oven. Be sure to use only TurboChef Oven Cleaner. Using any other cleaning products can damage critical parts and may void warranty on those parts. Refer to Figure 7 to view the cook cavity components.
10 OVEN MAINTENANCE Deep Clean Procedures Step 1: Prepare the Oven for Cleaning Ensure oven is turned off. To turn off oven, press ON/OFF key. Ensure cool down process is complete. (“Cooling Down” will disappear upon completion.) WARNING: Injury can occur if oven is not allowed time to cool properly before cleaning. DO NOT attempt to clean it until the “Cooling Down” message is off. Step 2: Clean and Remove the Oven Door Open oven door. Spray TurboChef Oven Cleaner to break up stubborn stains.
OVEN MAINTENANCE Air Diverter Plate (Covers Catalytic Converter) Grease Filters Rack Bottom Jetplate FIGURE 7 : Cook Cavity Rotate Hinge Retainer forward to unlocked position.
12 OPERATING THE OVEN Operating the Oven LEFT RIGHT LEFT 2 2 RIGHT 3 1 FIGURE 4 5 6 9 : High h Batch Keypad This section contains information on: Control Display and Key Identification Powering up Powering down Cooking Instructions Cooking Options Programming Recipes Using the Options Menu 4. Enter key Press to save edited information. 5. Back/Stop key Press to stop a cook cycle or to return to a previous screen. 6. On/Off key Press to turn the oven on and off.
OPERATING THE OVEN 3. Cool-down State during which the blower motor blows cool air into the cook cavity until the temperature is below 150ºF (66°C). This takes approximately 90 minutes. POWERING UP To turn on the oven, press the ON/OFF key. The oven will begin to warm up to its predefined cooking temperature (typically 450ºF or 230ºC). This takes approximately 10 minutes. 4.
14 OPERATING THE OVEN LEFT RIGHT Press the soft key that corresponds to the desired food group. In this example, pressing the top right soft key would access all food items in the “1st Group.” FIGURE NOTE: Press the groups 7-12. DOWN key to view food 1 1 : Selecting a Food Group LEFT RIGHT Press the soft key corresponding to the desired food item. In this example, pressing the top right soft key would initiate a cook cycle for the “First Item.
OPERATING THE OVEN LEFT RIGHT Press the “Start” soft key (bottom right) to initiate a cook cycle. FIGURE Use the UP and DOWN keys to adjust time in 5second increments. 1 3 : Time Screen LEFT RIGHT Press the “Save Time” soft key (bottom left) to save an adjusted time. Press the “Cook More” soft key (bottom right) to cook an item longer. FIGURE After selecting “Cook More,” adjust additional time in 5-second increments using the UP and DOWN keys.
16 OPERATING THE OVEN LEFT RIGHT Step: 1 Here the EDIT menu is turned on. Step: 2 To access the OPTIONS menu, simultaneously press and hold for 5 seconds. FIGURE 1 5 : Enabling/Disabling the Edit Menu LEFT RIGHT Step: 1 After “Erase Menu” is selected, a confirmation message appears. Step: 2 Step: 3 To access the OPTIONS menu, simultaneously press and hold for 5 seconds. FIGURE 1 6 : Erasing the Menu To access the OPTIONS menu: 1. Ensure the oven is in either the OFF state.
OPERATING THE OVEN LEFT RIGHT Step: 1 Here the WRITE is turned off. CARD function Step: 2 To access the OPTIONS menu, simultaneously press and hold for 5 seconds. FIGURE 1 7 : Enabling/Disabling the Write Card Function LEFT RIGHT Here the TIME screen function is turned on. Step: 1 Step: 2 To access the OPTIONS menu, simultaneously press and hold for 5 seconds.
18 OPERATING THE OVEN LEFT RIGHT Here the screen is turned on. DONE Step: 1 Step: 2 To access the OPTIONS menu, simultaneously press and hold for 5 seconds. FIGURE 1 9 : Enabling/Disabling the Done Screen LEFT RIGHT DEMONSTRATION mode is turned off. Step: 1 Step: 2 To access the OPTIONS menu, simultaneously press and hold for 5 seconds.
OPERATING THE OVEN LEFT SET TEMP 475ºF PRESS “ENTER” RIGHT Step: 3 & 4 FIGURE Step: 5 2 1 : Adjusting the Cook Cavity Temperature Modifying Recipes (Figures 22-25) The oven operator can preset cooking specifications for up to 72 food items, or “recipes,” on his/her menu. The High h Batch stores these menu items into twelve food groups, each containing six food items.
20 OPERATING THE OVEN EDIT GROUP 1ST GROUP 4TH GROUP 2ND GROUP 5TH GROUP 3RD GROUP 6TH GROUP LEFT Step: 6 FIGURE RIGHT In this example, pressing the top right soft key would access all food items in the “1st Group”. NOTE: Press the Groups 7-12.
OPERATING THE OVEN < 1ST GROUP> FIRST ITEM COOK TIME RACK ON EVENT % TIME % AIR TEST Step: 7a FIGURE 1 100 100 00:00 LEFT 2 3 0 0 100 100 WARMING UP The field selected to be modified will be bracketed. RIGHT Throughout this process, the oven warms up in case the operator wishes to test a new/modified recipe.
22 OPERATING THE OVEN Smart Card Reader Slot Smart Card - Notice orientation of chip FIGURE 2 6 : Inserting Smart Card into Reader LOADING . . . FROM CARD LOADING . . . DONE FROM CARD Step: 3 Step: 4 FIGURE 2 7 : Loading from Smart Card SAVING . . . TO CARD Step: 4 Step: 5 FIGURE 2 8 : Saving to Smart Card SAVING . . .
OPERATING THE OVEN Step: 1 At any point, the operator can zero out the counters for a given group. Step: 2 Step: 3 In this example, the second item (recipe) in the first group has completed one cook cycle. FIGURE 2 9 : Checking the Recipe Counter BACK/STOP to exit the menu. Saving Menu to Smart Card (Figures 26 and 28) 3. Press the CAUTION: Saving a menu to a smart card will overwrite all existing recipes programmed into the smart card. NOTE: To erase counters, press viewing the totals.
24 OPERATING THE OVEN LEFT RIGHT Step: 3/4 FIGURE In this example, the Temperature Offset is set at 20ºF (approximately 11ºC). 3 0 : Adjusting the Temperature Offset NOTE: Adjustments can be made only in Fahrenheit. (5ºF equals approximately 2.8ºC.) NOTE: At 20°F, pressing the “Offset” soft key rolls the TEMPERATURE OFFSET back to 0°F. 5. When finished, press the BACK/STOP to end the test and exit the TEST mode.
TROUBLESHOOTING TIPS Troubleshooting Tips LEFT RIGHT Step: 4 Serial number will be displayed. Step: 3 Step: 2 Step: 6 Write down the number and have it ready to reference when talking with Customer Service. FIGURE 3 1 : Viewing the Serial Number To greatly expedite service calls and troubleshooting, please follow the steps below on: Recording the Serial Number Recording Error Messages Checking the Fault Log Common Issues and Solutions RECORDING THE SERIAL NUMBER (FIGURE 31) 1.
26 TROUBLESHOOTING TIPS TABLE OF COMMON ISSUES AND SOLUTIONS ISSUE POSSIBLE SOLUTION(S) Oven is not receiving power. Ensure the oven is plugged in. Verify wall circuit breaker is on. Reset breaker and then power up the oven. Oven is not warming up properly. Oven is not cooking properly.
NORTH AMERICA LIMITED WARRANTY North America Limited Warranty TURBOCHEF HIGH H BATCH OVEN - NORTH AMERICA The TurboChef High h Batch Oven limited warranty outlined below is activated upon shipment of your oven. Should you require additional assistance after reviewing the limited warranty outlined below, please call TurboChef Customer Service at 800.90TURBO or +1 214-379-6000. LIMITED WARRANTY TurboChef Technologies, Inc.
28 NORTH AMERICA LIMITED WARRANTY Modifications and Repair: Equipment that has been modified or altered by persons other than TurboChef or its service agents, or Equipment that has had non-approved devices or connection items attached thereto, is excluded from coverage under this limited warranty. Repair of the Equipment by anyone other than TurboChef or its authorized service agents will void all warranties on the Equipment.
NORTH AMERICA LIMITED WARRANTY DISCLAIMER OF DAMAGES TurboChef disclaims all incidental, special and consequential damages, including but not limited to loss of use, lost revenue or profits, or substitute use, suffered by you or any third party, whether arising in contract, tort (including negligence), or otherwise, resulting from any breach by TurboChef or its service agents of this limited warranty, or resulting from the manufacture, use, or defects, of or in the Equipment, even if TurboChef was apprise
30 INTERNATIONAL LIMITED WARRANTY International Limited Warranty TURBOCHEF HIGH H BATCH OVEN - INTERNATIONAL This limited warranty shall apply to the sales of all TurboChef High h Batch ovens (the “Equipment”) manufactured by TurboChef Technologies, Inc. (“TurboChef”), and sold to purchasers outside of the United States, Canada, Puerto Rico, Central and South America by an Authorized Distributor of TurboChef International (the “Authorized Distributor”).
INTERNATIONAL LIMITED WARRANTY 2. You provide the Authorized Distributor from whom You purchased the Equipment and/or TurboChef with all data and information reasonably requested by TurboChef, the Authorized Distributor or its authorized service agents in connection with Your warranty claim; 3. You make the Equipment available to TurboChef, the Authorized Distributor or its authorized service agents; 4.
32 INTERNATIONAL LIMITED WARRANTY Charges for Service Not Covered by Limited Warranty: In the event that You request and receive repairs, replacement or service not covered by this limited warranty, You will be invoiced and must pay the Authorized Distributor or authorized service agent directly according to its normal scale of charges and business terms.
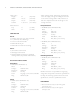
GLOSSARY OF TERMS Glossary of Terms Air Diverter Plate Covers the catalytic converter. Filters are attached to it via filter clips. Catalytic Converter Cleans recirculating airflow. Cook Cavity Chamber in which food is placed to cook. Cook Cycle All operative aspects of cooking a product. Cool-down State State during which the blower motor blows cool air into the cook cavity until the temperature is below 150ºF (66ºC). Takes approx. 90 minutes. Cooling Fans Fans that ventilate the electrical compartment.
34 GLOSSARY OF TERMS Filters Easy to remove, filters trap grease to help prolong the life of the catalytic converter. Filter Clips Clips that attach filters to the air diverter plate. Food Group Subset of a recipe menu, superset of a food item. Each food group contains 6 recipes, or “food items.” 12 total food groups exist, comprising a recipe menu. Food Item Subset of a food group. Operator programs food items (“recipes”) to preset cook times and specify events.
GLOSSARY OF TERMS Time Screen Screen from which the operator can adjust the total cook time before initiating a cook cycle. Warm-up State State during which the oven warms itself to the predetermined cook cavity temperature. Total Cook Time Temporal measurement of a cook cycle. Write Card Function Function allowing operator to save a recipe menu to a smart card. This function can be enabled/disabled in the OPTIONS menu.
For service or information: WITHIN NORTH AMERICA CALL Customer Service at 800.90 T U R B O or Sales & Marketing at 866.90 T U R B O OUTSIDE NORTH AMERICA CALL +1 214-379-6000 or Your Authorized Distributor Accelerating the World of Cooking TM Part Number: HHB-8708/Revision C/March 2007 Country Code: NA/EU Corporate Headquarters Global Operations Six Concourse Pkwy, Suite 1900 Atlanta, Georgia 30328 U S A +1 678.987.1700 P H O N E +1 678.987.