
User's Manual


Customize and Analyze
TuneUp Utilities 2006 47
You can use TuneUp Styler to replace this boot screen with just a few mouse
clicks, or you can create your own personal boot screen, for example with your
favorite vacation photo.
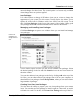
Click Boot screen in the navigation bar to go to this part of TuneUp Styler.
The module will list all available boot screens. The first time you use the
module, the only screen in the list will be the default Windows boot screen. Add
additional pre-made screens to the list, or create your own.
You can add additional boot screens to the list by clicking Add at the top of the
list. Here, you can import a boot screen from a file on your computer, or you can
download new boot screens from TuneUp Online.
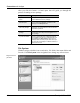
If you want to make your own personal boot screen, click the New Screen button
above the boot screen list. This will open the Create Boot Screen wizard, which
will guide you through the necessary steps.
Select the desired boot screen in the list and then click Install Boot Screen in the
lower right corner of the window. A progress dialog will be shown for the
duration of the installation.
If you no longer want to use your new boot screen, you can naturally restore the
default Windows screen at any time. To do this, click Restore Defaults in the
lower right corner of the window. The default screen is then selected in the list
automatically. Click Install Boot Screen to save your changes.
Creating Boot Screens
Give your imagination free reign and create your own boot screen that you can
install on your computer and share with your friends.
Downloading pre-
made boot screens
Creating your own
boot screen
Installing a boot
screen
Restoring the default
screen