OWNER’S MANUAL Maintenance & Assembly Instructions IMPORTANT: KEEP THIS MANUAL FOR FUTURE REFERENCE NOTICE It is the Purchaser’s/Owner’s obligation: 1. To disclose and post all Rules & Regulations, Danger, Warning and Caution labels affixed on the machine to their customers/users. 2. Equipment to be installed by TuffStuff Authorized Dealer or a service company approved by TuffStuff. 3. Provide trained personnel, supervision and correct usage of the equipment. 4.
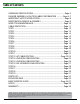
Table of Contents OVERHEAD SPECIFICATIONS �������������������������������������������������������������������������Page 3 DANGER, WARNING, & CAUTION LABELS INFORMATION ���������������Page 4-7 IMPORTANT SAFETY INSTRUCTIONS ����������������������������������������������������������Page 8 REGISTRATION, SERVICE & ASSEMBLY ��������������������������������������������������������Page 9 INSPECTION/MAINTENANCE ���������������������������������������������������������������������� Page 10 CABLE INSPECTION ����������
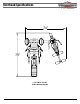
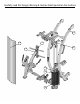
Overhead Specifications 74” 79” L 79” X W 74” X H 80” TOTAL WEIGHT 645 LBS HTX-2000 Dual Stack-Funtional Trainer 3
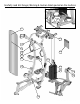
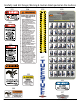
Carefully read ALL Danger, Warning & Caution labels posted on the machine 115 112 125 127 123 118 63 126 114 113 122 121 120 124 116 129 119 125 128 4 HTX-2000 Dual-Stack-Funtional Trainer
Carefully read ALL Danger, Warning & Caution labels posted on the machine 114 115 117 123 119 124 116 129 HTX-2000 Dual-Stack-Funtional Trainer 5
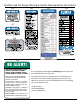
Carefully read ALL Danger, Warning & Caution labels posted on the machine 112 118 129 130 ! WARNING Important Safety Instructions: Before using this equipment, read and understand the Owner’s Manual and all DANGER, WARNING and CAUTION labels affixed on the machine. If you still need help, seek assistance from floor personnel. Use this equipment only for its intended use. When using the machine the first time, always choose a light resistance and train at a control rate of speed.
Carefully read ALL Danger, Warning & Caution labels posted on the machine 124 120 121 122 125 128 126 BE ALERT! THE FITNESS EQUIPMENT IN THIS FACILITY PRESENTS HAZARDS WHICH, IF NOT AVOIDED, COULD CAUSE SERIOUS INJURY OR DEATH. Prior to using the equipment, READ the warning labels and instruction placards affixed to each machine. If you are unsure on how to use a machine, seek the assistance of our floor personnel. We will be happy to instruct you on how to use the equipment properly.
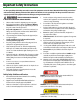
Important Safety Instructions It is the responsibility of the facility owner and/or owner of the equipment to review the Owner’s Manual with their facility personnel and understand all Danger, Warning and Caution labels affixed on the machine. It is the responsibility of the floor personnel to instruct users on proper operation of the equipment and review all danger, warning and caution labels. SERIOUS INJURY OR DEATH CAN OCCUR IF THESE SAFETY PRECAUTIONS ARE NOT OBSERVED: 1. 2.
Registration, Service & Assembly Thank you for purchasing the HTX-2000 Dual-Stack Functional Trainer. This machine is part of the TuffStuff line of quality strength training equipment. To maximize your use of the equipment, please study the Owner’s Manual thoroughly. Allow ample space around the machine for safe unrestricted use anRegistration deasier access.
Inspection/Maintenance Perform regular maintenance (see Inspection Label). Pay special attention to areas most susceptible to wear and tear, including but not limited to cables, pulleys and rubber grip. TuffStuff recommends you maintain a service contract with a TuffStuff Authorized Dealer or a Professional Service Company approved by TuffStuff. Keep a service log of all maintenance and repair activities. Extra copies can be downloaded from our website tuffstuffitness.
Cable Inspection WARNING: THE FOLLOWING CONDITIONS MAY INDICATE A WORN CABLE. REPLACE IMMEDIATELY. “NECKING”, STRECHED CABLE COVERING A CRACK IN THE CABLE COVER A TEAR IN THE CABLE COVER A BREAK ON THE CABLE CABLE END SLIPPING OUT IMPORTANT NOTE: DAMAGED OR WORNED CABLE (AS SHOWN ABOVE) MAY DAMAGE THE PULLEY(S). YOU MUST INSPECT THE PULLEYS AT THIS TIME FOR WEAR AND TEAR. REPLACE IF NEEDED.
e sn, e u s Step 1 44 79 94 44 74 94 79 71 94 71 69 69 69 69 94 The icons displayed in this Assembly Instructions are used to facilitate the correct assembly and safe use of this Product, 74 aswell-as to prevent injury to yourself or anyone else. provides information necessary to properly complete a procedure or information which will make the procedure easier to understand.
ge ason, ce ou ars Step 2 44 79 71 94 94 79 71 44 NOTE: MAKE SURE TO SUPPORT MAIN FRAME #1 THROUGH THIS STEP TO AVOID INJURY. 79 94 94 71 The icons displayed in this Assembly Instructions are used to facilitate the correct assembly and safe use of this Product, aswell-as to prevent injury to yourself or anyone else. 1 provides information necessary to properly 44 complete a procedure or information which will make the procedure easier to understand.
Step 3 71 94 69 22 44 66 94 44 79 74 22 23 The icons displayed in this Assembly Instructions are used to facilitate the correct assembly and safe use of this Product, aswell-as to prevent injury to yourself or anyone else. provides information necessary to properly complete a procedure or87information which will make the procedure easier to understand.
Step 4 87 93 95 87 93 95 4 Congratulations on your new purchase of the Smith-Half Cage Series. This gym is capable of a variety of different exercises, aswell-as, smooth and user-friendly adjustment features. In addition, this gym has been designed to meet the needs and performance requirements for a suitable home exercise machine. We hope you are completely satisfied with this product and wish you many years of enjoyment.
e sn, e u s Step 5 94 92 86 86 94 92 86 27 27 92 94 36 The icons displayed in this Assembly Instructions are used to facilitate the correct assembly and safe use of this Product, aswell-as to prevent injury to yourself or anyone else. 14 provides information necessary to properly complete a procedure or information which will make the procedure easier to understand.
Step 6 7 81 Congratulations on your new purchase of the Smith-Half Cage Series. This gym is capable of a variety of different exercises, aswell-as, smooth and user-friendly adjustment features. In addition, this gym has been designed to meet the needs and performance requirements for a suitable home exercise machine. We hope you are completely satisfied with this product and wish you many years of enjoyment.
Step 7 94 44 94 47 79 19 71 68 93 10 43 31 59 Congratulations on your new purchase of the Smith-Half Cage Series. This gym is capable of a variety of different exercises, aswell-as, smooth and user-friendly adjustment features. In addition, this gym has been designed to meet the needs and performance requirements for a suitable home exercise machine. We hope you are completely satisfied with this product and wish you many years of enjoyment.
age ason, nce you ars rds will nd ine ss, hat be ask Step 8 44 35 79 10 10 94 47 94 68 94 79 71 93 71 43 31 The icons displayed in this Assembly Instructions are used to facilitate the correct assembly and safe use of this Product, aswell-as to prevent injury to yourself or anyone else. 59 provides information necessary to properly complete a procedure or information which will make the procedure easier to understand.
Step 9 68 93 94 85 41 85 95 LOOSLY TIGHTEN ITEMS #85 UNTIL AFTER COMPLETING STEP 10. 79 95 68 79 45 94 79 71 71 94 18 44 94 94 71 45 45 6 71 94 71 The icons displayed in this Assembly Instructions are used to facilitate the correct assembly and safe use of this Product, aswell-as to prevent injury to yourself or anyone else.
Step 10 NOTES: 1. REPEAT ASSEMBLY STEP ON OTHER WEIGHT STACK. 2. ONCE GUIDE RODS ARE SECURED ON BOTH WEIGHT STACKS, TIGHTEN SCREWS (#85) FROM PREVIOUS STEP. Congratulations on your new purchase of the Smith-Half Cage Series. This gym is capable of a variety of different exercises, aswell-as, smooth and user-friendly adjustment features. In addition, this gym has been designed to meet the needs and performance requirements for a suitable home exercise machine.
Step 11 NOTE: 1. TOP PLATE LABEL GOES ON HOLE OFF CENTER AS SHOWN. LABEL WILL COVER HOLE ON CENTER. 2. FOLLOW THESE INSTRUCTIONS FOR BOTH WEIGHT STACKS. Weight stack label and lubrication instructions 1. Wipe front surface of weight stack with rubbing alcohol and wipe dry. 2. Peel off back sheet (adhesive side) from label #129 and make sure that the labels remain attached to the application tape. 3. Line up hole on the second label to hole on the first weight plate. 4.
age ason, nce you ars rds will nd ine ss, hat be ask Step 12 Lat Cable Routing 21 NOTE: 1. SOME PARTS CUT OUT/NOT SHOWN FOR CLARITY. 35 BEGIN BY RUNNING CABLE INSIDE THE TUBE TO UPPER PULLEY AND ASSEMBLE TOP BEARING HOUSING (35) AS SHOWN. 92 94 75 BEGIN HERE 33 CONTINUE ON NEXT PAGE The icons displayed in this Assembly Instructions are used to facilitate the correct assembly and safe use of this Product, aswell-as to prevent injury to yourself or anyone else.
Continue Lat Cable Routing NOTE: 1. SOME PARTS CUT OUT/NOT SHOWN FOR CLARITY. 21 CONTINUE FROM PREVIOUS PAGE 35 75 94 92 CABLE INSIDE TUBE 17 91 37 33 33 100 The icons displayed in this Assembly Instructions are used to facilitate the correct assembly and safe use of this Product, aswell-as to prevent injury to yourself or anyone else.
Step 13 Low Row Cable Routing NOTE: 1. SOME PARTS CUT OUT/NOT SHOWN FOR CLARITY. 2. ONCE PULLEYS ARE INPLACE, MAKE NECESARY ADJUSMENT TO THE CABLE ON THE ADJUSTABLE PULLEY BRACKET #18. 18 MAKE SURE CABLE RUNS 100 UNDERNEATH Congratulations on your new purchase of the Smith-HalfTHE Cage SCREW The icons displayed Series. This gym is capable of a variety of different exercises, as#74 AS SHOWN ABOVE.
Step 14 Low Row Cable Routing NOTE: 1. SOME PARTS CUT OUT/NOT SHOWN FOR CLARITY. MAKE SURE CABLE RUNS UNDERNEATH THE SCREW #74 AS SHOWN ABOVE. 17 37 The icons displayed in this Assembly 91 Instructions are used to facilitate the correct assembly and safe use of this Product, as34 well-as to prevent injury to yourself or anyone else.
Step 15 Leg Extension Cable Routing 68 NOTE: 1. ASSEMBLE PULLEYS (#44, #45) SHOWN ON THIS STEP UNTILL CABLE IS COMPLETELY ROUTED AND SECURED. 2. ONCE PULLEYS ARE INPLACE, MAKE NECESARY ADJUSMENT TO THE CABLE ON THE ADJUSTABLE CABLE BRACKET #16. 95 93 95 68 57 72 16 32 4 79 94 44 79 94 71 45 71 32 Congratulations on your new purchase of the Smith-Half Cage Series.
Step 16 97 73 12 97 73 73 The icons displayed in this Assembly Instructions are used to facilitate the correct assembly and safe use of this Product, as97 well-as to prevent injury to yourself or anyone else. age ason, nce you ars 13 provides information necessary to properly complete a procedure or information which will make the procedure easier to understand.
Step 17 103 73 103 97 97 73 11 11 11 Congratulations on your new purchase of the Smith-Half Cage Series. This gym is capable of a variety of different exercises, aswell-as, smooth and user-friendly adjustment features. In addition, this gym has been designed to meet the needs and performance requirements for a suitable home exercise machine. We hope you 97 are completely satisfied with this product and wish you many years of enjoyment.
Step 18 26 15 94 77 The icons displayed in this Assembly Instructions are used to facilitate the correct assembly and safe use of this Product, as76 well-as to prevent injury to yourself or anyone else. age ason, nce you ars 54 provides information necessary to properly complete a procedure or information which will make the procedure easier to understand.
Step 19 77 25 94 Congratulations on your new purchase of the Smith-Half Cage Series. This gym is capable of a variety of different exercises, aswell-as, smooth and user-friendly adjustment features. In addition, this gym has been designed to meet the needs and performance requirements for a suitable home exercise machine. We hope you are completely satisfied with this product and wish you many years of enjoyment.
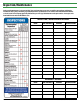
Parts List COLOR CHART GRAY= SUB-ASSEMBLY PARTS BLACK=HARDWARE REV0 HTX‐2000 Parts List Item No. 1 2 3 4 5 6 7 8 9 10 11 12 13 14 15 16 17 18 19 20 21 22 23 24 25 26 27 28 29 30 31 32 33 34 35 36 37 38 39 40 41 42 43 44 45 46 47 48 49 50 51 52 53 54 55 56 57 58 59 60 61 62 63 64 65 32 Description Rev. Part No.
! WARNING Before using this equipment, read and understand the Owner’s Manual and all attempt to fix or free any jammed parts b Important Safety Instruct immediately. ND CORNERS Before using read and understand the Owner’s Manua DANGER, WARNING and CAUTION labels affixed on the machine. If youthis stillequipment,Make sure the selector pin is fully inserted need help, seek assistance from floor personnel. Basic Exercise Guide DANGER, WARNING and CAUTION affixed onposition. the machine.
Basic Exercise Guide Use this equipment only for the exercises as shown. Know your limitations. If you are new to weight training, always start with lighter weight, learn how to perform the exercise correctly and train at a controlled rate of speed. Warm up properly with stretchings, calisthenics or cardiovascular exercises. Never hold your breath – general rule of thumb is to exhale when you exert. For additional recommended exercises please refer to DVD.
Notes HTX-2000 Dual Stack-Funtional Trainer 38
LIGHT COMMERCIAL WARRANTY This warranty applies only in the United States to the products manufactured or distributed by TuffStuff Fitness Equipment Inc. under the TUFFSTUFF brand name. TuffStuff warrants to the original purchaser that TuffStuff equipment will be free from defects in material and workmanship. All warranty periods begin to run from the date of purchase to the original purchaser.