
Installation & Assembly


installation steps:
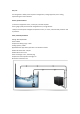
a. Take out the refrigerator and put it on the table. The side with several temperature is the front.
The inner diameter of the inlet and outlet pipes is Bmm hose connection. The pump can be
installed horizontally and vertically when using the aquarium filter pump or the external water
pump. If the ball is installed straight, the pump head should be facing down.
b. Take out the temperature probe and put it into the liquid that needs to be cooled. Plug in the
power.
C. Temperature control setting, factory setting cooling mode "see the attached table for the
folding table"
Setting instructions
Set: Set the button, long press to enter the code parameter settings.
Res: Back button ↓ long press to shut down
Heating
Cooling
Code parameter table
Temperature setting: Press the SET button to enter the temperature setting. Press the up and
down keys to change the temperature. 0.1 degree Celsius adjustment (factory default 25 ° C)
menu
Menu identifier
Menu function
Predetermined
area
unit
Defaults
F1
Backlash
1-15
°
C
1.0
F2
Temperature
correction
-10~10
°
C
0
After long press to enter the setting state, set the internal parameters to 0.1 degree adjustment.
Long press the Set button to enter the code menu
Set the light to be on and enter the setting mode.
The cooling light is always on and enters the working mode.
Set the lights and the cooling lights are not lit. Enter standby mode
Steps
1. Open the package and take out the chiller.
2. Please ensure that there is more than 20CM space before and after the chiller.
3. Please confirm the water pipe. The connection between the inlet and outlet pipes will not leak.
4. Turn on the power of the circulating equipment and confirm that the water in the aquarium
begins to circulate.
Check for leaks.
5. Turn on the power of the chiller, plug in the power plug, and press the power button.
The switch is powered on and the display shows the temperature of the fish tank.