
Installation & Assembly

read first REVIEW BEFORE ASSEMBLY
• Designed for hand assembly.
No tools required.
•Check regularly to ensure all
components are connected.
• Place finished unit in an area
with room for cats to play and
interact with all features.
Cat Condo Cage
very hel
pful tips
• Loosely lay out all parts for each step.
• Slide tubes into fabric sleeves first—then add connectors.
• Use appropriate force when assembling connectors and tubes
to avoid unnecessary damage.
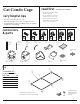
connectors
& parts
3 C
(6pcs)
4 C
(8pcs)
5 C
(6pcs)
6 C
(1pcs)
3 S
(4pcs)
2 S
(2pcs)
Foam footer pads
(9pcs)
A1
Sisal Post
(2pcs)
D1
Hideaway Den (1 pcs)
E2
Corner (1pcs)
M1
Square Plush Mat
(3pcs)
H
Hammock
(1pcs)
S1
Ramp (1pcs)
R1
Roof (1pcs)
A35
Long Tube
(37pcs)
D3
Hideaway Den (1pcs)
B28
Short Curve
(8pcs)
B40
Long Curve (4pcs)
3C
5C
4C
3 C
4 C
3 C
A 3 5
1
a
PARTS NAME QTY
3C 3-Way Corner ( 3 )
4 C 4-Way Corner ( 2 )
5C 5-Way Corner ( 1 )
A35 Long Tube ( 7 )
Foam Pads ( 6 )
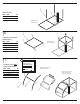
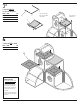
To form the BASE (pt.1),
you will need these pieces:
FIRST, lay out the components in position.
NEXT, insert tubes into connectors to form the base.
Self-adhesive foam pads
(if used) should be placed
on the underside of all
connectors.