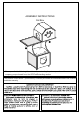
ASSEMBLY INSTRUCTIONS Cat Box Please provide the following information when contacting for parts or questions: the name of the company you purchased from, the UPS/FedEx tracking number This product comes with a 1 year warranty. Products purchased second hand/used are not covered under the warranty.
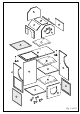
A C D E C B F Q O N S R S L J M I R P G K P H H H H Pg 1 of 10
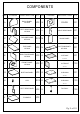
СOMPONENTS PART FIGURE DESCRIPTION QTY PART FIGURE DESCRIPTION QTY A BACK PANEL OF BOX 1PC K DOOR 1PC B LEFT SIDE PANEL OF BOX 1PC L RIGHT SIDE PANEL 1PC C TOP SIDE PANEL OF BOX BACK PANEL 1PC D TOP PANEL OF BOX 1PC N BOTTOM PANEL OF BOX 1PC E RIGHT SIDE PANEL OF BOX 1PC O JUTE MAT 1PC 2PCS M 37*32.
PART FIGURE DESCRIPTION QTY 8PCS 1 4*30 36PCS 2 3.
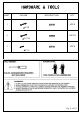
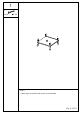
1 1 8 PCS 4*30 11 11 11 G 1 1 H H H STEP 1: 1. Attach legs H to panel G with screws (1) as indicated.
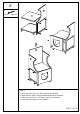
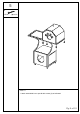
2 2 8 PCS L 3.5*35 J 2 2 2 2 K M I 2 2 2 2 STEP 2: 1. Attach panel A to part G & J with screws (2) as indicated. 2. Attach part K to panel L with preassembled dowels as indicated. 3. Attach panel I to part G , J & K with screws (2) as indicated. 4. Insert panel M to panel I & L as indicated.
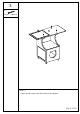
3 2 4 PCS 3.5*35 2 2 2 N 2 STEP 3: 1. Attach part N to panel I & L with screws (2) as indicated.
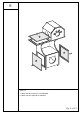
4 2 A 8 PCS 3.5*35 2 2 2 B F 2 2 2 2 D 2 2 2 2 C 2 2 2 C 2 2 2 2 A E 2 2 STEP 4: 1. Attach part B to panel A & F with screws (2) as indicated. 2. Attach part C & D to panel A & F with screws (2) as indicated. 3. Attach part C & E to panel A & F with screws (2) as indicated.
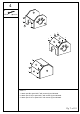
5 2 4 PCS 3.5*35 2 2 2 2 STEP 5: 1. Attach assembled box to part N with screws (2) as indicated.
6 O P P STEP 6: 1. Attach mat Ps to panel I & L as indicated. 2. Attach mat O to panel N as indicated.
7 3 2 PCS 3*10 Q 2 S R 2 S R STEP 7: 1. Attach ball S to panel N with screws (3) as indicated. 2. Put cushion Q to the box as indicated. 3. Put cushion Rs to the shelf as indicated.